class MVVM { constructor(options) { const { el, data, methods } = options this.methods = methods // 提取methods,便于后面将this给methods this.target = null // 后面有用 this.observer(this, data) this.instruction(document.getElementById(el)) // 获取挂载点 }
属性劫持
开始执行this.observer observer是一个数据监听器,将data的数据全部拦截下来
observer(root, data) { for (const key in data) { this.definition(root, key, data[key]) } }
在this.definition里面把data数据都劫持到this上面
definition(root, key, value) { if (typeof value === 'object') { // 假如value是对象则接着递归 return this.observer(value, value) } let dispatcher = new Dispatcher() // 调度员 Object.defineProperty(root, key, { set(newValue) { value = newValue dispatcher.notify(newValue) }, get() { dispatcher.add(this.target) return value } }) }
此时data的数据变化我们已经可以监听到了,但是我们监听到后还要与页面进行实时相应,所以这里我们使用调度员,在页面初始化的时候get(),这样this.target,也就是后面的指令解析器解析出来的v-model这样的指令储存到调度员里面,主要请看后面的解析器的代码
指令解析器
指令解析器通过执行 this.instruction(document.getElementById(el)) 获取挂载点
instruction(dom) { const nodes = dom.childNodes; // 返回节点的子节点集合 // console.log(nodes); //查看节点属性 for (const node of nodes) { // 与for in相反 for of 获取迭代的value值 if (node.nodeType === 1) { // 元素节点返回1 const attrs = node.attributes //获取属性 for (const attr of attrs) { if (attr.name === 'v-model') { let value = attr.value //获取v-model的值 node.addEventListener('input', e => { // 键盘事件触发 this[value] = e.target.value }) this.target = new Watcher(node, 'input') // 储存到订阅者 this[value] // get一下,将 this.target 给调度员 } if (attr.name == "@click") { let value = attr.value // 获取点击事件名 node.addEventListener('click', this.methods[value].bind(this) ) } } } if (node.nodeType === 3) { // 文本节点返回3 let reg = /\{\{(.*)\}\}/; //匹配 {{ }} let match = node.nodeValue.match(reg) if (match) { // 匹配都就获取{{}}里面的变量 const value = match[1].trim() this.target = new Watcher(node, 'text') this[value] = this[value] // get set更新一下数据 } } } }
这里代码首先解析出来我们自定义的属性然后,我们将@click的事件直接指向methods,methds就已经实现了
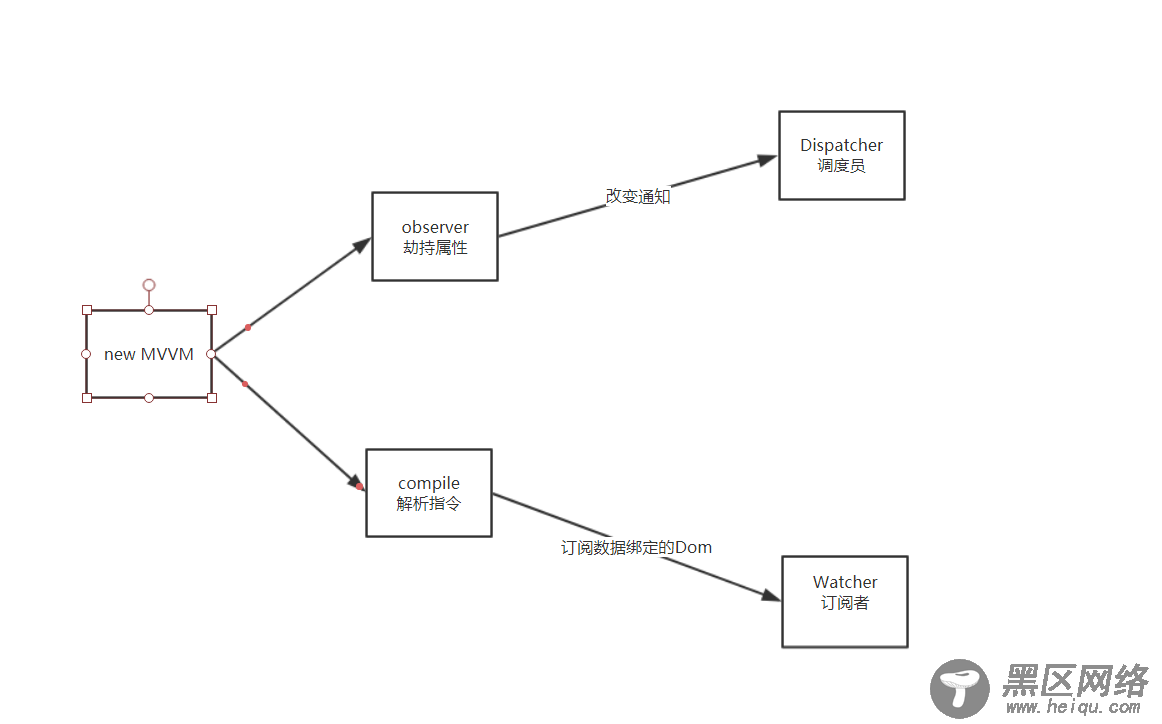
现在代码模型是这样

调度员Dispatcher与订阅者Watcher
我们需要将Dispatcher和Watcher联系起来
于是我们之前创建的变量this.target开始发挥他的作用了
正执行解析器里面使用this.target将node节点,以及触发关键词存储到当前的watcher 订阅,然后我们获取一下数据
this.target = new Watcher(node, 'input') // 储存到订阅者 this[value] // get一下,将 this.target 给调度员
在执行this[value]的时候,触发了get事件
get() { dispatcher.add(this.target) return value }
这get事件里面,我们将watcher订阅者告知到调度员,调度员将订阅事件存储起来
//调度员 > 调度订阅发布 class Dispatcher { constructor() { this.watchers = [] } add(watcher) { this.watchers.push(watcher) // 将指令解析器解析的数据节点的订阅者存储进来,便于订阅 } notify(newValue) { this.watchers.map(watcher => watcher.update(newValue)) // 有数据发生,也就是触发set事件,notify事件就会将新的data交给订阅者,订阅者负责更新 } }
与input不太一样的是文本节点不仅需要获取,还需要set一下,因为要让订阅者更新node节点
this.target = new Watcher(node, 'text') this[value] = this[value] // get set更新一下数据
所以在订阅者就添加了该事件,然后执行set
set(newValue) { value = newValue dispatcher.notify(newValue) },
notfiy执行,订阅发布者执行update更新node节点信息
class Watcher { constructor(node, type) { this.node = node this.type = type } update(value) { if (this.type === 'input') { this.node.value = value // 更新的数据通过订阅者发布到dom } if (this.type === 'text') { this.node.nodeValue = value } } }
页面初始化完毕
更新数据
node.addEventListener('input', e => { // 键盘事件触发 this[value] = e.target.value })
