例如,在dao.impl包下,有两个IAccountDao接口的实现类,分别是是AccountDaoImpl1和AccountDaoImpl2,在这两个类上分别加入注解@Repository("accountDao1")和@Repository("accountDao2")。
此时,项目结构为:
dao包: public interface IAccountDao dao.impl包: @Repository("accountDao1") public class AccountDaoImpl1 implements IAccountDao @Repository("accountDao2") public class AccountDaoImpl2 implements IAccountDao service包: public interface IAccountService service.impl包: @Service("accountService") public class AccountServiceImpl implements IAccountService ui包: public class Client如果还使用Autowired注解对AccountServiceImpl类中的accountDao变量进行注入,就会报错。这个时候,有三种方式可以选择:
只使用@Autowired注解,并修改accountDao变量名为accountDao1,此时注入的是dao.impl.AccountDaoImpl1
同时使用@Autowired和@Qualifier("accountDao2")注解,变量名可以任意,注入的是dao.impl.AccountDaoImpl2
只使用@Resource(name = "accountDao1")注解,变量名可以任意,注入的是dao.impl.AccountDaoImpl1
//方法一 @Autowired private IAccountDao accountDao1; //方法二 @Autowired @Qualifier("accountDao2") private IAccountDao accountDao22; //方法三 @Resource(name = "accountDao1") private IAccountDao accountDao;为了看的更清楚,我们进行如下改造:
//AccountDaoImpl1和AccountDaoImpl2中的saveAccounts方法: public void saveAccounts() { System.out.println(this.getClass()); System.out.println("向数据库写入账户数据!!!"); } //AccountServiceImpl中的saveAccounts方法: public void saveAccounts() { System.out.println("执行保存账户操作"); //调用持久层接口函数 accountDao.saveAccounts(); accountDao1.saveAccounts(); accountDao22.saveAccounts(); } //Client类中的main方法: public static void main(String[] args) { //验证依赖注入 ApplicationContext applicationContext = new ClassPathXmlApplicationContext("beans.xml"); IAccountService accountService = (IAccountService) applicationContext.getBean("accountService"); //调用saveAccount方法 accountService.saveAccounts(); }输出为:
执行保存账户操作 class dao.impl.AccountDaoImpl1 向数据库写入账户数据!!! class dao.impl.AccountDaoImpl1 向数据库写入账户数据!!! class dao.impl.AccountDaoImpl2 向数据库写入账户数据!!! 3.用于改变对象作用范围的注解:相当于xml配置的bean标签中的scope属性如果我们要改变bean的作用范围,就需要用到scope属性:
注解 作用 属性@Scope 用于指定bean的作用范围 value: 指定范围的取值。常用取值:singleton(单例,也是默认值)、prototype(多例)、
例如,我们在AccountServiceImpl2类上加上注解@Scope("prototype"),然后在main方法中执行:
IAccountDao accountDao11 = applicationContext.getBean("accountDao1", IAccountDao.class); System.out.println(accountDao11); IAccountDao accountDao12 = applicationContext.getBean("accountDao1", IAccountDao.class); System.out.println(accountDao12); IAccountDao accountDao21 = applicationContext.getBean("accountDao2", IAccountDao.class); System.out.println(accountDao21); IAccountDao accountDao22 = applicationContext.getBean("accountDao2", IAccountDao.class); System.out.println(accountDao22);可以看到输出中,前两个accountDao是同一个对象,后两个是不同对象:

@PostConstruct 用于指定初始化方法 用在方法上
@PreDestroy 用于指定销毁方法 用在方法上
注意:多例对象的销毁仍然由JVM执行,无法通过关闭容器来销毁
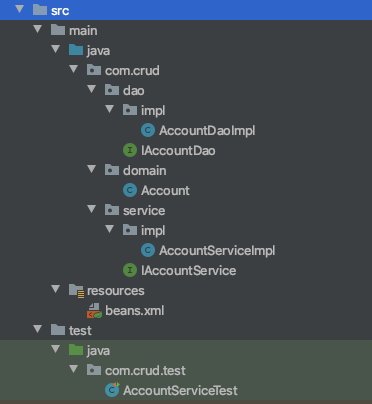
二、基于XML的IoC案例 1.准备工作这个IoC案例,主要演示对数据库的crud操作,所以首先需要创建数据库,sql文件如下:
create table account( id int primary key auto_increment, name varchar(40), money float )character set utf8 collate utf8_general_ci; insert into account(name,money) values('aaa',1000); insert into account(name,money) values('bbb',1000); insert into account(name,money) values('ccc',1000);整个项目的结构如下:

IAccountDao和IAccountService这两个接口类中的方法如下,因为只是演示,简单起见这两个接口中的方法一模一样:
/** 查询所有 */ List<Account> findAllAccounts(); /** 根据id查询账户 */ Account findAccountById(Integer id); /** 保存账户 */ void saveAccount(Account account); /** 修改账户*/ void updateAccount(Account account); /** 根据id删除账户 */ void deleteAccountById(Integer id);
