VueJs 搭建Axios接口请求工具(2)
更多关于AxIos的解释请参见:https://github.com/mzabriskie/axios
配置Axios工具
我们在使用之前,需要在src/main.js中进行简单的配置,先来看一下原始的main.js文件
// The Vue build version to load with the `import` command
// (runtime-only or standalone) has been set in webpack.base.conf with an alias.
import Vue from 'vue'
import App from './App'
import router from './router'
Vue.config.productionTip = false
/* eslint-disable no-new */
 new Vue({
 el: '#app',
 router,
 template: '<App/>',
 components: { App }
})
修改为:
// The Vue build version to load with the `import` command
// (runtime-only or standalone) has been set in webpack.base.conf with an alias.
import Vue from 'vue'
import App from './App'
import router from './router'
// 引用API文件
import api from './api/index.js'
// 将API方法绑定到全局
Vue.prototype.$api = api
Vue.config.productionTip = false
/* eslint-disable no-new */
new Vue({
 el: '#app',
 router,
 template: '<App/>',
 components: { App }
})
通过以上的配置,我们就可以在项目中使用axios工具了,接下来我们来测试一下这个工具。
使用Axios工具
我们来修改一下 src/page/Index.vue 文件,将代码调整为以下代码:
<template>
 <div>index page</div>
</template>
<script>
export default {
 created () {
  this.$api.get('topics', null, r => {
   console.log(r)
  })
 }
}
</script>
我们在Index.vue中向浏览器的控制台输入一些接口请求到的数据,如果你和我也一样,那说明我们的接口配置完成正确。如下图:
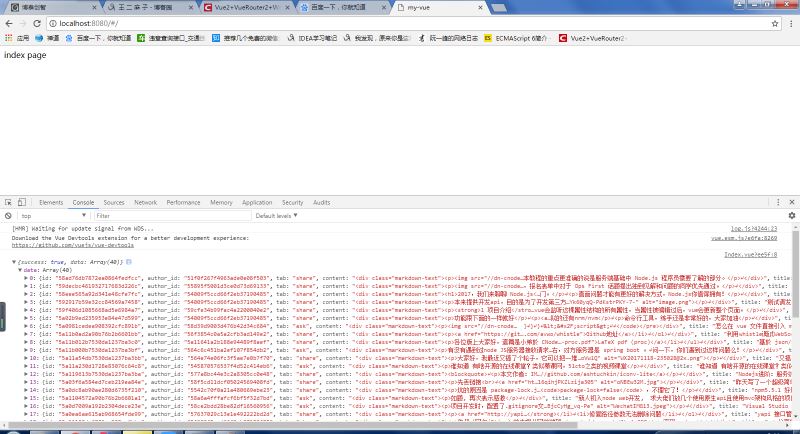
如果你是按我的操作一步一步来,那最终结果应该和我一样。如果出错请仔细检查代码。