如果sshd服务器使用了非默认的端口(如2222),则在登录时必须通过“-p”选项指定端口号。示例如下:
[root@centos01 ~]# vim /etc/ssh/sshd_config<!--修改ssh主配置文件--> Port 2222 <!--修改监听端口号为2222--> [root@centos01 ~]# systemctl restart sshd <!--重启sshd服务--> [root@centos02 ~]# ssh -p 2222 root@192.168.100.10 <!--客户端登录ssh--> root@192.168.100.10's password: <!--输入密码--> Last login: Mon Nov 11 19:20:28 2019 from 192.168.100.10 [root@centos01 ~]# <!--成功登录--> 2、scp远程复制通过scp命令可以利用SSH安全连接与远程主机相互复制文件,使用scp命令时,除了必须指定复制源、目标之外,还应指定目标主机地址、登录用户,执行后根据提示输入验证口令即可。示例如下:
[root@centos02 ~]# scp root@192.168.100.10:/etc/ssh/sshd_config ./ <!--将远程主机数据复制到本地数据,保存在当前位置--> root@192.168.100.10's password: <!--输入密码--> sshd_config 100% 3910 3.6MB/s 00:00 [root@centos02 ~]# scp -r ./sshd_config root@192.168.100.10:/opt <!--将本地数据上传到远程主机目录的opt中--> root@192.168.100.10's password: <!--输入密码--> sshd_config 100% 3910 1.2MB/s 00:00 3、sftp安装FTP通过sftp命令可以利用SSH安全连接与远程主机上传、下载文件,采用了与FTP类似的登录过程和交互环境,便于目录资源管理。示例如下:
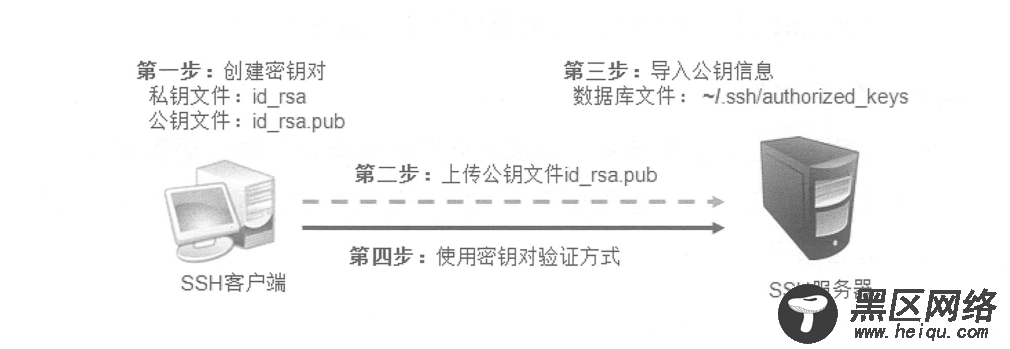
[root@centos01 ~]# cd /opt/ <!--进入opt目录--> [root@centos01 opt]# sftp root@192.168.100.20 <!--登录sftp--> root@192.168.100.20's password: <!--输入密码--> Connected to 192.168.100.20. sftp> pwd <!--查看客户端登录sftp的位置默认在宿主目录--> Remote working directory: /root sftp> put sshd_config <!--上传数据到远程主机--> Uploading sshd_config to /root/sshd_config sshd_config 100% 3910 6.4MB/s 00:00 sftp> get sshd_config <!--下载数据到本地--> Fetching /root/sshd_config to sshd_config /root/sshd_config 100% 3910 3.6MB/s 00:00 sftp> exit <!--退出登录--> 三、构建密钥对验证的SSH体系密钥对验证方式可以远程登录提供更好的安全性。在Linux服务器、客户端中构建密钥对验证SSH体系的基本过程。如下图所示,整个过程包括四步,首先要在SSH客户端以zhangsan用户身份创建密钥对,并且要将创建的公钥文件上传至SSH服务器端,然后要将公钥信息导入服务器端的目标用户lisi的公钥数据库,最后以服务器端用户lisi的身份登录验证。

在客户端中,通过ssh-keygen工具为当前用户创建密钥对文件。可用的加密算法为ECDSA或DSA(ssh-keygen命令的“-t”选项用于指定算法类型)。示例如下:
[root@centos02 ~]# ssh-keygen -t dsa <!--创建密钥对--> Generating public/private dsa key pair. Enter file in which to save the key (/root/.ssh/id_dsa): <!--指定私钥位置--> Created directory '/root/.ssh'. Enter passphrase (empty for no passphrase): <!--设置私钥短语--> Enter same passphrase again: <!--确认所设置的短语--> Your identification has been saved in /root/.ssh/id_dsa. Your public key has been saved in /root/.ssh/id_dsa.pub. The key fingerprint is: SHA256:zv0EdqIuOfwSovN2Dkij08y9wZ0f1+IyhY7LFNKKzkk root@centos02 The key's randomart image is: +---[DSA 1024]----+ | | | | | | | . | | o . o S.+ . | | * *.+.=.+.= | |o E.*o+==.+ o | | =o..*Oo++ + | | ++oo+*+o. . | +----[SHA256]-----+ [root@centos02 ~]# ls -lh ~/.ssh/id_dsa* <!--确认生成的密钥文件--> -rw------- 1 root root 668 11月 12 16:11 /root/.ssh/id_dsa -rw-r--r-- 1 root root 603 11月 12 16:11 /root/.ssh/id_dsa.pub新生成的密钥对文件中,id_das是私钥文件,权限默认为600,对于私钥文件必须妥善保管,不能泄露给他人;id_dsa.pub是公钥文件,用来提供给ssh服务器。
2、将公钥文件上传至服务器将上一步生成的公钥文件上传至服务器,并部署到服务器端用户的公钥数据库中。上传公钥文件时可以选择SCP、FTP、HTTP甚至发送E-mail等任何方式。
root@centos02 ~]# ssh-copy-id -i ./.ssh/id_dsa.pub root@192.168.100.10 <!--将公钥文件上传至服务器并导入公钥文本--> /usr/bin/ssh-copy-id: INFO: Source of key(s) to be installed: "./.ssh/id_dsa.pub" The authenticity of host '192.168.100.10 (192.168.100.10)' can't be established. ECDSA key fingerprint is SHA256:PUueT9fU9QbsyNB5NC5hbSXzaWxxQavBxXmfoknXl4I. ECDSA key fingerprint is MD5:6d:f7:95:0e:51:1a:d8:9e:7b:b6:3f:58:51:51:4b:3b. Are you sure you want to continue connecting (yes/no)? yes <!--输入yes--> /usr/bin/ssh-copy-id: INFO: attempting to log in with the new key(s), to filter out any that are already installed /usr/bin/ssh-copy-id: INFO: 1 key(s) remain to be installed -- if you are prompted now it is to install the new keys root@192.168.100.10's password: <!--输入密码--> Number of key(s) added: 1 Now try logging into the machine, with: "ssh 'root@192.168.100.10'" and check to make sure that only the key(s) you wanted were added. 3、在客户端使用密钥对验证
