1. Linux内核namespace机制
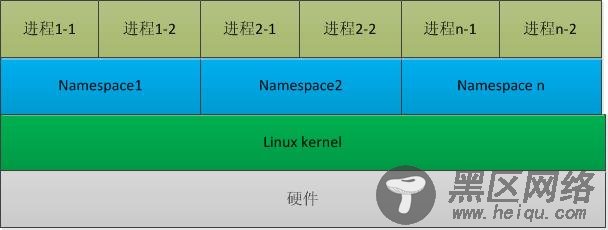
Linux Namespaces机制提供一种资源隔离方案。PID,IPC,Network等系统资源不再是全局性的,而是属于某个特定的Namespace。每个namespace下的资源对于其他namespace下的资源都是透明,不可见的。因此在操作系统层面上看,就会出现多个相同pid的进程。系统中可以同时存在两个进程号为0,1,2的进程,由于属于不同的namespace,所以它们之间并不冲突。而在用户层面上只能看到属于用户自己namespace下的资源,例如使用ps命令只能列出自己namespace下的进程。这样每个namespace看上去就像一个单独的Linux系统。

2 . Linux内核中namespace结构体
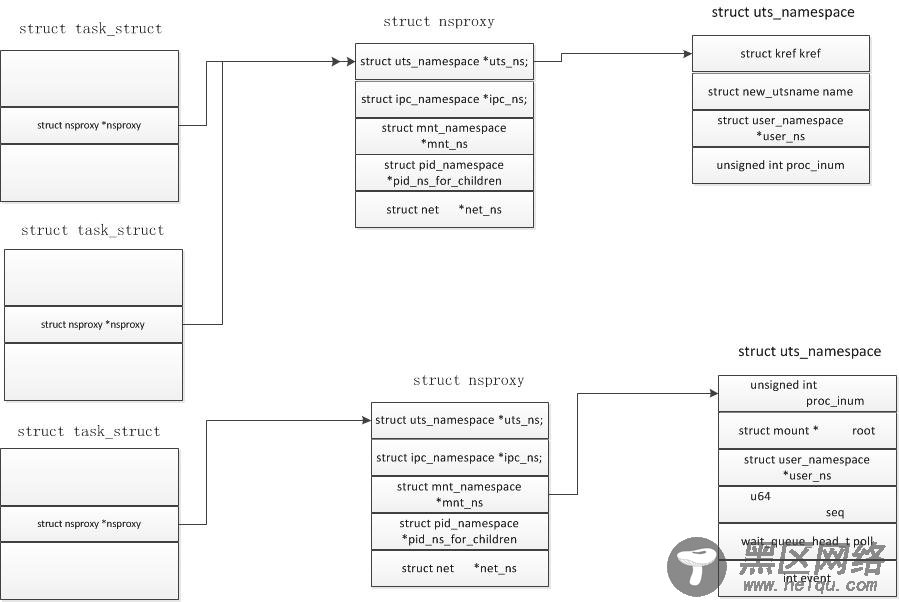
在Linux内核中提供了多个namespace,其中包括fs (mount), uts, network, sysvipc, 等。一个进程可以属于多个namesapce,既然namespace和进程相关,那么在task_struct结构体中就会包含和namespace相关联的变量。在task_struct 结构中有一个指向namespace结构体的指针nsproxy。
struct task_struct {
……..
/* namespaces */
struct nsproxy *nsproxy;
…….
}
再看一下nsproxy是如何定义的,在include/linux/nsproxy.h文件中,这里一共定义了5个各自的命名空间结构体,在该结构体中定义了5个指向各个类型namespace的指针,由于多个进程可以使用同一个namespace,所以nsproxy可以共享使用,count字段是该结构的引用计数。
/* 'count' is the number of tasks holding a reference.
* The count for each namespace, then, will be the number
* of nsproxies pointing to it, not the number of tasks.
* The nsproxy is shared by tasks which share all namespaces.
* As soon as a single namespace is cloned or unshared, the
* nsproxy is copied
*/
struct nsproxy {
atomic_t count;
struct uts_namespace *uts_ns;
struct ipc_namespace *ipc_ns;
struct mnt_namespace *mnt_ns;
struct pid_namespace *pid_ns_for_children;
struct net *net_ns;
};
(1) UTS命名空间包含了运行内核的名称、版本、底层体系结构类型等信息。UTS是UNIX Timesharing System的简称。
(2) 保存在struct ipc_namespace中的所有与进程间通信(IPC)有关的信息。
(3) 已经装载的文件系统的视图,在struct mnt_namespace中给出。
(4) 有关进程ID的信息,由struct pid_namespace提供。
(5) struct net_ns包含所有网络相关的命名空间参数。
系统中有一个默认的nsproxy,init_nsproxy,该结构在task初始化是也会被初始化。#define INIT_TASK(tsk) \
{
.nsproxy = &init_nsproxy,
}
其中init_nsproxy的定义为:
static struct kmem_cache *nsproxy_cachep;
struct nsproxy init_nsproxy = {
.count = ATOMIC_INIT(1),
.uts_ns = &init_uts_ns,
#if defined(CONFIG_POSIX_MQUEUE) || defined(CONFIG_SYSVIPC)
.ipc_ns = &init_ipc_ns,
#endif
.mnt_ns = NULL,
.pid_ns_for_children = &init_pid_ns,
#ifdef CONFIG_NET
.net_ns = &init_net,
#endif
};
对于 .mnt_ns 没有进行初始化,其余的namespace都进行了系统默认初始。

3. 使用clone创建自己的Namespace
如果要创建自己的命名空间,可以使用系统调用clone(),它在用户空间的原型为
int clone(int (*fn)(void *), void *child_stack, int flags, void *arg)
这里fn是函数指针,这个就是指向函数的指针,, child_stack是为子进程分配系统堆栈空间,flags就是标志用来描述你需要从父进程继承那些资源, arg就是传给子进程的参数也就是fn指向的函数参数。下面是flags可以取的值。这里只关心和namespace相关的参数。
CLONE_FS 子进程与父进程共享相同的文件系统,包括root、当前目录、umask
CLONE_NEWNS 当clone需要自己的命名空间时设置这个标志,不能同时设置CLONE_NEWS和CLONE_FS。
Clone()函数是在libc库中定义的一个封装函数,它负责建立新轻量级进程的堆栈并且调用对编程者隐藏了clone系统条用。实现clone()系统调用的sys_clone()服务例程并没有fn和arg参数。封装函数把fn指针存放在子进程堆栈的每个位置处,该位置就是该封装函数本身返回地址存放的位置。Arg指针正好存放在子进程堆栈中的fn的下面。当封装函数结束时,CPU从堆栈中取出返回地址,然后执行fn(arg)函数。
/* Prototype for the glibc wrapper function */
#include <sched.h>
int clone(int (*fn)(void *), void *child_stack,
int flags, void *arg, ...
/* pid_t *ptid, struct user_desc *tls, pid_t *ctid */ );
/* Prototype for the raw system call */
long clone(unsigned long flags, void *child_stack,
void *ptid, void *ctid,
struct pt_regs *regs);
我们在Linux内核中看到的实现函数,是经过libc库进行封装过的,在Linux内核中的fork.c文件中,有下面的定义,最终调用的都是do_fork()函数。
#ifdef __ARCH_WANT_SYS_CLONE
#ifdef CONFIG_CLONE_BACKWARDS
SYSCALL_DEFINE5(clone, unsigned long, clone_flags, unsigned long, newsp,
int __user *, parent_tidptr,
int, tls_val,
int __user *, child_tidptr)
#elif defined(CONFIG_CLONE_BACKWARDS2)
SYSCALL_DEFINE5(clone, unsigned long, newsp, unsigned long, clone_flags,
int __user *, parent_tidptr,
int __user *, child_tidptr,
int, tls_val)
#elif defined(CONFIG_CLONE_BACKWARDS3)
SYSCALL_DEFINE6(clone, unsigned long, clone_flags, unsigned long, newsp,
int, stack_size,
int __user *, parent_tidptr,
int __user *, child_tidptr,
int, tls_val)
#else
SYSCALL_DEFINE5(clone, unsigned long, clone_flags, unsigned long, newsp,
int __user *, parent_tidptr,
int __user *, child_tidptr,
int, tls_val)
#endif
{
return do_fork(clone_flags, newsp, 0, parent_tidptr, child_tidptr);
}
#endif
3.1 do_fork函数
在clone()函数中调用do_fork函数进行真正的处理,在do_fork函数中调用copy_process进程处理。
long do_fork(unsigned long clone_flags,
unsigned long stack_start,
unsigned long stack_size,
int __user *parent_tidptr,
int __user *child_tidptr)
{
struct task_struct *p;
int trace = 0;
long nr;
/*
* Determine whether and which event to report to ptracer. When
* called from kernel_thread or CLONE_UNTRACED is explicitly
* requested, no event is reported; otherwise, report if the event
* for the type of forking is enabled.
*/
if (!(clone_flags & CLONE_UNTRACED)) {
if (clone_flags & CLONE_VFORK)
trace = PTRACE_EVENT_VFORK;
else if ((clone_flags & CSIGNAL) != SIGCHLD)
trace = PTRACE_EVENT_CLONE;
else
trace = PTRACE_EVENT_FORK;
if (likely(!ptrace_event_enabled(current, trace)))
trace = 0;
}
p = copy_process(clone_flags, stack_start, stack_size,
child_tidptr, NULL, trace);
/*
* Do this prior waking up the new thread - the thread pointer
* might get invalid after that point, if the thread exits quickly.
*/
if (!IS_ERR(p)) {
struct completion vfork;
struct pid *pid;
trace_sched_process_fork(current, p);
pid = get_task_pid(p, PIDTYPE_PID);
nr = pid_vnr(pid);
if (clone_flags & CLONE_PARENT_SETTID)
put_user(nr, parent_tidptr);
if (clone_flags & CLONE_VFORK) {
p->vfork_done = &vfork;
init_completion(&vfork);
get_task_struct(p);
}
wake_up_new_task(p);
/* forking complete and child started to run, tell ptracer */
if (unlikely(trace))
ptrace_event_pid(trace, pid);
if (clone_flags & CLONE_VFORK) {
if (!wait_for_vfork_done(p, &vfork))
ptrace_event_pid(PTRACE_EVENT_VFORK_DONE, pid);
}
put_pid(pid);
} else {

