QEMU 是一个广泛使用的开源计算机仿真器和虚拟机,它提供了虚拟机硬件的虚拟化功能,其使用的某些特定硬件的固件则由一些开源项目提供。本文将介绍 QEMU 代码中使用到的 BIOS,通过分析 QEMU 代码,讲解 BIOS 是如何加载到虚拟机的物理内存。
QEMU 中使用 BIOS 简介BIOS 提供主板或者显卡的固件信息以及基本输入输出功能,QEMU 使用的是一些开源的项目,如 Bochs、openBIOS 等。QEMU 中使用到的 BIOS 以及固件一部分以二进制文件的形式保存在源码树的 pc-bios 目录下。pc-bios 目录里包含了 QEMU 使用到的固件,还有一些 BIOS 以 git 源代码子模块的形式保存在 QEMU 的源码仓库中,当编译 QEMU 程序的时候,也同时编译出这些 BIOS 或者固件的二进制文件。QEMU 支持多种启动方式,比如说 efi、pxe 等, 都包含在该目录下,这些都需要特定 BIOS 的支持。
清单 1. QEMU 源码树中的 BIOS 文件$ ls pc-bios/ acpi-dsdt.aml efi-rtl8139.rom openbios-ppc pxe-e1000.rom qemu_logo_no_text.svg slof.bin bamboo.dtb efi-virtio.rom openbios-sparc32 pxe-eepro100.rom qemu-nsis.bmp spapr-rtas bamboo.dts keymaps openbios-sparc64 pxe-ne2k_pci.rom qemu-nsis.ico spapr-rtas.bin bios.bin kvmvapic.bin optionrom pxe-pcnet.rom vgabios.bin efi-e1000.rom linuxboot.bin palcode-clipper pxe-rtl8139.rom s390-ccwvgabios-cirrus.bin efi-eepro100.rom petalogix-ml605.dtb pxe-virtio.rom s390-ccw.img vgabios-qxl.bin efi-ne2k_pci.rom multiboot.bin petalogix-s3adsp1800.dtb q35-acpi-dsdt.aml s390-zipl.rom vgabios-stdvga.bin efi-pcnet.rom ohw.diff ppc_rom.bin qemu-icon.bmp sgabios.bin vgabios-vmware.bin
清单 2. QEMU 源码树以子模块方式保存的 BIOS 代码-bash-4.1$ cat .gitmodules [submodule "roms/vgabios"] path = roms/vgabios url = git://git.qemu.org/vgabios.git/ [submodule "roms/seabios"] path = roms/seabios url = git://git.qemu.org/seabios.git/ [submodule "roms/SLOF"] path = roms/SLOF url = git://git.qemu.org/SLOF.git [submodule "roms/ipxe"] path = roms/ipxe url = git://git.qemu.org/ipxe.git [submodule "roms/openbios"] path = roms/openbios url = git://git.qemu.org/openbios.git [submodule "roms/qemu-palcode"] path = roms/qemu-palcode url = git://github.com/rth7680/qemu-palcode.git [submodule "roms/sgabios"] path = roms/sgabios url = git://git.qemu.org/sgabios.git [submodule "pixman"] path = pixman url = git://anongit.freedesktop.org/pixman [submodule "dtc"] path = dtc url = git://git.qemu.org/dtc.git 当我们从源代码编译 QEMU 时候,QEMU 的 Makefile 会将这些二进制文件拷贝到 QEMU 的数据文件目录中。
清单 3. QEMU 的 Makefile 中关于 BIOS 的拷贝操作:ifneq ($(BLOBS),) set -e; for x in $(BLOBS); do \ $(INSTALL_DATA) $(SRC_PATH)/pc-bios/$$x "$(DESTDIR)$(qemu_datadir)"; \ done
QEMU 加载 BIOS 过程分析当 QEMU 用户空间进程开始启动时,QEMU 进程会根据所传递的参数以及当前宿主机平台类型,自动加载适当的 BIOS 固件。 QEMU 进程启动初始阶段,会通过 module_call_init 函数调用 qemu_register_machine 注册该平台支持的全部机器类型,接着调用 find_default_machine 选择一个默认的机型进行初始化。 以最新的 QEMU 代码(1.7.0)的 x86_64 平台为例,支持的机器类型有:
清单 4. 1.7.0 版本 x86_64 QEMU 中支持的类型pc-q35-1.7 pc-q35-1.6 pc-q35-1.5 pc-q35-1.4 pc-i440fx-1.7 pc-i440fx-1.6 pc-i440fx-1.5 pc-i440fx-1.4 pc-1.3 pc-1.2 pc-1.1 pc-1.0 pc-0.15 pc-0.14 pc-0.13 pc-0.12 pc-0.11 pc-0.10 isapc
最新代码中使用的默认机型为 pc-i440fx-1.7,使用的 BIOS 文件为:
pc-bios/bios.bin Default machine name : pc-i440fx-1.7 bios_name = bios.bin
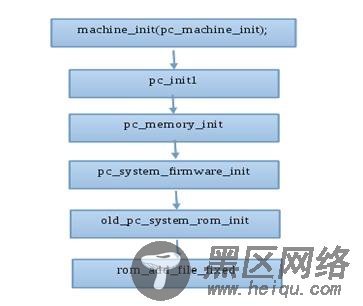
pc-i440fx-1.7 解释为 QEMU 模拟的是 INTEL 的 i440fx 硬件芯片组,1.7 为 QEMU 的版本号。找到默认机器之后,为其初始化物理内存,QEMU 首先申请一块内存空间用于模拟虚拟机的物理内存空间,申请完好内存之后,根据不同平台或者启动 QEMU 进程的参数,为虚拟机的物理内存初始化。具体函数调用过程见图 1。
图 1. QEMU 硬件初始化函数调用流程图:
在 QEMU 中,整个物理内存以一个结构体 struct MemoryRegion 表示,具体定义见清单 5。
清单 5. QEMU 中 MemoryRegion 结构体struct MemoryRegion { /* All fields are private - violators will be prosecuted */ const MemoryRegionOps *ops; const MemoryRegionIOMMUOps *iommu_ops; void *opaque; struct Object *owner; MemoryRegion *parent; Int128 size; hwaddr addr; void (*destructor)(MemoryRegion *mr); ram_addr_t ram_addr; bool subpage; bool terminates; bool romd_mode; bool ram; bool readonly; /* For RAM regions */ bool enabled; bool rom_device; bool warning_printed; /* For reservations */ bool flush_coalesced_mmio; MemoryRegion *alias; hwaddr alias_offset; unsigned priority; bool may_overlap; QTAILQ_HEAD(subregions, MemoryRegion) subregions; QTAILQ_ENTRY(MemoryRegion) subregions_link; QTAILQ_HEAD(coalesced_ranges, CoalescedMemoryRange) subregions_link; const char *name; uint8_t dirty_log_mask; unsigned ioeventfd_nb; MemoryRegionIoeventfd *ioeventfds; NotifierList iommu_notify; };
