1. NS2中的Tdma时帧结构如下图:

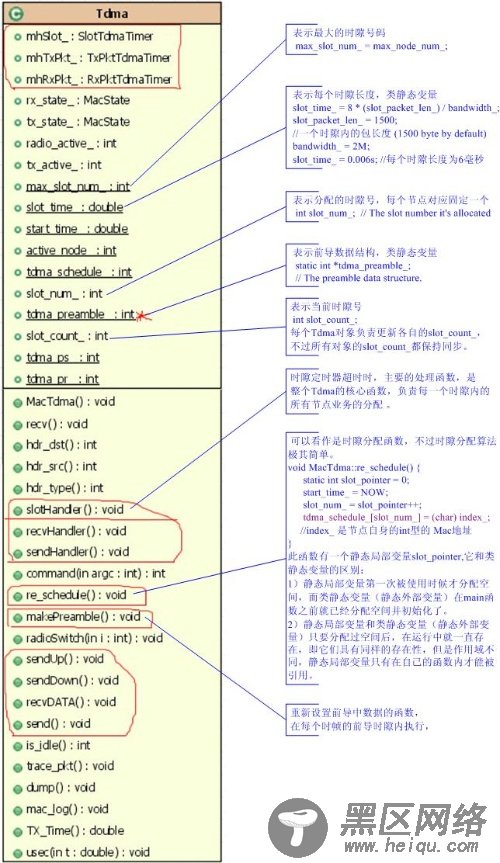
其中前导的数据结构为:static int *tdma_preamble_;
tdma_preamble_ = new int[max_slot_num_]; //max_slot_num_为节点总数
tdma_preamble_[slot_num_] = ETHER_ADDR(MAC_TDMA(pktTx_)->dh_da);
//前导中存储的是目标节点的Mac地址(4个字节),slot_num_表示当时隙号。
在前导时隙这段时间,完成的主要工作就是设置tdma_preamble_[0]到
tdma_preamble_[ max_slot_num_ - 1]的值,代表从0到max_slot_num_-1个数据时隙各个时隙中要发送数据的目标节点地址。
2. 整个Tdma的类图如下:
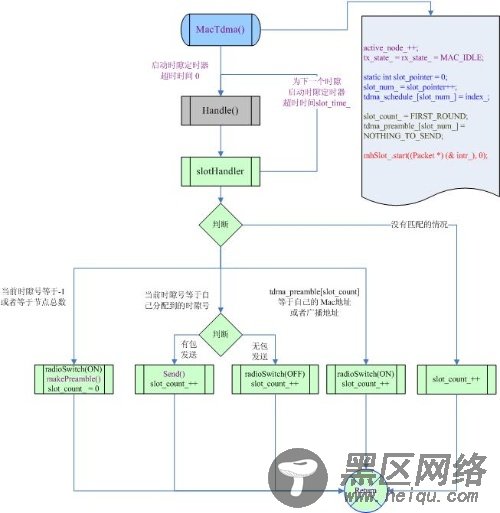
3. Tdma执行过程和关键的时隙控制函数如下图:
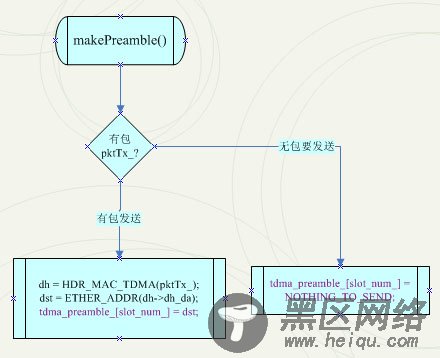
4. 设置前导中数据的函数makePreamble过程:
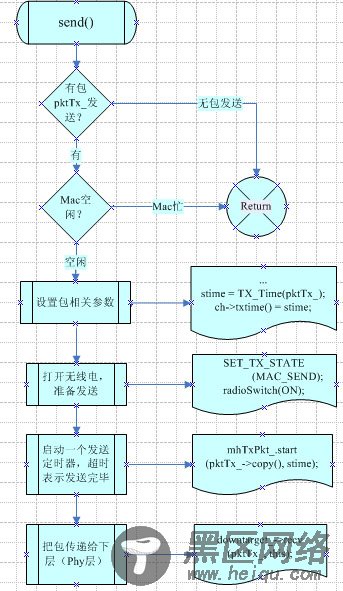
5. 发送函数流程图:
6. 接收函数流程图:
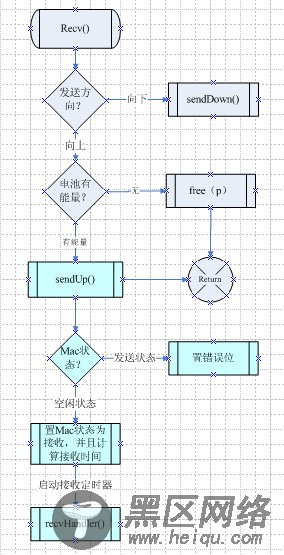
7. 一个例子分析,场景:三个节点,相互可见,单信道下节点0和1几乎同时在0.020001秒即20毫秒的时候给2发送数据,2只接收不发送,仿真在1秒时结束。
Mac层采用NS2自带的Tdma协议,则:
Tdma的时帧结构为:
输出的结果显示:
<0>, 0.000000, make the new preamble now.
<0>, 0.000000, write NO_PKT to slot 0 in preamble
<1>, 0.000000, make the new preamble now.
<1>, 0.000000, write NO_PKT to slot 1 in preamble
<2>, 0.000000, make the new preamble now.
<2>, 0.000000, write NO_PKT to slot 2 in preamble
<0>, 0.006000, time to send.
<1>, 0.006000, preamble[0]=-2, nothing to do now.
<2>, 0.006000, preamble[0]=-2, nothing to do now.
<0>, 0.012000, preamble[1]=-2, nothing to do now.
<1>, 0.012000, time to send.
<2>, 0.012000, preamble[1]=-2, nothing to do now.
<0>, 0.018000, preamble[2]=-2, nothing to do now.
<1>, 0.018000, preamble[2]=-2, nothing to do now.
<2>, 0.018000, time to send.
<0>, 0.024000, make the new preamble now.
<0>, 0.024000, write -1 to slot 0 in preamble
<1>, 0.024000, make the new preamble now.
<1>, 0.024000, write -1 to slot 1 in preamble
<2>, 0.024000, make the new preamble now.
<2>, 0.024000, write NO_PKT to slot 2 in preamble
<0>, 0.030000, time to send.
<1>, 0.030000, preamble[0]=-1, I am supposed to receive now.
<2>, 0.030000, preamble[0]=-1, I am supposed to receive now.
<0>, 0.036000, preamble[1]=-1, I am supposed to receive now.
<1>, 0.036000, time to send.
<2>, 0.036000, preamble[1]=-1, I am supposed to receive now.
<0>, 0.042000, preamble[2]=-2, nothing to do now.
<1>, 0.042000, preamble[2]=-2, nothing to do now.
<2>, 0.042000, time to send.
.......
从上面可以看出,NS2中自带的Tdma的实现是极其简单的,时隙分配算法也特别简单。
Ubuntu 13.04 安装NS2.35
Linux平台下NS2.35安装
