开始Rails之旅
sqlliteLinux机器可能没有安装Sqllite-devel,安装一下吧:yum install sqlite-devel
JavaScript服务器解释引擎linux机器可能没有安装JavaScript的服务器解释引擎,安装一下吧:gem install execjs gem install therubyracer,貌似这两步之后也不行,我的机器是REHL6.2,需要安装node.js才行,步骤如下:
wget
tar xfv node-v0.10.5.tar.gz
cd node-v0.10.5
./configure
make
make install
Git
Git安装:Getting Started - Installing Git
Installing GitLet’s get into using some Git. First things first—you have to install it. You can get it a number of ways; the two major ones are to install it from source or to install an existing package for your platform.
Installing from SourceIf you can, it’s generally useful to install Git from source, because you’ll get the most recent version. Each version of Git tends to include useful UI enhancements, so getting the latest version is often the best route if you feel comfortable compiling software from source. It is also the case that many Linux distributions contain very old packages; so unless you’re on a very up-to-date distro or are using backports, installing from source may be the best bet.
To install Git, you need to have the following libraries that Git depends on: curl, zlib, openssl, expat, and libiconv. For example, if you’re on a system that has yum (such as Fedora) or apt-get (such as a Debian based system), you can use one of these commands to install all of the dependencies:
$ yum install curl-devel expat-devel gettext-devel openssl-devel zlib-devel $ apt-get install libcurl4-gnutls-dev libexpat1-dev gettext libz-dev libssl-devWhen you have all the necessary dependencies, you can go ahead and grab the latest snapshot from the Git web site:
Then, compile and install:
$ tar -zxf git-1.7.2.2.tar.gz $ cd git-1.7.2.2 $ make prefix=/usr/local all $ sudo make prefix=/usr/local installAfter this is done, you can also get Git via Git itself for updates:
$ git clone git://git.kernel.org/pub/scm/git/git.git Installing on LinuxIf you want to install Git on Linux via a binary installer, you can generally do so through the basic package-management tool that comes with your distribution. If you’re on Fedora, you can use yum:
$ yum install git-coreOr if you’re on a Debian-based distribution like Ubuntu, try apt-get:
$ apt-get install git Installing on MacThere are two easy ways to install Git on a Mac. The easiest is to use the graphical Git installer, which you can download from the Google Code page (see Figure 1-7):
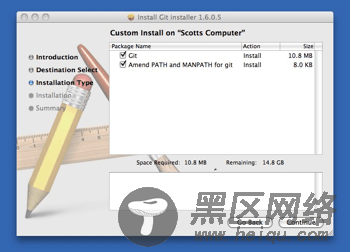
Figure 1-7. Git OS X installer.
The other major way is to install Git via MacPorts (). If you have MacPorts installed, install Git via
$ sudo port install git-core +svn +doc +bash_completion +gitwebYou don’t have to add all the extras, but you’ll probably want to include +svn in case you ever have to use Git with Subversion repositories (see Chapter 8).
Installing on WindowsInstalling Git on Windows is very easy. The msysGit project has one of the easier installation procedures. Simply download the installer exe file from the GitHub page, and run it:
After it’s installed, you have both a command-line version (including an SSH client that will come in handy later) and the standard GUI.
Note on Windows usage: you should use Git with the provided msysGit shell (Unix style), it allows to use the complex lines of command given in this book. If you need, for some reason, to use the native Windows shell / command line console, you have to use double quotes instead of simple quotes (for parameters with spaces in them) and you must quote the parameters ending with the circumflex accent (^) if they are last on the line, as it is a continuation symbol in Windows.
Git配置与使用:与 推送到GitHub:教程见
注意:你必须先注册一个GitHub.Com账户,如果使用SSH方式进行推送,则需要创建SSH秘钥,需要在GitHub中建立Repository。
SSH推送到GitHub的命令如下:
git remote add origin git@github.com:<username>/first_app.git
$ git push -u origin master
<username>要替换成你在GitHub注册的用户名,master是你的分支名称,现在我们可以在GitHub中看到这个master分支了:
https://github.com/pumadong/first_app
关于Git,在Windows及Mac下面,都有GUI程序可用,在linux下面,貌似只有git命令可用了。
建立一个Raise项目并推送到GitHub
发布到云部署平台heroku
heroku.com注册一个账户
wget https://toolbelt.heroku.com/install.sh --no-check-certificate
chmod +x install.sh
./install.sh
echo 'PATH="/usr/local/heroku/bin:$PATH"' >> /etc/profile
通过以上步骤,安装完成heroku的linux客户端,下面开始部署:
heroku login
cd /data/ruby/rails_project/first_app
heroku create
注意:执行这些命令,会自动把~/.ssh/id_rsa.pub里面的公钥,写到您的heroku账户的SSH Keys里面,如果有过ssh重新生成等,需要到账户里面更新。貌似heroku和github用的是一个公钥。
下面,我们发布程序:git push heroku master ,正常的话,已经部署成功了,我的url如下:
使用scoffold快速建立一个用户微博程序
演示从头到尾建立一个大型的示例程序
Windows下安装 rubyinstaller
执行rubyinstaller-2.0.0-p353-x64.exe,进行安装,安装完毕后,cmd里面执行:ruby -v,显示版本号,说明ruby安装成功;
执行gem -v,显示版本号,说明RubyGems(Ruby程序包管理器)也已经被默认安装好了;
DevKit
安装DevKit-mingw64-64-4.7.2-20130224-1432-sfx.exe,解压到一个固定的位置,使用后不能变换位置,更多参考:
https://github.com/oneclick/rubyinstaller/wiki/Development-Kit
步骤大致如下:
1) 将下载 DevKit 解压到 D:\DevKit 目录。
2) 打开 CMD 窗口,进入 D:\DevKit 目录,输入ruby dk.rb init 。#生成config.yml,这里会检查将要添加DevKit支持的Ruby列表,只支持通过RubyInstaller安装的Ruby。
3) 输入 ruby dk.rb install #开始安装。
4) 输入 ruby dk.rb review #检查要添加DevKit支持的Ruby列表是否有误,可以略过。
5) 输入 gem install rdiscount --platform=ruby 。#这一步只是验证DevKit是否安装成功,如果能安装rdiscount成功说明安装DevKit成功,也可以不做。
安装完以上后,可以安装rails了:
从CMD提示窗口输入指令:gem install rails 开始安装rails。
如不想安装文档文件,可以输入:gem install rails --no-rdoc --no-ri
程序自动下载并安装rails, 耐心等待。
安装完成后,你可以在路径 D:\Ruby\lib\ruby\gems\1.9.1\gems 看到些东西,都是rails的包文件,与ruby安装在同一目录下。
这时在CMD提示窗口输入指令: rails -v 显示rails的版本号。
拷贝libmysql.dll、libmysql.lib到 D:\Ruby\bin目录下,执行:
gem install mysql2 -- '--with-mysql-lib="E:\Program Files\MySQL\MySQL Server 5.5\lib" --with-mysql-include="E:\Program Files\MySQL\MySQL Server 5.5\include"'
或者
gem install mysql2 -- '--with-mysql-dir="E:\Program Files\MySQL\MySQL Server 5.5"'
就可以安装成功了,但是使用时(require 'mysql2')报错,如下图:
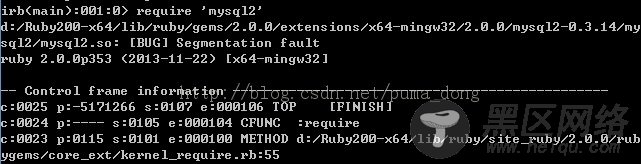
出现的原因是的libmysql.lib和mingw64-gcc不兼容导致的,于是卸载mysql2:gem uninstall mysql2。
gendef.exe,这个从https://structure-svm-map.googlecode.com/files/svm-map-win.zip下载,解压后在Python-mingw-lib目录里面。
拷贝到devkit/mingw/bin下,我之所以考到这里,是因为dlltool.exe也在这里,都放到path里方便。
然后运行:gendef.exe libmysql.dll。
这条命令会生成libmysql.def文件。
生成这个libmysql.def文件之后,就可以生成新的lib了。
dlltool -v –dllname libmysql.dll –def libmysql.def –output-lib libmysql.lib。
拷贝libmysql.lib到D:\Ruby\bin目录下面,重新安装,
都OK了。
注意事项
如果在Windows下面编辑的文件,拿到Linux下面未必能正确运行,因为Windows的换行符到Linux里面是^M,而Linux的是$,对于Windows下面编辑的文件,可以用如下命令进行处理:
dos2unix ruby_start
是否是这种情况,可以通过:cat ruby_start -A看到
到现在,再Ruby的环境中,应该也浸淫了至少2周的时间了吧,对Ruby基本语法,运行环境,生态环境,应该都有一定了解了吧。
开始进入IDE的世界吧。就用RubyMine,现在的版本是6了。经过前几周记事本写代码的世界,现在改用IDE,是不是发现工作变得轻松起来了呢。