配置环境:
宿主机:Ubuntu 13.04 (x86_64)
docker版本:0.7.0
Gitlab 版本:4.2.0(已经搭建好的)
Gitlab CI版本:3.2.0
一、从index.docker.io搜寻所需镜像。
二、去https://index.docker.io获取镜像相关的信息。
三、修改镜像使镜像符合自己的需要。
四、让自己的镜像跑起来。
Client version: 0.7.0
Go version (client): go1.2rc5
Git commit (client): 0d078b6
Server version: 0.7.0
Git commit (server): 0d078b6
Go version (server): go1.2rc5
Last stable version: 0.7.0
当然是去我们最可爱得index.docker.io上去搜寻啦。
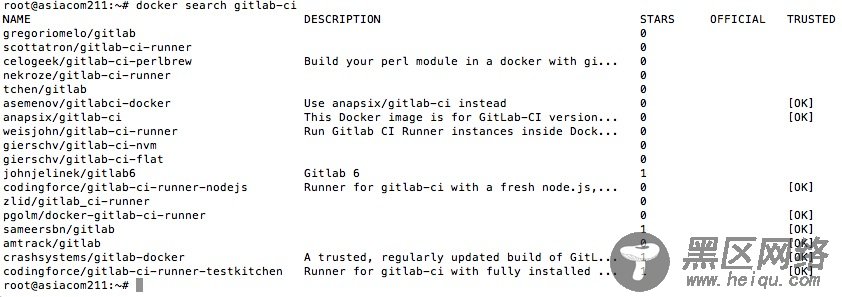
sudo docker search gitlab-ci #从docker index搜寻gitlab-ci的镜像

这里有很多的可用image很多,这些都是用户上传的,可以自己选择,我一般都是看TRUSTED栏有ok的就可以,这是我自己猜的啊,你根据自己的经验来就行。我选的是anapsix/gitlab-ci,看这个比较顺眼,就它了。
二、去https://index.docker.io获取镜像相关的信息。
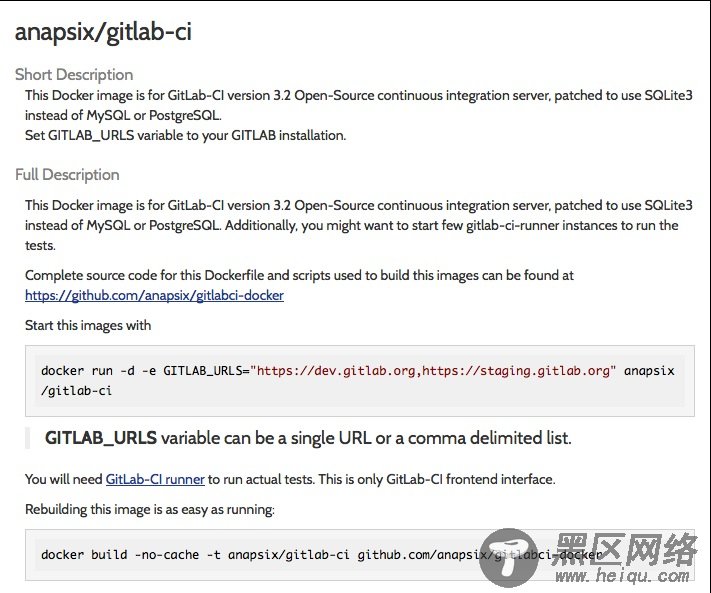
别着急让你下载的镜像跑起来,我们把别人的成果偷来之后总不能不会用把,接着去https://index.docker.io 去看看我们偷来的东西是谁的,怎么样让这个东东跑起来。

看看,人家都教你怎么用啦。人家还告诉你怎么做的这个镜像,就是我们的Dockerfile。不过我是要和自己内网的Gitlab上用,所以直接拷贝下来的东西不能用。
这是Dockerfile的内容:
FROM tianon/debian #基础镜像包
MAINTAINER Anastas Semenov <anapsix@random.io> #作者
<P>
RUN apt-get update #run跑的是命令
</P>
#底下这一部分和实体机上安装类似,但是还是有很大的不同,我就掉进这个坑里去过。
RUN DEBIAN_FRONTEND=noninteractive apt-get install -y --force-yes libxml2-dev libxslt-dev libcurl4-openssl-dev libreadline6-dev libc6-dev libssl-dev libyaml-dev libicu-dev zlib1g-dev libsqlite3-dev wget curl gcc build-essential make git sudo postfix cron ruby1.9.1 ruby1.9.1-dev rubygems-integration redis-server
RUN gem install bundle --no-ri --no-rdoc
RUN adduser --disabled-login --gecos 'GitLab CI' gitlab_ci
RUN cd /home/gitlab_ci; sudo -u gitlab_ci -H git clone -b 3-2-stable --depth 1 https://github.com/gitlabhq/gitlab-ci.git gitlab-ci
RUN cd /home/gitlab_ci/gitlab-ci; sudo -u gitlab_ci -H mkdir -p tmp/pids tmp/sockets
RUN cd /home/gitlab_ci/gitlab-ci; curl -sL https://raw.github.com/anapsix/gitlabci-docker/master/BUNDLER-adding-sqlite3-support.patch | sudo -u gitlab_ci -H git am
RUN cd /home/gitlab_ci/gitlab-ci; sudo -u gitlab_ci -H bundle install --without development test postgres mysql --deployment
RUN cd /home/gitlab_ci/gitlab-ci; sudo -u gitlab_ci -H curl -sL https://raw.github.com/anapsix/gitlabci-docker/master/gitlab_ctrl.rb > ./gitlabci_ctrl.rb; chmod +x ./gitlabci_ctrl.rb
RUN cd /home/gitlab_ci/gitlab-ci; sudo -u gitlab_ci -H ./gitlabci_ctrl.rb --db --puma --app GITLAB_URLS="https://dev.gitlab.org/"
RUN cd /home/gitlab_ci/gitlab-ci; sudo -u gitlab_ci -H bundle exec rake db:setup RAILS_ENV=production
RUN cd /home/gitlab_ci/gitlab-ci; sudo -u gitlab_ci -H bundle exec whenever -w RAILS_ENV=production
# cleanup, if needed
#RUN DEBIAN_FRONTEND=noninteractive apt-get remove --force-yes -y ruby1.9.1-dev
#RUN DEBIAN_FRONTEND=noninteractive apt-get autoremove --force-yes -y
EXPOSE 9000 #container开的端口
WORKDIR /home/gitlab_ci/gitlab-ci
CMD /home/gitlab_ci/gitlab-ci/gitlabci_ctrl.rb --start #启动命令
就相当与你偷了别人的东西(打个比如)不会用,去找人家,人家还告诉你这个东西怎么用,而且还告诉你这个东西是怎么做出来的。哈哈哈,真是个好yin。
