主机欺骗刚好是我们需要的工具。在这里使用功能强大的 gmetric 并告诉它我们正在其上运行的主机 —— gmetric 是将信息插入到 Ganglia 中的命令行工具。通过这种方法,您可以监视任何内容。
gmetric 最精彩的部分是什么?大量已经编写好的脚本。
作为一种学习体验,我将向您展示如何彻底改造运行 ipmitool 以远程访问计算机的方法:
确保 ipmitool 可以在带外正常工作。我已经设置了 BMC(目标计算机中的芯片),以便我可以在其中运行 IPMI 命令。例如:我的监视主机名为 redhouse。通过 redhouse,我希望监视集群中的所有其他节点。Redhouse 是 gmetad 运行的位置,也是 Web 浏览器指向的位置(以便访问所有 Ganglia 信息)。
我的集群中的一个节点拥有 x01 主机名。我把 x01 的 BMC 设为拥有解析到主机 x01-bmc 的 IP 地址。在这里,我尝试远程访问该主机:
# ipmitool -I lanplus -H x01-bmc -U USERID -P PASSW0RD sdr dump \ /tmp/x01.sdr Dumping Sensor Data Repository to '/tmp/x01.sdr' # ipmitool -I lanplus -H x01-bmc -U USERID -P PASSW0RD -S /tmp/x01.sdr \ sdr type Temperature Ambient Temp | 32h | ok | 12.1 | 20 degrees C CPU 1 Temp | 98h | ok | 3.1 | 20 degrees C CPU 2 Temp | 99h | ok | 3.2 | 21 degrees C看上去一切良好。现在让我们把它放到一个脚本中以提供给 gmetric。
创建使用 ipmitool 的脚本以提供给 gmetric。我们创建了下面的 /usr/local/bin/ipmi-ganglia.pl 脚本并将其放到监视服务器中:
#!/usr/bin/perl # vallard@us.ibm.com use strict; # to keep things clean... er cleaner use Socket; # to resolve host names into IP addresses # code to clean up after forks use POSIX ":sys_wait_h"; # nodeFile: is just a plain text file with a list of nodes: # e.g: # node01 # node02 # ... # nodexx my $nodeFile = "/usr/local/bin/nodes"; # gmetric binary my $gmetric = "/usr/bin/gmetric"; #ipmitool binary my $ipmi = "/usr/bin/ipmitool"; # userid for BMCs my $u = "xcat"; # password for BMCs my $p = "f00bar"; # open the nodes file and iterate through each node open(FH, "$nodeFile") or die "can't open $nodeFile"; while(my $node = <FH>){ # fork so each remote data call is done in parallel if(my $pid = fork()){ # parent process next; } # child process begins here chomp($node); # get rid of new line # resolve node's IP address for spoofing my $ip; my $pip = gethostbyname($node); if(defined $pip){ $ip = inet_ntoa($pip); }else{ print "Can't get IP for $node!\n"; exit 1; } # check if the SDR cache file exists. my $ipmiCmd; unless(-f "/tmp/$node.sdr"){ # no SDR cache, so try to create it... $ipmiCmd = "$ipmi -I lan -H $node-bmc -U $u -P $p sdr dump /tmp/$node.sdr"; `$ipmiCmd`; } if(-f "/tmp/$node.sdr"){ # run the command against the cache so that its faster $ipmiCmd = "$ipmi -I lan -H $node-bmc -U $u -P $p -S /tmp/$node.sdr sdr type Temperature "; # put all the output into the @out array my @out = `$ipmiCmd`; # iterate through each @out entry. foreach(@out){ # each output line looks like this: # Ambient Temp | 32h | ok | 12.1 | 25 degrees C # so we parse it out chomp(); # get rid of the new line # grap the first and 5th fields. (Description and Temp) my ($descr, undef, undef, undef,$temp) = split(/\|/); # get rid of white space in description $descr =~ s/ //g; # grap just the temp, (We assume C anyway) $temp = (split(' ', $temp))[0]; # make sure that temperature is a number: if($temp =~ /^\d+/ ){ #print "$node: $descr $temp\n"; my $gcmd = "$gmetric -n '$descr' -v $temp -t int16 -u Celcius -S $ip:$node"; `$gcmd`; } } } # Child Thread done and exits. exit; } # wait for all forks to end... while(waitpid(-1,WNOHANG) != -1){ 1; }除了所有解析之外,此脚本只运行 ipmitool 命令并获取温度。然后,它将针对每项度量数据,使用 gmetric 命令将这些值放到 Ganglia 中。
以 cron 作业的形式运行脚本。运行 crontab -e。我添加了以下每 30 分钟就运行一次的条目:30 * * * * /usr/local/bin/ipmi-ganglia.sh。您可能希望它发生得更加频繁或者次数更少。
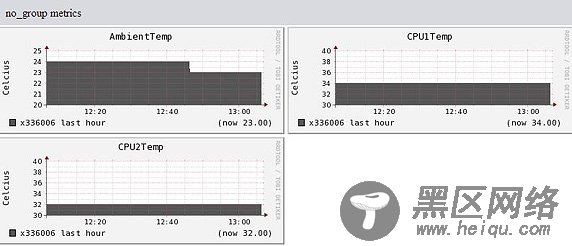
打开 Ganglia 并查看结果。打开 Ganglia Web 浏览器并查看一个节点的图形,您可以看到节点被欺骗并且更新了每个节点条目:
图 6. no_group 度量数据

欺骗的缺点之一是类别归入 no_group 度量组。gmetric 似乎没有办法像带内版本那样进行良好的分组。

