手动轮播图,为轮播图中的一种,轮播图主要有无缝轮播,手动轮播,延迟轮播,切换轮播等等,轮播图主要用于展现图片,新出商品,词条,又能美观网页。給网页中增加动态效果。接下来通过本文给大家分享原生JS实现手动轮播图的实例代码,一起看看吧
手动轮播图,为轮播图中的一种,轮播图主要有无缝轮播,手动轮播,延迟轮播,切换轮播等等。。。
轮播图主要用于展现图片,新出商品,词条,又能美观网页。給网页中增加动态效果。
手动轮播,是小编认为最简单的一种轮播方式,既能左右翻页,还能通过悬浮按钮,快速预览图片,所以今天就给大家写一个原生js手动轮播图。
一,利用JavaScript制作手动轮播图,首先排版。
引入默认样式表(可以手写);
<link href="css/Default style sheet.css" />//本博客有css默认样式表可以下载。
div排版布局:
<body> <div> <div><img src="https://www.jb51.net/img/1.jpg"/></div> <div><</div> <div>></div> <div> <ul> <li>1</li> <li>2</li> <li>3</li> <li>4</li> <li>5</li> </ul> </div> </div> </body>
二,定义div的CSS样式,给div设置宽高,定位。
<style> body{ background: darkturquoise; } #box{ height:320px; width:480px; margin: 3px auto; border: 2px solid red; } #lunbo{ height: 292px; width:453px; border: 1px solid yellow; margin: 0px auto; position: relative; } #left{ height: 60px; width: 60px; font-size: 60px; text-align: center; line-height: 60px; position: absolute; top:150px; left: 440px; color: black; } #right{ height: 60px; width: 60px; font-size: 60px; text-align: center; line-height: 60px; position: absolute; top:150px; left: 880px; color: black; } #radiu{ height: 30px; width: 240px; text-align: center; margin: 0px auto; } #radiu li{ float: left; background: white; height: 30px; width: 30px; line-height: 30px; border-radius:50% ; margin-right:6px; } .active{ background: orange; color: ; } </style> 原生js代码: <script> window.onload=function(){ var ridiu=document.getElementById("radiu") var right=document.getElementById("right"); var left=document.getElementById("left") var img=document.getElementById("img"); var oli=ridiu.getElementsByTagName("li") var arry=['https://www.jb51.net/img/1.jpg','img/2.jpg','img/3.jpg','img/4.jpg','img/5.jpg'] var a=null; right.onclick=function(){ a++ if(a>arry.length-1){ a=0; } img.src=arry[a] } left.onclick=function(){ a-- if(a<0){ a=arry.length-1; } img.src=arry[a] } for (var i=0;i<oli.length;i++) { oli[i].onclick=function(){ a++ if(a==arry.length){ a=0; } img.src=arry[a]; } } } </script>
HTML全部效果代码:
<!DOCTYPE html> <html> <head> <meta charset="utf-8"> <title>手动轮播图</title> <link href="css/Default style sheet.css" /> <style> body{ background: darkturquoise; } #box{ height:320px; width:480px; margin: 3px auto; border: 2px solid red; } #lunbo{ height: 292px; width:453px; border: 1px solid yellow; margin: 0px auto; position: relative; } #left{ height: 60px; width: 60px; font-size: 60px; text-align: center; line-height: 60px; position: absolute; top:150px; left: 440px; color: black; } #right{ height: 60px; width: 60px; font-size: 60px; text-align: center; line-height: 60px; position: absolute; top:150px; left: 880px; color: black; } #radiu{ height: 30px; width: 240px; text-align: center; margin: 0px auto; } #radiu li{ float: left; background: white; height: 30px; width: 30px; line-height: 30px; border-radius:50% ; margin-right:6px; } .active{ background: orange; color: ; } </style> <script> window.onload=function(){ var ridiu=document.getElementById("radiu") var right=document.getElementById("right"); var left=document.getElementById("left") var img=document.getElementById("img"); var oli=ridiu.getElementsByTagName("li") var arry=['https://www.jb51.net/img/1.jpg','img/2.jpg','img/3.jpg','img/4.jpg','img/5.jpg'] var a=null; right.onclick=function(){ a++ if(a>arry.length-1){ a=0; } img.src=arry[a] } left.onclick=function(){ a-- if(a<0){ a=arry.length-1; } img.src=arry[a] } for (var i=0;i<oli.length;i++) { oli[i].onclick=function(){ a++ if(a==arry.length){ a=0; } img.src=arry[a]; } } } </script> </head> <body> <div> <div><img src="https://www.jb51.net/img/1.jpg"/></div> <div><</div> <div>></div> <div> <ul> <li>1</li> <li>2</li> <li>3</li> <li>4</li> <li>5</li> </ul> </div> </div> </body> </html>
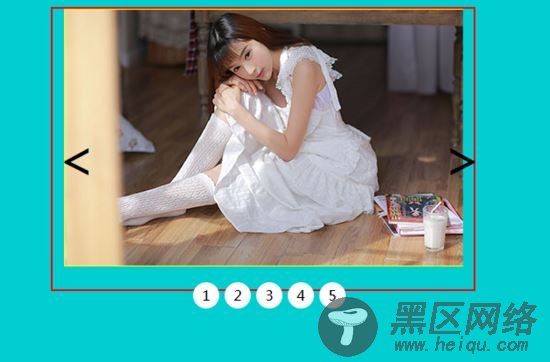
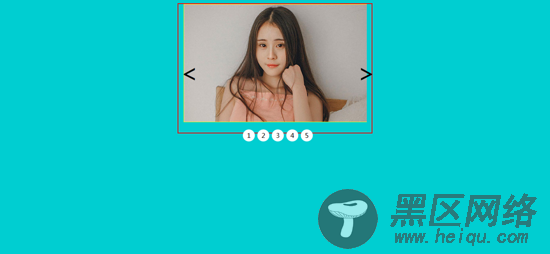
效果图: