// server.js const express = require('express'); const MongoClient = require('mongodb').MongoClient; const bodyParser = require('body-parser'); const app = express(); const port = 8000; require('./app/routes')(app, {}); app.listen(port, () => { console.log('We are live on ' + port); });
请注意,由于还没有设置数据库,因此只需传入一个空对象。
好的,现在你可以制作自己的 CREATE 路由了。
语法很简单:
// note_routes.js module.exports = function(app, db) { app.post('/notes', (req, res) => { // You'll create your note here. res.send('Hello') }); };
当应用程序收到对 '/ notes' 路径的 post 请求时,它将执行回调内的代码 —— request 对象(包含请求的参数或JSON)和 response 对象。
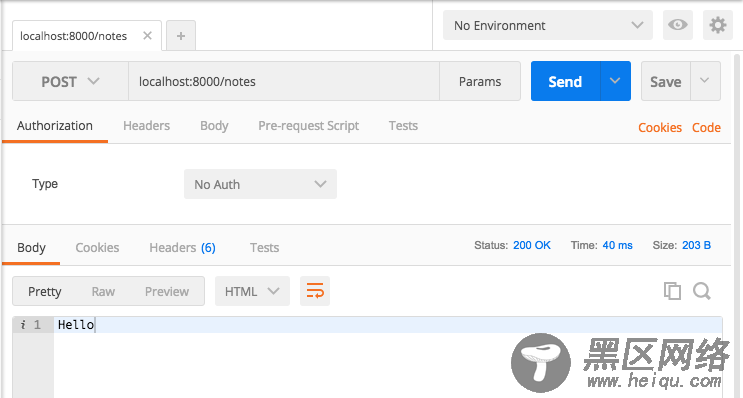
你可以使用 Postman 将 POST 请求发送到 localhost:8000/notes 来测试。

你应该得到回复:'Hello'。
太好了!你创建了第一个真正的路由。
下一步是在你的请求中添加一些参数并在 API 中处理它们,最后添加到你的数据库中。
请求参数
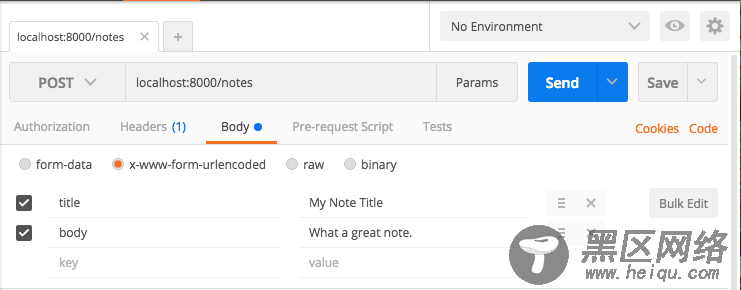
在 Postman 中,在选择 x-www-form-urlencoded 单选按钮后,转到 Body 选项卡并添加一些键值对。
这会将编码后的表单数据添加到你的请求中,你可以使用 API 处理该请求。

你可以去尝试更多的设置项。
现在在你的 note_routes.js 中,让我们输出 body 的内容。
// note_routes.js module.exports = function(app, db) { app.post('/notes', (req, res) => { console.log(req.body) res.send('Hello') }); };
用 Postman 发送请求,你会看到……undefined。
不幸的是,Express 无法自行处理 URL 编码的表单。虽然你确实安装了这个 body-parser 包......
// server. const express = require('express'); const MongoClient = require('mongodb').MongoClient; const bodyParser = require('body-parser'); const app = express(); const port = 8000; app.use(bodyParser.urlencoded({ extended: true })); require('./app/routes')(app, {}); app.listen(port, () => { console.log('We are live on ' + port); });
Now you should see the body as an object in the terminal.
现在你应该将 body 视为终端中的对象。
{ title: 'My Note Title', body: 'What a great note.' }
第一个路由的最后一步:设置数据库,然后添加数据。
最简单方法是通过mLab 设置 Mongo 数据库的:它是最小的而且是免费的,设置的速度非常快。
创建帐户和 MongoDB 部署后,将用户的用户名和密码添加到数据库:

然后复制这里第二个 URL:

在项目根目录的目录配置中,创建一个db.js文件。
mkdir config cd config touch db.js
在里面,添加刚才的URL:
module.exports = { url : YOUR URL HERE };
别忘了把你的用户名和密码(来自数据库用户的密码,而不是你的 mLab 帐户)添加到URL中。 (如果你要将此项目提交到 Github 上,请确保包含 .gitignore 文件 像这样,,不要与任何人分享你的密码。)
现在在你的 server.js 中,可以用 MongoClient 连接到数据库了,使用它来包装你的应用程序设置:
// server.js const express = require('express'); const MongoClient = require('mongodb').MongoClient; const bodyParser = require('body-parser'); const db = require('./config/db'); const app = express(); const port = 8000; app.use(bodyParser.urlencoded({ extended: true })); MongoClient.connect(db.url, (err, database) => { if (err) return console.log(err) require('./app/routes')(app, database); app.listen(port, () => { console.log('We are live on ' + port); }); })
如果你用的是最新版本的 MongoDB(3.0+),请将其修改为:
// server.js const express = require('express'); const MongoClient = require('mongodb').MongoClient; const bodyParser = require('body-parser'); const db = require('./config/db'); const app = express(); const port = 8000; app.use(bodyParser.urlencoded({ extended: true })); MongoClient.connect(db.url, (err, database) => { if (err) return console.log(err) // Make sure you add the database name and not the collection name const database = database.db("note-api") require('./app/routes')(app, database); app.listen(port, () => { console.log('We are live on ' + port); }); })
这是你的基础架构的最后一个设置!
添加到你的数据库
MongoDB将数据存储在 collections 中。在你的项目中,你希望将笔记存储在一个名为 notes 的 collection 中。
由于将数据库作为路径中的 db 参数传入,因此可以像这样访问它:
db.collection('notes')
创建笔记就像在集合上调用 insert 一样简单:
const note = { text: req.body.body, title: req.body.title} db.collection('notes').insert(note, (err, results) => { }
插入完成后(或由于某种原因失败),要么返回错误或反回新创建的笔记对象。这是完整的 note_routes.js 代码:
