rpm安装方法
[root@ Server_rsync ~]# rpm -qa | grep rsync
rsync-3.0.6-4.el5_7.1
RHEL默认有安装rsync, 可以编辑/etc/xinetd.d/rsync 后用service xinetd restart 来启动。
[root@ Server_rsync ~ ~]# vim /etc/xinetd.d/rsync
# default: off
# description: The rsync server is a good addition to an ftp server, as it \
# allows crc checksumming etc.
service rsync
{
disable = no 默认yes 改成 no
socket_type = stream
wait = no
user = root
server = /usr/bin/rsync
server_args = --daemon
log_on_failure += USERID
}
源码安装rsync方法:
去官网下载最新版
[root@Server_rsync ~]#tar -xvzf rsync-3.1.1.tar.gz –C /usr/local
[root@Server_rsync ~]#cd /usr/local/rsync-3.1.1/
[root@Server_rsync ~]#configure;make;make install
源码安装成功,只是服务端启动方法不同,配置文件一样,如下方法启动:
/usr/local/rsync-3.1.1/rsync --daemon
配置文件创建 rsync服务器默认没有 /etc/rsync.conf
[root@Server_rsync ~]# vim /etc/rsyncd.conf
motd file = /etc/rsyncd.motd 欢迎信息,可以不写
pid file = /var/run/rsyncd.pid
lock file = /var/run/rsync.lock
log file = /var/log/rsyncd.log
port = 873 port可以不加,默认为873端口,可以改为其它端口
uid = root 可以为nobody
gid = root
hosts allow = 192.168.0.0./16,172.17.0.0/16
hosts deny = *
max connections = 10
## 上面这段是全局配置,下面的模块可以有多个
[files] 模块名字,自己命名
path = /backup/ftptap2delcom/
comment = rsync ftp 这个是描述要共享的东东
ignore errors
read only = yes
list = no
auth users = rsync_test 同步验证时用什么账号这个用户和/etc/password没有关系。
secrets file = /etc/rsyncd_pwd 指定认证文件然后创建认证文件
配置文件结束,下面是修改密码文件。
[root@ Server_rsync ~]# vim /etc/rsyncd_pwd
rsync_test:2014?
/etc/rsyncd_pwd 格式为用户名:密码。注意这个不是系统用户,只是rsync_test用户。
[root@ Server_rsync ~]# chmod 600 /etc/rsync.passwd 只能所有者可读,否则报错
[root@ Server_rsync ~]# service xinetd start
Starting xinetd: [ OK ]
检查rsync进程
[root@ Server_rsync ~]# netstat -anp | grep 873
tcp 0 0 0.0.0.0:873 0.0.0.0:* LISTEN 3169/xinetd
在对rsync服务器配置结束以后,下一步就需要在客户端发出rsync命令来实现将服务器端的文件备份到客户端来。
在Linux客户端测试:
客户端只需要建立密码文件,文件名可以自己命名,我这建立一个文件为pwd
[root@Client_rsync ~]#touch /etc/pwd ;vim /etc/pwd
[root@Client_rsync ~]# 2014? 客户端只须要密码,不须要用户名:密码
[root@Client_rsync ~]#chmod 600 /etc/pwd 只能所有者可读,否则会报错
[root@Client_rsync ~]# rsync –auz --delete –password-file=/etc/pwd rsync_test@172.17.5.13::files /backup_client/ftptap2delcom
receiving file list ... rsync: readlink "/install.log" (in jason) failed: Permission denied (13)
rsync: readlink "/install.log.syslog" (in jason) failed: Permission denied (13)
rsync: readlink "/anaconda-ks.cfg" (in jason) failed: Permission denied (13)
。。。。。。
检查客户端 /backup_client/ftptap2delcom 文件是否和服务器端 /backup/ftptap2delcom同步。同步则OK
定时计划
可以吧rsync –auz --delete –password-file=/etc/pwd rsync_test@172.17.5.13::files /backup_client/ftptap2delcom 这句写到cron中去,做定时同步。
Windows客户端
去官网下载Windows 版 cwrsync
下载地址为:
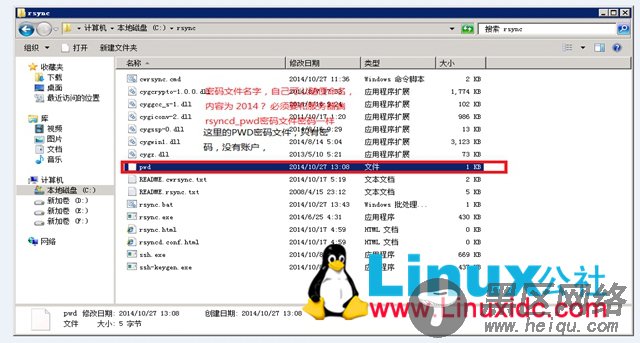
下载后解压到C盘改名为rsync,在相应目录建立密码文件PWD:


