1 5 * * * /usr/sbin/ntpdate time.nist.gov >> /var/log/upClock.log
附5. 查看nginx的并发连接数
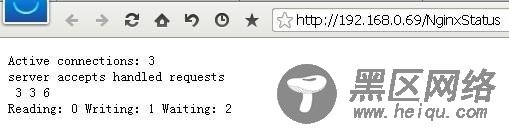
在浏览器中打开<ipaddrss>/NginxStatus
以上解析:
Active connections:当前 Nginx 正处理的活动连接数。
server accepts handled requests :总共处理了15个连接 , 成功创建 15 次握手,总共处理了76个请求。
Reading:nginx 读取到客户端的 Header 信息数。
Writing:nginx 返回给客户端的 Header 信息数。
Waiting :开启 keep-alive 的情况下, Nginx 已经处理完正在等候下一个请求指令的停留连接。
附6. 开启nginx缓存功能(2012年5月30日新增)
proxy.conf文件前面已经配置过了,这里无需再配置,直接配置cn100.conf文件即可。
vi /usr/local/nginx/conf/vhost/cn100.conf
server { listen 80; server_name localhost; #charset GB2312; location / { proxy_pass ; proxy_redirect off; proxy_set_header Host $host; proxy_set_header X-Real-IP $remote_addr; proxy_set_header X-Forwarded-For $proxy_add_x_forwarded_for; proxy_cache cache_one; proxy_cache_valid 200 302 304 1h; #200、302、304错误状态码保存1小时 proxy_cache_valid 301 1d; #301错误状态码保存1天 proxy_cache_valid any 1m; #其余的保存1分钟 #以域名、URI、参数组合成Web缓存的Key值,存储缓存内容到二级缓存目录内 proxy_cache_key $host$uri$is_args$args; expires 30d; #设置失效时间为30天 } # 设置手动清除URL缓存 location ~ /purge(/.*) { # 设置只允许指定的IP或IP段才可以清除URL缓存 allow 127.0.0.1; allow 192.168.0.0/16; deny all; proxy_cache_purge cache_one $host$1$is_args$args; } location /NginxStatus { stub_status on; access_log off; auth_basic "NginxStatus"; allow 192.168.0.0/16; deny all; } access_log off; error_page 404 /404.html; error_page 500 502 503 504 /404.html; location = /404.html { root html; } limit_conn ctohome_zone 50; #同一ip并发数为50,超过会返回503 }
以上配置文件红色部分为新增内容。
清除URL缓存方法:
假设你的URL为:,浏览器输入:,就可以清除该URL的缓存。
五、安装配置keepalived
1.安装keepalived(HA):
$ tar zxvf keepalived-1.2.2.tar.gz
$ cd keepalived-1.2.2
$ ./configure
Keepalived configuration
------------------------
Keepalived version : 1.2.2
Compiler : gcc
Compiler flags : -g -O2 -DETHERTYPE_IPV6=0x86dd
Extra Lib : -lpopt -lssl -lcrypto
Use IPVS Framework : No
IPVS sync daemon support : No
Use VRRP Framework : Yes
Use Debug flags : No
注:若IPVS处为No,不用担心,是没有装ipvsadm的原因,我们是用nginx做负载,所以这里只需要用到VRRP。
make
make install
2.将keepalived 以服务方式启动
cp /usr/local/etc/rc.d/init.d/keepalived /etc/rc.d/init.d/
cp /usr/local/etc/sysconfig/keepalived /etc/sysconfig
mkdir /etc/keepalived
cp /usr/local/etc/keepalived/keepalived.conf /etc/keepalived/
cp /usr/local/sbin/keepalived /usr/sbin
chkconfig keepalived on
3.修改keepalived配置文件
vi /etc/keepalived/keepalived.conf
! Configuration File for keepalived global_defs { notification_email { servererror@cn100.com } notification_email_from Alexandre.Cassen@firewall.loc smtp_server mail.cn100.com # smtp_connect_timeout 30 router_id LVS_DEVEL } vrrp_script chk_http_port { script "/etc/keepalived/nginx_pid.sh" # 检查nginx状态的脚本 interval 2 weight 3 } vrrp_instance VI_1 { state MASTER interface eth0 virtual_router_id 51 priority 100 advert_int 1 authentication { auth_type PASS auth_pass 1111 } virtual_ipaddress { 192.168.0.56 # 192.168.200.17 # 192.168.200.18 } track_script { chk_http_port } }
4.添加检查nginx状态的脚本,当nginx停止时,会自动将nginx启动
vi /etc/keepalived/nginx_pid.sh
#!/bin/bash #version 0.0.1 # A=`ps -C nginx --no-header |wc -l` if [ $A -eq 0 ];then # /usr/sbin/nginx service nginx start sleep 3 if [ `ps -C nginx --no-header |wc -l` -eq 0 ];then # killall keepalived service keepalived stop fi fi
chmod +x /etc/keepalived/nginx_pid.sh
server keepalived start
5.添加防火墙协议
VRRP(Virtual Router Redundancy Protocol,虚拟路由器冗余协议)
在iptables配置当中增加:
-I INPUT -s 192.168.0.47 -d 224.0.0.18 -j ACCEPT # 如果是backup服务器,这里改成master服务器的IP