Nginx是一款免费,开源,轻量级高性能的网站服务器(http server)和反向代理(reverse proxy)服务器程序,能够反向代理http协议和mail协议。
Nginx原作者于2002年开发nginx,正式第一版于2004年发布,至今nginx已经在web server占据了很大的市场份额如图(可以在 查看到):

从这张图可以看出Nginx已经在Web Server中排名第三了,并且自从nginx出来以后市场份额一直有增无减,这是最新发布的统计数据2014年12月18日发布的。
Nginx与Apache的异同:它们都为http服务软件,都采用模块化设计结构并且都支持动态语言(php、python、perl)等,同时都支持正反向代理、虚拟主机、URL重写、压缩资源、SSL加密等功能,最大差别是apache的处理速度慢并且占用很多系统内存资源,
2.Nginx的安装与配置(编译安装)
首先下载Nginx源码包到本地并且解压
wget && tar xf nginx-1.6.2.tar.gz
使用./configure --help查看帮助
./configure --help 或者安装一个第三方软件包(bash-completion)手动编译时可以快速查看支持的参数

可以从图中看出来nginx1.6.2可使用的参数有100种,介绍下将nginx作为http服务器的常用参数吧
--conf-path 设置nginx的配置文件所在的路径需要指明配置文件的文件名(默认为安装目录下的conf/nginx.conf)
--error-log-path 设置nginx的错误日志文件所在的路径需要指明日志文件的文件名(默认为安装目录下的logs/error.log)
--group 设置nginx运行时以什么组来运行worker进程(默认为nobody组)
--user 设置nginx运行时以什么用户来运行worker进程(默认为nobody用户)
--prefix 指明nginx的安装所在路径
--sbin-path 指明nginx的sbin目录所在的目录(默认为安装目录下sbin/nginx)
--pid-path 指明nginx的pid文件所在的路径需要指明pid文件名(默认为安装目录下的logs/nginx.pid)
--lock-path 指明nginx的lock文件所在的路径
--http-log-path 指明nginx的访问文件所在路径(默认为安装目录下的log/access.log)
--with-http_gzip_static_module 启用gzip压缩模块
--with-http_ssl_mdule 启用ssl模块
./configure --prefix=/usr/local/nginx \
--conf-path=/usr/local/nginx/conf/nginx.conf \
--http-log-path=/usr/local/nginx/logs/access.log \
--user=nginx \
--group=nginx \
--error-log-path=/usr/local/nginx/logs/error.log \
--pid-path=/usr/local/nginx/var/nginx.pid \
--lock-path=/usr/local/nginx/var/nginx.lock \
--with-http_gzip_static_module \
--with-http_ssl_module

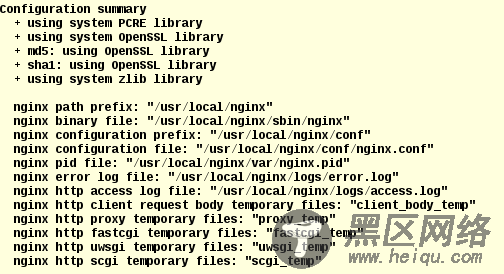
确定没有任何错误后使用make && make install 安装
3.添加服务启动脚本
将如下脚本添加至/etc/rc.d/init.d/nginx目录下,然后使用chmod u+x /etc/rc.d/init.d/nginx 将nginx添加至系统服务chkconfig --add nginx如果需要开机启动则可以输入chkconfig nginx on即可
#!/bin/sh
#
# nginx - this script starts and stops the nginx daemon
#
# chkconfig: - 85 15
# description: Nginx is an HTTP(S) server, HTTP(S) reverse \
# proxy and IMAP/POP3 proxy server
# processname: nginx
# config: /etc/nginx/nginx.conf
# config: /etc/sysconfig/nginx
# pidfile: /var/run/nginx.pid
# Source function library.
. /etc/rc.d/init.d/functions
# Source networking configuration.
. /etc/sysconfig/network
# Check that networking is up.
[ "$NETWORKING" = "no" ] && exit 0
nginx="/usr/local/nginx/sbin/nginx"
prog=$(basename $nginx)
NGINX_CONF_FILE="/usr/local/nginx/conf/nginx.conf"
lockfile=/usr/local/nginx/var/nginx.lock
make_dirs() {
# make required directories
user=`nginx -V 2>&1 | grep "configure arguments:" | sed 's/[^*]*--user=\([^ ]*\).*/\1/g' -`
options=`$nginx -V 2>&1 | grep 'configure arguments:'`
for opt in $options; do
if [ `echo $opt | grep '.*-temp-path'` ]; then
value=`echo $opt | cut -d "=" -f 2`
if [ ! -d "$value" ]; then
# echo "creating" $value
mkdir -p $value && chown -R $user $value
fi
fi
done
}
start() {
[ -x $nginx ] || exit 5
[ -f $NGINX_CONF_FILE ] || exit 6
make_dirs
echo -n $"Starting $prog: "
daemon $nginx -c $NGINX_CONF_FILE
retval=$?
echo
[ $retval -eq 0 ] && touch $lockfile
return $retval
}
stop() {
echo -n $"Stopping $prog: "
killproc $prog -QUIT
retval=$?
echo
[ $retval -eq 0 ] && rm -f $lockfile
return $retval
}
restart() {
configtest || return $?
stop
sleep 1
start
}
reload() {
configtest || return $?
echo -n $"Reloading $prog: "
killproc $nginx -HUP
RETVAL=$?
echo
}
force_reload() {
restart
}
configtest() {
$nginx -t -c $NGINX_CONF_FILE
}
rh_status() {
status $prog
}
rh_status_q() {
rh_status >/dev/null 2>&1
}
case "$1" in
start)
rh_status_q && exit 0
$1
;;
stop)
rh_status_q || exit 0
$1
;;
restart|configtest)
$1
;;
reload)
rh_status_q || exit 7
$1
;;
force-reload)
force_reload
;;
status)
rh_status
;;
condrestart|try-restart)
rh_status_q || exit 0
;;
*)
echo $"Usage: $0 {start|stop|status|restart|condrestart|try-restart|reload|force-reload|configtest}"
exit 2
esac
--------------------------------------分割线 --------------------------------------
CentOS 6.2实战部署Nginx+MySQL+PHP
搭建基于Linux6.3+Nginx1.2+PHP5+MySQL5.5的Web服务器全过程
CentOS 6.3下配置Nginx加载ngx_pagespeed模块
CentOS 6.4安装配置Nginx+Pcre+php-fpm
--------------------------------------分割线 --------------------------------------

