import router from '@/router' import store from '@/store' import { getToken } from './auth' import NProgress from 'nprogress' // 进度条 import 'nprogress/nprogress.css' // 进度条样式 import { Message } from 'element-ui' const whiteList = ['/login'] // 不重定向白名单 router.beforeEach((to, from, next) => { NProgress.start() if (getToken()) { if (to.path === '/login') { next({ path: 'https://www.jb51.net/' }) NProgress.done() } else { // 实时拉取用户的信息 store.dispatch('GetUserInfo').then(res => { next() }).catch(err => { store.dispatch('FedLogOut').then(() => { Message.error('拉取用户信息失败,请重新登录!' + err) next({ path: 'https://www.jb51.net/' }) }) }) } } else { if (whiteList.includes(to.path)) { next() } else { next('/login') NProgress.done() } } }) router.afterEach(() => { NProgress.done() // 结束Progress })
Nginx try_files 以及 404
nginx 配置如下:
location / { root /www/vue-project-demo/; try_files $uri $uri/ /index.html index.htm; }
try_files : 可以理解为nginx 不处理你的这些url地址请求; 那么服务器如果不处理了,前端要自己做一些404 操作,比如下面这样:
// router.js import Vue from 'vue' import Router from 'vue-router' import Home from './views/Home.vue' Vue.use(Router) export default new Router({ mode: 'history', base: process.env.BASE_URL, routes: [ { path: '/404', component: () => import('@/views/404') }, { path: 'https://www.jb51.net/', name: 'home', component: Home }, { path: '/about', name: 'about', // route level code-splitting // this generates a separate chunk (about.[hash].js) for this route // which is lazy-loaded when the route is visited. component: () => import(/* webpackChunkName: "about" */ './views/About.vue') }, { path: '*', redirect: '/404' } ] })
然后写一个404 的view 就ok 。
常用的utils
到现在为止, utils/ 目录下应该有 auth.js 、permission.js、request.js ;
那么对与一些常用的方法,你可以放到 utils/common.js 里,统一 install 到 vue 实例上,并通过 Vue.use() 使用;
对于一些全局的过滤器,你仍可以放到 utils/filters.js 里,使用 Vue.fileter() 注册到全局;
对于一些全局方法,又不是很长用到的,可以放到 utils/index.js ,哪里使用哪里 import
mixin减少项目冗余代码
直接看代码吧,要写奔溃了....
使用cdn减少文件打包的体积
到此时,看我项目里都用了什么:
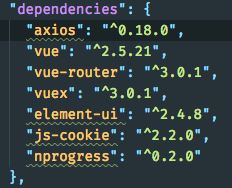
主要就是这些,那么执行一下打包命令呢?

可能这时候你还觉得没什么, 单文件最多的还没超过 800kb 呢...
我把项目通过 jenkins 部署到服务器上,看一下访问:
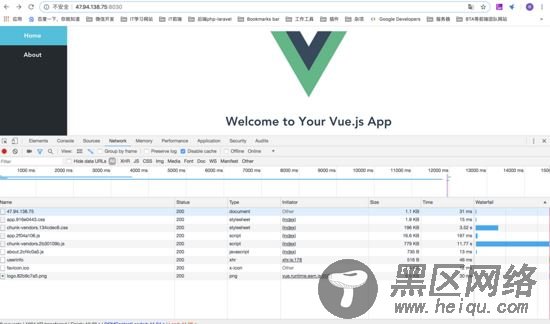
可以看到, chunk-vendors 加载了将近12秒,这还是只有框架没有内容的前提下,当然你可能说你项目中用不到 vuex 、用不到 js-cookie ,但是随着项目的迭代维护,最后肯定不比现在小。
那么,有些文件在生产环境是不是可以尝试使用 cdn 呢?
为了方便对比,这里保持原代码不动( master 分支),再切出来一个分支改动优化( optimize 分支), 上代码:
// vue.config.js 修改 const path = require('path') function resolve(dir) { return path.join(__dirname, './', dir) } // cdn预加载使用 const externals = { 'vue': 'Vue', 'vue-router': 'VueRouter', 'vuex': 'Vuex', 'axios': 'axios', 'element-ui': 'ELEMENT', 'js-cookie': 'Cookies', 'nprogress': 'NProgress' } const cdn = { // 开发环境 dev: { css: [ 'https://unpkg.com/element-ui/lib/theme-chalk/index.css', 'https://cdn.bootcss.com/nprogress/0.2.0/nprogress.min.css' ], js: [] }, // 生产环境 build: { css: [ 'https://unpkg.com/element-ui/lib/theme-chalk/index.css', 'https://cdn.bootcss.com/nprogress/0.2.0/nprogress.min.css' ], js: [ 'https://cdn.jsdelivr.net/npm/vue@2.5.17/dist/vue.min.js', 'https://cdn.jsdelivr.net/npm/vue-router@3.0.1/dist/vue-router.min.js', 'https://cdn.jsdelivr.net/npm/vuex@3.0.1/dist/vuex.min.js', 'https://cdn.jsdelivr.net/npm/axios@0.18.0/dist/axios.min.js', 'https://unpkg.com/element-ui/lib/index.js', 'https://cdn.bootcss.com/js-cookie/2.2.0/js.cookie.min.js', 'https://cdn.bootcss.com/nprogress/0.2.0/nprogress.min.js' ] } } module.exports = { chainWebpack: config => { // 这里是对环境的配置,不同环境对应不同的BASE_API,以便axios的请求地址不同 config.plugin('define').tap(args => { const argv = process.argv const mode = argv[argv.indexOf('--project-mode') + 1] args[0]['process.env'].MODE = `"${mode}"` args[0]['process.env'].BASE_API = '"http://47.94.138.75:8000"' return args }) /** * 添加CDN参数到htmlWebpackPlugin配置中, 详见public/index.html 修改 */ config.plugin('html').tap(args => { if (process.env.NODE_ENV === 'production') { args[0].cdn = cdn.build } if (process.env.NODE_ENV === 'development') { args[0].cdn = cdn.dev } return args }) // svg loader const svgRule = config.module.rule('svg') // 找到svg-loader svgRule.uses.clear() // 清除已有的loader, 如果不这样做会添加在此loader之后 svgRule.exclude.add(/node_modules/) // 正则匹配排除node_modules目录 svgRule // 添加svg新的loader处理 .test(/\.svg$/) .use('svg-sprite-loader') .loader('svg-sprite-loader') .options({ symbolId: 'icon-[name]' }) // 修改images loader 添加svg处理 const imagesRule = config.module.rule('images') imagesRule.exclude.add(resolve('src/icons')) config.module .rule('images') .test(/\.(png|jpe?g|gif|svg)(\?.*)?$/) }, // 修改webpack config, 使其不打包externals下的资源 configureWebpack: config => { const myConfig = {} if (process.env.NODE_ENV === 'production') { // 1. 生产环境npm包转CDN myConfig.externals = externals } if (process.env.NODE_ENV === 'development') { /** * 关闭host check,方便使用ngrok之类的内网转发工具 */ myConfig.devServer = { disableHostCheck: true } } // open: true, // hot: true // // https: true, // // proxy: { // // '/proxy': { // // target: 'http://47.94.138.75', // // // changeOrigin: true, // // pathRewrite: { // // '^/proxy': '' // // } // // } // // }, // } return myConfig } }
最后去除 main.js 中引入的 import 'element-ui/lib/theme-chalk/index.css'
OK ,现在执行一下 build :
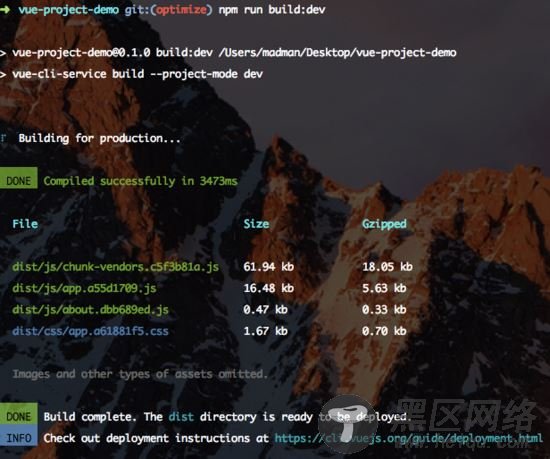
可以看到,相对于 793.20KB , 61.94k 小了将近 13 倍!!!
把这个分支部署到服务器,话不多说,对比一下就好:

使用Gzip 加速