今天让我们来探索一下ckeditor的扩展功能,换句话说就是自定义按钮,以及点击按钮之后实现的功能。
要实现自定义按钮,我们要做几个事情:
1、准备一个图标,最好是16*16大小的png格式图片,你没有的话,姜哥帮你准备了一张。
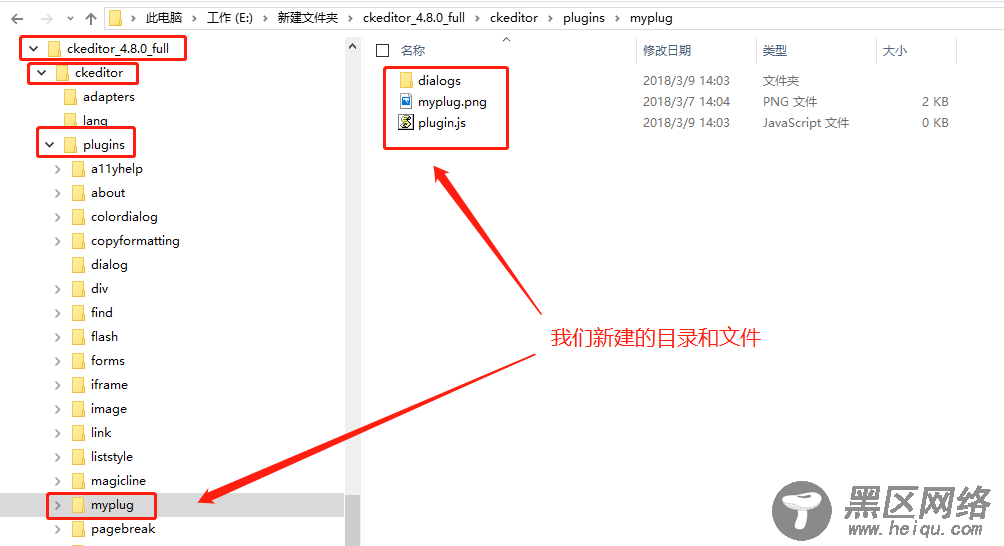
2、在plugins目录下建立我们和自定义插件同名的目录,并且在里面建立一个叫plugin.js的文件。
3、在我们自己的插件目录中,建立一个dialogs目录,并且在里面新建一个与我们插件同名的js文件,实现插件的功能。
动手!
1、建立相应的文件夹和文件,姜哥在ckeditor/plugins/下新建了一个myplug目录,将来我的插件就叫myplug
2、编辑plugin.js文件,填入以下内容,特别要注意里面的名字前后保持一致,后期运行有问题,多半是名字写错了:
(function(){ //Section 1 : 按下自定义按钮时执行的代码 var a= { exec:function(editor){ alert("This a custome button!"); } }, //Section 2 : 创建自定义按钮、绑定方法 b='myplug'; //注意myplug名字 CKEDITOR.plugins.add(b,{ init:function(editor){ CKEDITOR.dialog.add('myplugDialog', this.path + 'dialogs/myplug.js'); //注意myplug名字 editor.addCommand('myplug', new CKEDITOR.dialogCommand('myplugDialog')); //注意myplug名字 //注意myplug名字 和 图片路径 editor.ui.addButton('myplug',{ label:'打开我的插件', icon: this.path + 'myplug.png', command:b }); } }); })();
3、配置config.js中的toolbar,将自定义插件显示出来:
CKEDITOR.editorConfig = function( config ) { config.extraPlugins="myplug"; //增加了我们的自定义插件 config.toolbar = 'Full'; config.toolbar_Full = [ { name: 'custome_plugin', items : [ 'myplug'] }, //将自定义插件加入toolbar { name: 'insert', items : [ 'upload','album','-','Table' ] }, { name: 'clipboard', items : [ 'Cut','Copy','Paste','PasteText','PasteFromWord','-','Undo','Redo' ] }, { name: 'basicstyles', items : [ 'Bold','Italic','Underline','Strike','Subscript','Superscript' ] }, { name: 'paragraph', items : [ 'NumberedList','BulletedList','-','-','Blockquote', '-','JustifyLeft','JustifyCenter','JustifyRight','JustifyBlock' ] }, { name: 'colors', items : [ 'TextColor','BGColor' ] }, { name: 'document', items : [ 'Source' ] }, ]; };
在这里我们只加了两行,一行是config.extraPlugins="myplug";这个向ckeditor注册了我们的自定义插件,告诉ckeditor还有我们的这个myplug这么个东西;另一行是{ name: 'custome_plugin', items : [ 'myplug'] },用来配置toolbar,让ckeditor将我们的按钮显示出来,注意后面的逗号,不要漏了噢。
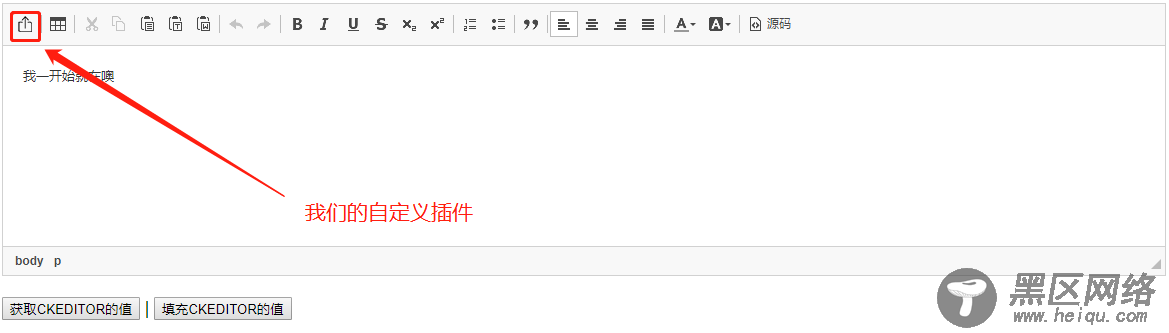
保存之后,看一下运行效果,图标出来了,可是点击以后一闪而过,那是因为我们还没有开发对应的dialog代码:
注意:如果大家这一步失败了,可以尝试从两个方面排查:
①、前面我一再强调的,名字有没有弄错;
②、也许是文件编码的问题,尝试把所有的中文都删掉,换成英文试试。
4、开发dialogs/myplug.js,实现业务功能
在myplug/dialogs/新建一个叫myplug.js的文件,这个其实和前面一步中,plugin.js文件中的这一行是对应的:
CKEDITOR.dialog.add('myplugDialog', this.path + 'dialogs/myplug.js'); //注意myplug名字
在那个文件中,其实指定了我们dialog文件的目录和文件名,理论上是可以随意的,但是为了容易管理,墙裂建议大家搞成一样的,不要给自己制造麻烦~来看一下,我们要在myplug.js里写什么:
(function () { function myplugDialog(editor) { return { title: 'Who does you want to say hello?', //窗口标题 minWidth: 300, minHeight: 80, buttons: [{ type: 'button', id: 'someButtonID', label: 'Button', onClick: function () { alert('This is a custome button'); } //对话框底部的自定义按钮 }, CKEDITOR.dialog.okButton, //对话框底部的确定按钮 CKEDITOR.dialog.cancelButton], //对话框底部的取消按钮 contents: //每一个contents在对话框中都是一个tab页 [ { id: 'user', //contents的id label: 'You name', title: 'You name', elements: //定义contents中的内容,我们这里放一个文本框,id是name [ { id: 'name', type: 'text', style: 'width: 50%;', label: 'You name', } ] } ], onLoad: function () { //alert('onLoad'); }, onShow: function () { //alert('onShow'); }, onHide: function () { //alert('onHide'); }, onOk: function () { //点击 确定 按钮之后触发的事件 var name = this.getValueOf( 'user', 'name' ); //从界面上取值的方法,getValueOf( 'contents的id', '控件的id' ) editor.insertHtml('<p>' + name + ' : Hello world!' + '</p>'); //将内容放入到editor this.commitContent(); }, onCancel: function () { //alert('onCancel'); }, resizable: CKEDITOR.DIALOG_RESIZE_HEIGHT }; } CKEDITOR.dialog.add('myplugDialog', function (editor) { return myplugDialog(editor); }); })();