{ "$schema": "http://json.schemastore.org/template", "author": "hippiezhou <hippiezhou@outlook.com>", "classifications": ["wpf", "mvvmlight", "Dependency Injection"], "name": "wpf mvvmlight: use dotnetcore to create wpf with mvvmlight.", "tags": { "language": "C#", "type": "project" }, "identity": "wpf.mvvmlight", "shortName": "wpf-mvvmlight", "sourceName": "wpf.mvvmlight", "preferNameDirectory": true }
最后,打开我们的终端,将目录切换至当前项目目录下(就是 .template.config 所在的目录),然后执行下述安装操作
dotnet new -i C:\Users\hippieZhou\Desktop\helloworld\wpfapp
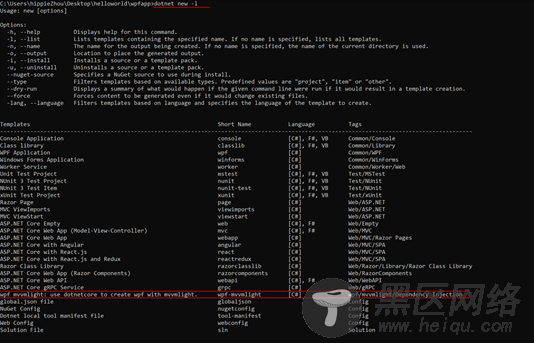
此时,我们的项目模板会被打包到 DotNetCore 的 CLI 中,如下图所示:

同时,在 C:\Users\hippieZhou.templateengine\dotnetcli\v3.0.100-preview3-010431 目录下的以 templatecache.json 结尾的 JSON 文件内容也会发生修改,会在 TemplateInfo 结点下新增一个如下的节点内容:
{ "ConfigMountPointId": "f3861181-7a43-4fc5-ab1c-12d95e734c0a", "Author": "hippiezhou <hippiezhou@outlook.com>", "Classifications": [ "wpf", "mvvmlight", "Dependency Injection" ], "DefaultName": null, "Description": "", "Identity": "wpf.mvvmlight", "GeneratorId": "0c434df7-e2cb-4dee-b216-d7c58c8eb4b3", "GroupIdentity": "", "Precedence": 0, "Name": "wpf mvvmlight: use dotnetcore to create wpf with mvvmlight.", "ShortNameList": [ "wpf-mvvmlight" ], "Tags": { "language": { "Description": null, "ChoicesAndDescriptions": { "C#": "" }, "DefaultValue": "C#" }, "type": { "Description": null, "ChoicesAndDescriptions": { "project": "" }, "DefaultValue": "project" } }, "CacheParameters": { "name": { "DataType": "string", "DefaultValue": null, "Description": "The default name symbol" } }, "ConfigPlace": "/.template.config/template.json", "LocaleConfigMountPointId": "00000000-0000-0000-0000-000000000000", "LocaleConfigPlace": null, "HostConfigMountPointId": "00000000-0000-0000-0000-000000000000", "HostConfigPlace": null, "ThirdPartyNotices": null, "BaselineInfo": {}, "HasScriptRunningPostActions": false, "ConfigTimestampUtc": null },
注:如果后期我们不慎将我们的模板删除了,我们通过删除掉这两个文件里面对应的模板节点就可以在 CLI 中取消应用了。
我们可以使用下述操作进行测试一下:
# 使用我们自定义的项目模板,创建 wpf 项目 dotnet new wpf-mvvmlight -n test cd test dotnet restore dotnet run
如果不出意外的话,我们就可以看到这个项目的代码段和我们自定义的模板代码段是一样的。
如果卸载我们的项目模板可以使用如下命令:
dotnet new -u C:\Users\hippieZhou\Desktop\helloworld\wpfapp
注:我们需要确保我们的自定义模板不能丢失,要不然到时候就卸载就麻烦了(至少目前看来是这样的)。
关于如何将我们的自定义模板可以上传到 NuGet 供别人下载使用,这里就不做介绍了,具体操作可参考园里介绍如何在 DotNetCore MVC 中打造自己的项目模板方法是一样的。我在本文中的创建的代码模板也不会提交上去,还是等着 MVVMLight 的原作者 Laurent Bugnion 来操刀会好一些。
总结
本文介绍了如何通过 DotNet CLI 来创建自定义的 WPF 项目模板。在实际的使用过程中,CLI 的功能和支持的参数会更多,所以感兴趣的朋友可以自行研究。
how-to-create-a-dot-net-new-project-template-in-dot-net-core
