bundles.Add(new ScriptBundle("~/bundles/EasyUi").Include( "~/Scripts/EasyUi/easyloader.js")); bundles.Add(new StyleBundle("~/EasyUi/icon").Include("~/Scripts/EasyUi/themes/icon.css"));
两项,使该文档看起来如下:
using System.Web; using System.Web.Optimization; namespace Ninesky { public class BundleConfig { // 有关 Bundling 的详细信息,请访问 ?LinkId=254725 public static void RegisterBundles(BundleCollection bundles) { bundles.Add(new ScriptBundle("~/bundles/jquery").Include( "~/Scripts/jquery-{version}.js")); bundles.Add(new ScriptBundle("~/bundles/EasyUi").Include( "~/Scripts/EasyUi/easyloader.js")); bundles.Add(new ScriptBundle("~/bundles/jqueryval").Include( "~/Scripts/jquery.unobtrusive*", "~/Scripts/jquery.validate*")); // 使用 Modernizr 的开发版本进行开发和了解信息。然后,当你做好 // 生产准备时,请使用 上的生成工具来仅选择所需的测试。 bundles.Add(new ScriptBundle("~/bundles/modernizr").Include( "~/Scripts/modernizr-*")); bundles.Add(new StyleBundle("~/Skins/css").Include("~/Skins/Default/Style.css")); bundles.Add(new StyleBundle("~/Skins/usercss").Include("~/Skins/Default/User.css")); bundles.Add(new StyleBundle("~/Skins/ManageCss").Include("~/Skins/Default/Manage/Style.css")); bundles.Add(new StyleBundle("~/EasyUi/icon").Include("~/Scripts/EasyUi/themes/icon.css")); } } }
这里会用到easyui的combotree。
查阅了官方文档,数据格式为
Tree Data Format
Every node can contains following properties:
•id: node id, which is important to load remote data
•text: node text to show
•state: node state, 'open' or 'closed', default is 'open'. When set to 'closed', the node have children nodes and will load them from remote site
•checked: Indicate whether the node is checked selected.
•attributes: custom attributes can be added to a node
•children: an array nodes defines some children nodes
那么在Models文件夹里新家Ui文件夹,该文件夹用来控件数据相关的模型,添加Tree类
using System; using System.Collections.Generic; using System.Linq; using System.Web; namespace Ninesky.Models.Ui { /// <summary> /// 树形控件数据 /// </summary> public class Tree { /// <summary> /// Id /// </summary> public int id { get; set; } /// <summary> /// 文本 /// </summary> public string text { get; set; } /// <summary> /// 节点状态:'open'或'closed',默认'open'。 /// </summary> public string state { get; set; } /// <summary> /// 图标 /// </summary> public string iconCls { get; set; } /// <summary> /// 子节点 /// </summary> public List<Tree> children { get; set; } } }
打开~/Scripts/EasyUi/themes/icon.css文件
在底部添加代码
.icon-general { background: url('icons/ns_general.png') no-repeat !important; }
切记一定记得加!important来调整css的优先级。easyui会将icon-general这个类添加在列表项的最后,如果不加这句'icons/ns_general.png'图标将不会显示。
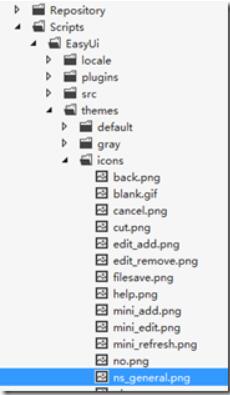
选择一个16*16的图表命名为ns_general.png,并复制到一下文件夹

这里要用递归的方式调取一般栏目的树形结构:打开CategoryRepository.cs。在底部添加两个函数
/// <summary> /// 栏目列表 /// </summary> /// <param>模型名称</param> /// <returns></returns> public IQueryable<Category> List(string model) { return dbContext.Categorys.Where(c => c.Model == model).OrderBy(c => c.Order); } /// <summary> /// 普通栏目树形类表 /// </summary> /// <returns></returns> public List<Tree> TreeGeneral() { var _root = Children(0, 0).Select(c => new Tree { id = c.CategoryId, text = c.Name, iconCls = "icon-general" }).ToList(); if (_root != null) { for (int i = 0; i < _root.Count(); i++) { _root[i] = RecursionTreeGeneral(_root[i]); } } return _root; } /// <summary> /// 普通栏目树形类表递归函数 /// </summary> /// <param></param> /// <returns></returns> private Tree RecursionTreeGeneral(Tree tree) { var _children = Children(tree.id, 0).Select(c => new Tree { id = c.CategoryId, text = c.Name, iconCls="icon-general" }).ToList(); if (_children != null) { for (int i = 0; i < _children.Count(); i++) { _children[i] = RecursionTreeGeneral(_children[i]); } tree.children = _children; } return tree; }
打开CategoryController,添加一个 [JsonTreeParent()] 返回可以做父栏目的栏目树列表。
