修改完的效果如下:
# DataSource spring.datasource.url = jdbc:mysql://localhost:3306/ApolloConfigDB?characterEncoding=utf8 spring.datasource.username = root spring.datasource.password = 1234 配置 apollo-portal 的数据库连接信息先将 apollo-portal-x.x.x-github.zip 上传至 192.168.10.101。
解压apollo-portal-x.x.x-github.zip
打开config目录下的application-github.properties文件
填写正确的 ApolloPortalDB 数据库连接串信息,注意用户名和密码后面不要有空格!
修改完的效果如下:
# DataSource spring.datasource.url = jdbc:mysql://localhost:3306/ApolloPortalDB?characterEncoding=utf8 spring.datasource.username = root spring.datasource.password = 1234 配置 apollo-portal 的 meta service 信息Apollo Portal 需要在不同的环境访问不同的 meta service(apollo-configservice) 地址,所以我们需要在配置中提供这些信息。默认情况下,meta service 和 config service 是部署在同一个JVM进程,所以 meta service 的地址就是 config service 的地址。
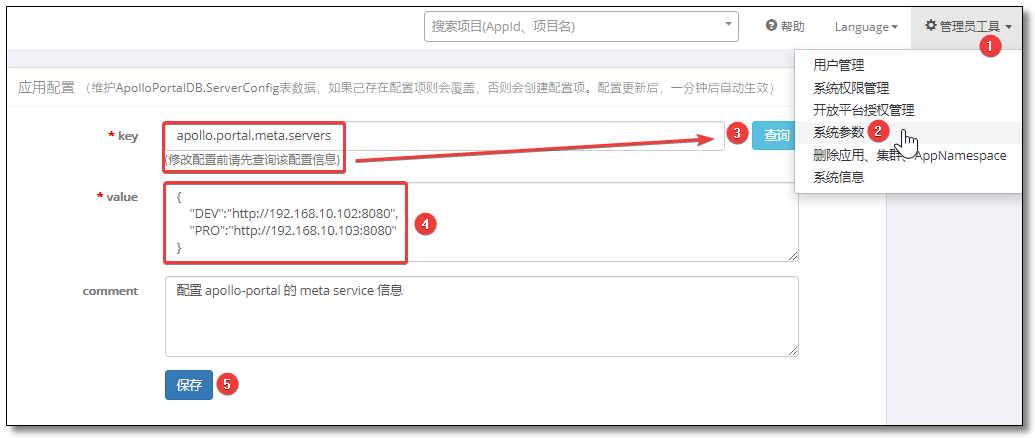
❝对于 1.6.0 及以上版本,可以通过 ApolloPortalDB.ServerConfig 中的配置项来配置 Meta Service 地址。
❞ 新版本配置方式通过 apollo.portal.meta.servers 添加 meta service(apollo-configservice) 地址,类似以下方式,修改完需要重启生效。

打开apollo-portal-x.x.x-github.zip中config目录下的apollo-env.properties文件。
假设 DEV 的 apollo-configservice 未绑定域名,地址是 1.1.1.1:8080,FAT 的 apollo-configservice 绑定了域名 apollo.fat.xxx.com,UAT 的 apollo-configservice 绑定了域名 apollo.uat.xxx.com,PRO 的 apollo-configservice 绑定了域名 apollo.xxx.com,那么可以如下修改各环境 meta service 服务地址,格式为${env}.meta=http://${config-service-url:port},如果某个环境不需要,也可以直接删除对应的配置项,参考案例如下:
dev.meta=http://1.1.1.1:8080 fat.meta=http://apollo.fat.xxx.com uat.meta=http://apollo.uat.xxx.com pro.meta=http://apollo.xxx.com如果采用旧版本配置方式,本小节配置方案如下:
#local.meta=http://localhost:8080 dev.meta=http://192.168.10.102:8080 #fat.meta=http://fill-in-fat-meta-server:8080 #uat.meta=http://fill-in-uat-meta-server:8080 #lpt.meta=${lpt_meta} pro.meta=http://192.168.10.103:8080除了通过apollo-env.properties方式配置 meta service 以外,apollo 也支持在运行时指定 meta service(优先级比apollo-env.properties高):
通过 Java System Property ${env}_meta
可以通过 Java 的 System Property ${env}_meta来指定
如java -Ddev_meta=http://config-service-url -jar xxx.jar
也可以通过程序指定,如System.setProperty("dev_meta", "http://config-service-url");
通过操作系统的 System Environment ${ENV}_META
如DEV_META=http://config-service-url
注意 key 为全大写,且中间是_分隔
启动三台机器都进入对应安装包的 script 目录,执行 startup.sh 文件。
我的启动顺序为:
192.168.10.101 启动 Portal
192.168.10.102 启动 ConfigService 再启动 AdminService
192.168.10.103 启动 ConfigService 再启动 AdminService
先访问:192.168.10.102:8080 和 192.168.10.103:8080 看看 Eureka 以及各服务是否正常启动,如下:


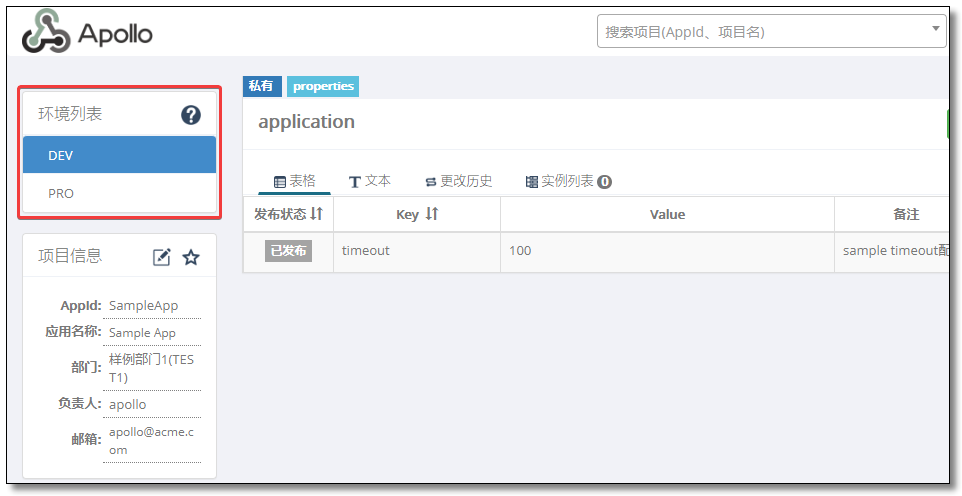
再访问:192.168.10.101:8070 输入 Apollo/admin 进行登录,点击案例项目 SampleApp 进入项目首页,看到多环境说明搭建成功,后续的操作就和之前讲的一样了,这里就不再过多赘述。


