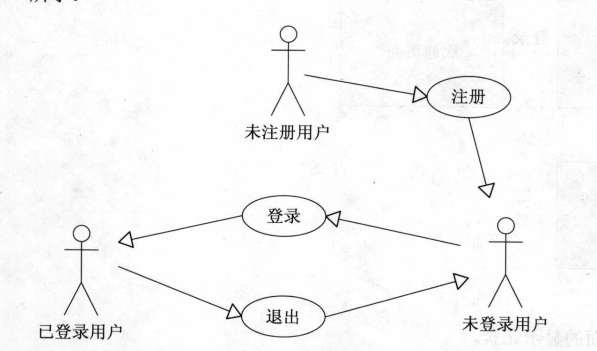
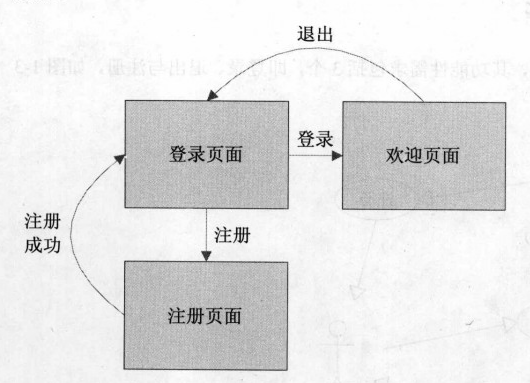
2.页面流程图
3.数据库设计
本例利用oracle数据库
建设用户表
包罗id,username,password和email,共4个字段
-- Create table create table P_USER ( id VARCHAR2(50) not null, username VARCHAR2(20), password VARCHAR2(20), email VARCHAR2(50) ) tablespace USERS pctfree 10 initrans 1 maxtrans 255 storage ( initial 64 minextents 1 maxextents unlimited ); -- Add comments to the table comment on table P_USER is '用户表'; -- Add comments to the columns comment on column P_USER.id is 'id'; comment on column P_USER.username is '用户名'; comment on column P_USER.password is '暗码'; comment on column P_USER.email is 'email';
4.页面设计
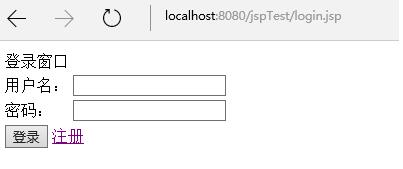
4.1登录页面
login.jsp
<%@ page language="java" import="java.util.*" pageEncoding="UTF-8"%> <% String path = request.getContextPath(); String basePath = request.getScheme()+"://"+request.getServerName()+":"+request.getServerPort()+path+"https://www.jb51.net/"; %> <!DOCTYPE HTML PUBLIC "-//W3C//DTD HTML 4.01 Transitional//EN"> <html> <head> <base href="https://www.jb51.net/<%=basePath%>"> <title>登录页面</title> <meta http-equiv="pragma" content="no-cache"> <meta http-equiv="cache-control" content="no-cache"> <meta http-equiv="expires" content="0"> <meta http-equiv="keywords" content="keyword1,keyword2,keyword3"> <meta http-equiv="description" content="This is my page"> <!-- <link type="text/css" href="https://www.jb51.net/styles.css"> --> </head> <body> <form action="login_action.jsp" method="post"> <table> <tr> <td colspan="2">登录窗口</td> </tr> <tr> <td>用户名:</td> <td><input type="text" /> </td> </tr> <tr> <td>暗码:</td> <td><input type="text" /> </td> </tr> <tr> <td colspan="2"><input type="submit" value="登录" /> <a href="https://www.jb51.net/register.jsp">注册</a> </td> </tr> </table> </form> </body> </html>
页面结果
4.2登录逻辑处理惩罚页面
login_action.jsp
<%@ page language="java" import="java.util.*" pageEncoding="utf-8"%> <%@ page import="java.sql.*" %> <% String path = request.getContextPath(); String basePath = request.getScheme()+"://"+request.getServerName()+":"+request.getServerPort()+path+"https://www.jb51.net/"; %> <% String username = request.getParameter("username"); String password = request.getParameter("password"); if(username==null||"".equals(username.trim())||password==null||"".equals(password.trim())){ //out.write("用户名或暗码不能为空!"); System.out.println("用户名或暗码不能为空!"); response.sendRedirect("https://www.jb51.net/login.jsp"); return; //request.getRequestDispatcher("https://www.jb51.net/login.jsp").forward(request, response); } boolean isValid = false; Connection con = null;// 建设一个数据库毗连 PreparedStatement pre = null;// 建设预编译语句工具,一般都是用这个而不消Statement ResultSet result = null;// 建设一个功效集工具 try { Class.forName("oracle.jdbc.driver.OracleDriver");// 加载Oracle驱动措施 //System.out.println("开始实验毗连数据库!"); String url = "jdbc:oracle:" + "thin:@127.0.0.1:1521:orcl";// 127.0.0.1是本机地点,orcl是Oracle的默认数据库名 String user = "scott";// 用户名,系统默认的账户名 String pwd = "tiger";// 你安装时选配置的暗码 con = DriverManager.getConnection(url, user, pwd);// 获取毗连 // System.out.println("毗连乐成!"); String sql = "select * from p_user where username=? and password=?";// 预编译语句,“?”代表参数 pre = con.prepareStatement(sql);// 实例化预编译语句 pre.setString(1, username);// 配置参数,前面的1暗示参数的索引,而不是表中列名的索引 pre.setString(2, password);// 配置参数,前面的1暗示参数的索引,而不是表中列名的索引 result = pre.executeQuery();// 执行查询,留意括号中不需要再加参数 if (result.next()){ isValid = true; } } catch (Exception e) { e.printStackTrace(); } finally { try { // 逐一将上面的几个工具封锁,因为不封锁的话会影响机能、而且占用资源 // 留意封锁的顺序,最后利用的最先封锁 if (result != null) result.close(); if (pre != null) pre.close(); if (con != null) con.close(); //System.out.println("数据库毗连已封锁!"); } catch (Exception e) { e.printStackTrace(); } } if(isValid){ System.out.println("登录乐成!"); session.setAttribute("username", username); response.sendRedirect("welcome.jsp"); return; }else{ System.out.println("登录失败!"); response.sendRedirect("https://www.jb51.net/login.jsp"); return; } %>