这篇文章分享两个使用React Hook以及函数式组件开发的简单示例。
一个简单的组件案例Button组件应该算是最简单的常用基础组件了吧。我们开发组件的时候期望它的基础样式能有一定程度的变化,这样就可以适用于不同场景了。第二点是我在之前做项目的时候写一个函数组件,但这个函数组件会写的很死板,也就是上面没有办法再绑定基本方法。即我只能写入我已有的方法,或者特性。希望编写Button组件,即使没有写onClick方法,我也希望能够使用那些自带的默认基本方法。
对于第一点,我们针对不同的className,来写不同的css,是比较好实现的。
第二点实现起略微困难。我们不能把Button的默认属性全部写一遍,如果能够把默认属性全部导入就好了。
事实上,React已经帮我们实现了这一点。React.ButtonHTMLAttributes<HTMLElement>里面就包含了默认的Button属性。可是我们又不能直接使用这个接口,因为我们的Button组件可能还有一些自定义的东西。对此,我们可以使用Typescript的交叉类型
type NativeButtonProps = MyButtonProps & React.ButtonHTMLAttributes<HTMLElement>
此外,我们还需要使用resProps来导入其他非自定义的函数或属性。
下面是Button组件具体实现方案:
import React from 'react' import classNames from 'classnames' type ButtonSize = 'large' | 'small' type ButtonType = 'primary' | 'default' | 'danger' interface BaseButtonProps { className?: string; disabled?: boolean; size?: ButtonSize; btnType?: ButtonType; children?: React.ReactNode; } type NativeButtonProps = BaseButtonProps & React.ButtonHTMLAttributes<HTMLElement> const Button: React.FC<NativeButtonProps>= (props) => { const { btnType, className, disabled, size, children, // resProps用于取出所有剩余属性 ...resProps } = props // btn, btn-lg, btn-primary const classes = classNames('btn', className, { [`btn-${btnType}`]: btnType, [`btn-${size}`]: size, 'disabled': disabled }) return ( <button className={classes} disabled={disabled} {...resProps} > {children} </button> ) } Button.defaultProps = { disabled: false, btnType: 'default' } export default Button
通过上面的方式,我们就可以在我们自定义的Button组件中使用比如onClick方法了。使用Button组件案例如下:
<Button disabled>Hello</Button> <Button btnType='primary' size='large' className="haha">Hello</Button> <Button btnType='danger' size='small' onClick={() => alert('haha')}>Test</Button>
展示效果如下:

在这个代码中我们引入了一个新的npm package称之为classnames,具体使用方式可以参考,使用它就可以很方便实现className的扩展,它的一个简单使用示例如下:
classNames('foo', 'bar'); // => 'foo bar' classNames('foo', { bar: true }); // => 'foo bar' classNames({ 'foo-bar': true }); // => 'foo-bar' classNames({ 'foo-bar': false }); // => '' classNames({ foo: true }, { bar: true }); // => 'foo bar' classNames({ foo: true, bar: true }); // => 'foo bar' // lots of arguments of various types classNames('foo', { bar: true, duck: false }, 'baz', { quux: true }); // => 'foo bar baz quux' // other falsy values are just ignored classNames(null, false, 'bar', undefined, 0, 1, { baz: null }, ''); // => 'bar 1'
通过使用classNames,就可以很方便的在Button中添加个性化的属性。可以看到对于组件的HTML输出结果中有hahaclassName:
<button>Hello</button>
与此同时,我们上述代码方式也解决了自定义组件没有办法使用默认属性和方法问题。
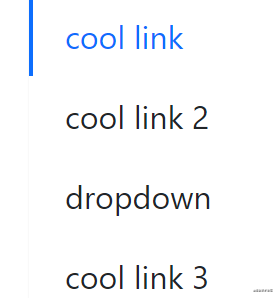
更复杂的父子组件案例接下来我们展示一下如何用函数组件完成一个菜单功能。这个菜单添加水平模式和垂直模式两种功能模式。点开某个菜单详情,将这个详情作为子组件。
当然,菜单这个功能根本就不需要父组件传数据到子组件(子组件指的是菜单详情),我们为了学习和演示如何将父组件数据传给子组件,强行给他添加这个功能。有点画蛇添足,大家理解一下就好。
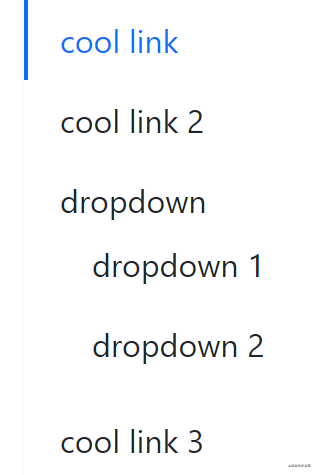
首先介绍父子组件的功能描述。Menu是整体父组件,MenuItem是每一个具体的小菜单,SubMenu里面是可以点开的下拉菜单。
下图是展开后的样子:
整体代码结构如下: