Angular 2 原生就支持一些有用的验证器:
required: 验证字段必须存在
minlength: 验证字段值的最小长度有效
maxlength: 验证字段值的最大长度有效
pattern: 验证输入的值是否匹配给定的模板,比如 email
我们会基于下面的接口创建一个表单来获取用户信息。
// user.interface.ts export interface User { username: string; // required, must be 5-8 characters email: string; // required, must be valid email format password: string; // required, value must be equal to confirm password. confirmPassword: string; // required, value must be equal to password. }
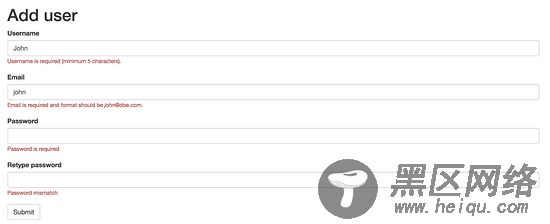
需求
仅在字段数据不正确或提交表单的时候,为每个字段 显示错误消息 。
UI 展示:
# App 配置
这是我们的文件结构:
|- app/ |- app.component.html |- app.component.ts |- app.module.ts |- equal-validator.directive.ts |- main.ts |- user.interface.ts |- index.html |- styles.css |- tsconfig.json
为了使用新的表单模块,我们需要用 npm install @ angular/forms 指令调用 npm 包,并在应用程序模块中导入最新的表单模块。
$ npm install @angular/forms --save
下面是我们应用程序的 app.module.ts 模块:
// app.module.ts import { NgModule } from '@angular/core'; import { BrowserModule } from '@angular/platform-browser'; import { FormsModule } from '@angular/forms'; import { AppComponent } from './app.component'; @NgModule({ imports: [ BrowserModule, FormsModule ], // import forms module here declarations: [ AppComponent ], bootstrap: [ AppComponent ], }) export class AppModule { }
# App 组件
让我们继续创建 App 组件。
// app.component.ts import { Component, OnInit } from '@angular/core'; import { User } from './user.interface'; @Component({ moduleId: module.id, selector: 'app-root', templateUrl: 'app.component.html', styleUrls: ['app.component.css'] }) export class AppComponent implements OnInit { public user: User; ngOnInit() { // initialize model here this.user = { username: '', email: '', password: '', confirmPassword: '' } } save(model: User, isValid: boolean) { // 调用API保存customer console.log(model, isValid); } }
# HTML 视图
这是我们的 HTML 视图的样子。
<!-- app.component.html --> <div> <h1>Add user</h1> <form #f="ngForm" novalidate (ngSubmit)="save(f.value, f.valid)"> <!-- 我们将把验证的字段放在这里 --> <button type="submit" [disabled]="!myForm.valid">Submit</button> </form> </div>
现在来一个个添加控件。
用户名
需求: 必填,长度在 5-8 个字符之间
<!-- app.component.html --> ... <div> <label>Username</label> <input type="text" [ngModel]="user.username" required minlength="5" maxlength="8" #username="ngModel"> <small [hidden]="username.valid || (username.pristine && !f.submitted)"> Username is required (minimum 5 characters). </small> </div> <pre *ngIf="username.errors">{{ username.errors | json }}</pre> ...
required、minlength、maxlength 都是内置的验证器,所以很容易使用。
我们只会在用户名无效、获得焦点和提交表单的情况下显示错误消息。最后一条的 pre 标签在开发过程中对调试很有用。它会显示字段的所有验证错误。
电子邮件地址
需求: 必填,必须是有效的电子邮件地址格式
<!-- app.component.html --> ... <div> <label>Email</label> <input type="email" [ngModel]="user.email" required pattern="^[a-zA-Z0–9_.+-]+@[a-zA-Z0–9-]+.[a-zA-Z0–9-.]+$" #email="ngModel" > <small [hidden]="email.valid || (email.pristine && !f.submitted)"> Email is required and format should be <i>john@doe.com</i>. </small> </div> ...
我们把 email 设置为必填,然后使用内建的模板验证器,通过正则表达式来检查 email 的值:^[a-zA-Z0–9_.+-]+@[a-zA-Z0–9-]+.[a-zA-Z0–9-.]+$.
密码和确认密码
需求:
密码: 必填,值必须与确认密码的值相同。
确认密码: 必填,值必须与密码的值相同。
<!-- app.component.html --> ... <div> <label>Password</label> <input type="password" [ngModel]="user.password" required #password="ngModel"> <small [hidden]="password.valid || (password.pristine && !f.submitted)"> Password is required </small> </div> <div> <label>Retype password</label> <input type="password" [ngModel]="user.confirmPassword" required validateEqual="password" #confirmPassword="ngModel"> <small [hidden]="confirmPassword.valid || (confirmPassword.pristine && !f.submitted)"> Password mismatch </small> </div> ...
validateEqual 是我们自定义的验证器。它会将当前输入的值与输入的密码值进行对比验证。
# 自定义确认密码验证器
我们将制定一个 validate equal 指令。