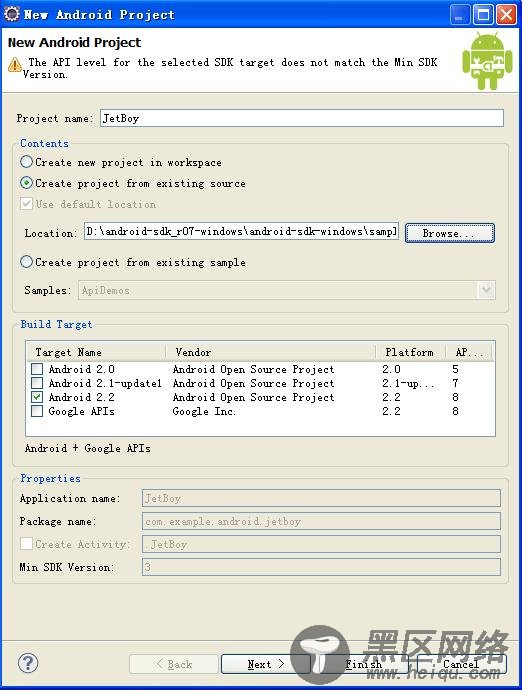
1、打开Eclipse,选择File->new->Android Project,如附图所示窗口:
2、选择Create project from existing source单选框,然后点击->Browse..., 找到想要查看的android例子目录:
备注:一般android例子位于android的SDK安装目录中的samples下面的各个android版本目录,例如:android-sdk-windows/samples/android-8
3、选择好后,工程名和android开发版本都会自动选择上,点击 finish,即可;
常见问题:
错误信息:
[2011-04-22 16:26:16 - Home] ------------------------------
[2011-04-22 16:26:16 - Home] Android Launch!
[2011-04-22 16:26:16 - Home] adb is running normally.
[2011-04-22 16:26:16 - Home] No Launcher activity found!
[2011-04-22 16:26:16 - Home] The launch will only sync the application package on the device!
[2011-04-22 16:26:16 - Home] Performing sync
[2011-04-22 16:26:16 - Home] Automatic Target Mode: using existing emulator 'emulator-5554' running compatible AVD 'android1'
[2011-04-22 16:26:16 - Home] WARNING: Application does not specify an API level requirement!
[2011-04-22 16:26:16 - Home] Device API version is 8 (Android 2.2)
[2011-04-22 16:26:20 - Home] Application already deployed. No need to reinstall.
[2011-04-22 16:26:20 - Home] /Home/bin/Home.apk installed on device
[2011-04-22 16:26:20 - Home] Done!
[2011-04-22 16:29:01 - Home] ------------------------------
问题分析:根据红色提示,说明没有找到可运行的Activity
解决办法:
打开AndroidManifest.xml清单文件,找到" <action android:name="android.intent.action.MAIN" />"位置,
将"<category android:name="android.intent.category.LAUNCHER" />”添加进去即可.
如下所示:
<activity android:name="Home"
android:theme="@style/Theme"
android:launchMode="singleInstance"
android:stateNotNeeded="true">
<intent-filter>
<action android:name="android.intent.action.MAIN" />
<category android:name="android.intent.category.HOME"/>
<category android:name="android.intent.category.DEFAULT" />
<category android:name="android.intent.category.LAUNCHER" />
</intent-filter>
</activity>
附图:

