在前面一篇文章中,大致介绍了怎么仿Mac Dock效果,有的朋友问起那个梯形怎么实现的,其实这个很简单,就是一张背景图片,不过你要先理解.9图片代表的含义,这里有一片文章有介绍,不过大家最好是亲身体验下,这样的话理解更深入。
相关阅读 : Android开发:为launcher添加一个仿Mac的Dock(附源码)
这个图片就是我们项目中用到的图片:
这个就是我显示在Launcher主界面的自定义类:
public class DockView extends LinearLayout implements DropTarget,DragSource, DragController.DragListener,OnClickListener, View.OnLongClickListener {
/**
* @author jezz
*
*/
public DockView(Context context){
super(context);
}
public DockView(Context context, AttributeSet attrs) {
super(context, attrs);
mDockBgId = R.drawable.shortcut_selector;
}
public void init(){
//初始化操作
}
public boolean acceptDrop(DragSource source, int x, int y, int xOffset,int yOffset, Object dragInfo) {
//接受什么类型的图标
final ItemInfo item = (ItemInfo) dragInfo;
if (item.itemType == LauncherSettings.Favorites.ITEM_TYPE_APPWIDGET
|| item.itemType == LauncherSettings.Favorites.ITEM_TYPE_LIVE_FOLDER
|| item.itemType == LauncherSettings.Favorites.ITEM_TYPE_USER_FOLDER
|| item.itemType == LauncherSettings.Favorites.ITEM_TYPE_WIDGET_PHOTO_FRAME
|| item.itemType == LauncherSettings.Favorites.ITEM_TYPE_WIDGET_SEARCH
|| item.itemType == LauncherSettings.Favorites.ITEM_TYPE_WIDGET_CLOCK) {
return false;
}
}
public void onDragEnter(DragSource source, int x, int y, int xOffset,int yOffset, Object dragInfo) {
//拖入进入区域
setBackgroundResource(R.drawable.dock_press_bg);
}
public void onDragExit(DragSource source, int x, int y, int xOffset,int yOffset, Object dragInfo) {
//拖动离开区域
setBackgroundResource(R.drawable.dock_bg);
}
public void onDragOver(DragSource source, int x, int y, int xOffset,int yOffset, Object dragInfo) {
}
public void onDrop(DragSource source, int x, int y, int xOffset,int yOffset, Object dragInfo) {
//拖动释放
}
public void onDragEnd() {
}
public void onDragStart(View v, DragSource source, Object info,int dragAction) {
//开始拖动
}
public void onClick(View v) {
//单击打开app
ImageView view=(ImageView)v;
DockInfo dockInfo=(DockInfo)view.getTag();
try {
Intent i = Intent.getIntent(dockInfo.info.intent.toUri(0));
mLauncher.startActivitySafely(i);
} catch (URISyntaxException e) {
e.printStackTrace();
}
}
public boolean onLongClick(View v) {
//长按实现拖动
}
public void onDropCompleted(View target, boolean success) {
//拖动释放事件
}
}
这个三个接口DropTarget,DragSource, DragController.DragListener是launcher自己定义的,你必须在Launcher启动的时候,将你的这几个接口实现在DragLayer.java里面,要注意的细节很多,你们多研究下代码就知道了。
自定义的类放在layout-land下面,有个launcher.xml写入到文件的最下面:
<com.android.launcher.DockView
android:id="@+id/dock_view"
android:background="@drawable/dock_bg"
android:layout_width="wrap_content"
android:layout_height="wrap_content"
android:layout_gravity="bottom|center_horizontal"
/>
其中这个@drawable/dock_bg就是.9(九宫格图片),每次添加Icon的时候都会水平自由拉伸。
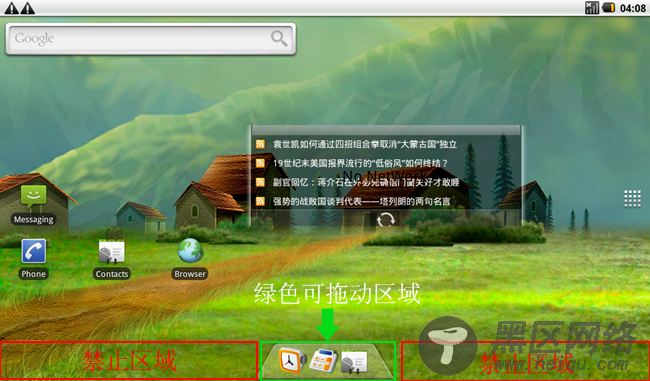
还有一个注意的地方就是我们下面Dock区域是能让任何快捷方式和Widget放到这个区域的,所以我们要设置一个禁区,不过系统已经为我们写好了,我们只需要设置一下就可以了,在同样在layout-land目录下的workspace_screen.xml文件里,内容如下:
<com.android.launcher.CellLayout
xmlns:android="http://schemas.android.com/apk/res/android"
xmlns:launcher="http://schemas.android.com/apk/res/com.android.launcher"
android:layout_width="fill_parent"
android:layout_height="fill_parent"
launcher:cellWidth="106dip"
launcher:cellHeight="73dip"
launcher:longAxisStartPadding="0dip"
launcher:longAxisEndPadding="55dip"
launcher:shortAxisStartPadding="0dip"
launcher:shortAxisEndPadding="70dip"
launcher:shortAxisCells="6"
launcher:longAxisCells="8" />
我们只需要该launcher:shortAxisEndPadding="70dip"这个就可以,这个数值根据你的需求来即可了。
最后来一张我们真机上的截图:


