else if(contact == "up"){ var y = e.clientY;//鼠标位置的纵坐标 var heightBefore = mainDiv.offsetHeight - 2;//选取框变化前的高度 var addHeight = getPosition(mainDiv).top - y;//增加的高度 mainDiv.style.height = heightBefore + addHeight + 'px';//选取框变化后的宽度 mainDiv.style.top = mainDiv.offsetTop - addHeight + 'px';//相当于变化后左上角的纵坐标,鼠标向上移纵坐标减小,下移增大 }
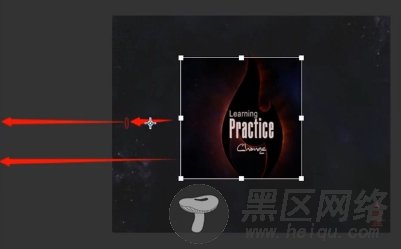
3)点击左边触点
原理同点击上面触点,宽度和左边的位置都会变化
变化示意图:
js代码:
else if(contact == "left"){ var widthBefore = mainDiv.offsetWidth - 2; var addWidth = getPosition(mainDiv).left - e.clientX;//增加的宽度等于距离屏幕左边的距离减去鼠标位置横坐标 mainDiv.style.width = widthBefore + addWidth + 'px'; mainDiv.style.left = mainDiv.offsetLeft - addWidth + 'px';//左边的距离(相当于左边位置横坐标)等于选取框距父级元素的距离减去增加的宽度 }
4)点击下面触点
增加的宽度 = 鼠标位置纵坐标 - 距屏幕上边的距离 - 原先的宽度
左上角的位置不需改变
js代码:
else if(contact = "down"){ var heightBefore = mainDiv.offsetHeight - 2; var addHeight = e.clientY - getPosition(mainDiv).top - mainDiv.offsetHeight; mainDiv.style.height = heightBefore + addHeight + 'px'; }
5)点四个角时的变化是高度和宽度变化的叠加,所以最好将上面四个变化的过程封装成函数,便于维护和代码复用。
如果用if else 需要判断8次,所以改为switch语句来简化代码
修改后的js代码如下:
window.onmousemove = function(e){ var e = e||window.event; if(isDraging == true){ switch (contact){ case "up" : upMove(e);break; case "right" : rightMove(e);break; case "down" : downMove(e);break; case "left" : leftMove(e);break; case "up-right" : upMove(e);rightMove(e);break; case "down-right" : downMove(e);rightMove(e);break; case "down-left" : downMove(e);leftMove(e);break; case "up-left" : upMove(e);leftMove(e);break; } } } //获取id的函数 function $(id){ return document.getElementById(id); } //获取元素相对于屏幕左边及上边的距离,利用offsetLeft function getPosition(el){ var left = el.offsetLeft; var top = el.offsetTop; var parent = el.offsetParent; while(parent != null){ left += parent.offsetLeft; top += parent.offsetTop; parent = parent.offsetParent; } return {"left":left,"top":top}; } //up移动 function upMove(e){ var y = e.clientY;//鼠标位置的纵坐标 var heightBefore = mainDiv.offsetHeight - 2;//选取框变化前的高度 var addHeight = getPosition(mainDiv).top - y;//增加的高度 mainDiv.style.height = heightBefore + addHeight + 'px';//选取框变化后的宽度 mainDiv.style.top = mainDiv.offsetTop - addHeight + 'px';//相当于变化后左上角的纵坐标,鼠标向上移纵坐标减小,下移增大 } //right移动 function rightMove(e){ var x = e.clientX;//鼠标位置的横坐标 var widthBefore = mainDiv.offsetWidth - 2;//选取框变化前的宽度 //var widthBefore = mainDiv.clientWidth; var addWidth = x - getPosition(mainDiv).left - widthBefore;//鼠标移动后选取框增加的宽度 mainDiv.style.width = widthBefore + addWidth + 'px';//选取框变化后的宽度 } //down移动 function downMove(e){ var heightBefore = mainDiv.offsetHeight - 2; var addHeight = e.clientY - getPosition(mainDiv).top - mainDiv.offsetHeight; mainDiv.style.height = heightBefore + addHeight + 'px'; } //left移动 function leftMove(e){ var widthBefore = mainDiv.offsetWidth - 2; var addWidth = getPosition(mainDiv).left - e.clientX;//增加的宽度等于距离屏幕左边的距离减去鼠标位置横坐标 mainDiv.style.width = widthBefore + addWidth + 'px'; mainDiv.style.left = mainDiv.offsetLeft - addWidth + 'px';//左边的距离(相当于左边位置横坐标)等于选取框距父级元素的距离减去增加的宽度 }
四、实现选取框区域明亮显示
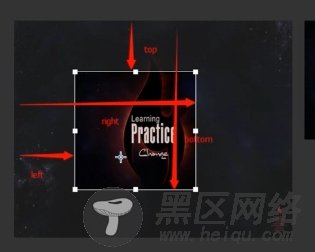
1)选取框内的第二层图片需重新设置其clip属性
四个方面图示:
js代码:
//设置选取框图片区域明亮显示 function setChoice(){ var top = mainDiv.offsetTop; var right = mainDiv.offsetLeft + mainDiv.offsetWidth; var bottom = mainDiv.offsetTop + mainDiv.offsetHeight; var left = mainDiv.offsetLeft; img2.style.clip = "rect("+top+"px,"+right+"px,"+bottom+"px,"+left+"px)"; }
2)鼠标移动时会导致图片被选中,可在js代码中添加一行代码使其禁止图片被选中
//禁止图片被选中 document.onselectstart = new Function('event.returnValue = false;');
也可以在css样式里添加 *{user-select:none}
意思是文本不可选中,对图片跟div有一样的效果。
五、实现选取框位置可拖动
首先要阻止事件冒泡
js代码如下:
//鼠标按下触点时 rightDiv.onmousedown = function(e){ e.stopPropagation(); isDraging = true; contact = "right"; }
六、实现图片剪切区域预览
新增一个图片预览区域的div
html代码:
<div> <img src="https://www.jb51.net/img/1.jpg" /> </div>
css代码:
#preview{ position: absolute; width: 500px; height: 380px; top: 100px; left:710px ; } #preview #img3{position: absolute;}
注意:要让clip:rect(top,right,bottom,left) 起作用,必须让作用元素为相对/绝对定位。
js部分同样是利用clip属性,和setChoice()函数同时被调用
同时为了让右边预览区的左上角位置固定,需要设置其top和left的值