首先需要确保Apache安装成功,正常配置和运行。
安装必要的软件安装openssl:
apt-get install openssl
安装ssl-cert:
apt-get install ssl-cert
加载apache ssl模块
加载apache ssl模块:
a2enmod ssl
创建apache下的ssl目录:
mkdir /etc/apache2/ssl
创建证书相关文件进入/etc/apache2/ssl目录,创建私鈅,需要输入两次相同的关键字:
openssl genrsa -des3 -out my-server.key 1024
创建证书:
openssl req -new -key my-server.key -x509 -out my-server.crt -config /etc/ssl/openssl.cnf
如果希望延长有效时间默认1个月,可增加参数:
-days 3650
创建和运行站点创建站点文件/etc/apache2/sites-available/ssl,主要内容:
NameVirtualHost *:443 <VirtualHost *:443> ServerAdmin webmaster@localhost DocumentRoot /var/www/ <Directory /> Options FollowSymLinks AllowOverride None </Directory><Directory /var/www/> Options Indexes FollowSymLinks MultiViews AllowOverride None Order allow,deny allow from all </Directory> ScriptAlias /cgi-bin/ /usr/lib/cgi-bin/ <Directory "/usr/lib/cgi-bin"> AllowOverride None Options +ExecCGI -MultiViews +SymLinksIfOwnerMatch Order allow,deny Allow from all </Directory> ErrorLog /var/log/apache2/error.log # Possible values include: debug, info, notice, warn, error, crit, # alert, emerg. LogLevel warn CustomLog /var/log/apache2/access.log combined ServerSignature On Alias /doc/ "/usr/share/doc/" <Directory "/usr/share/doc/"> Options Indexes MultiViews FollowSymLinks AllowOverride None Order deny,allow Deny from all Allow from 127.0.0.0/255.0.0.0 ::1/128 </Directory> SSLEngine on SSLCertificateFile /etc/apache2/ssl/my-server.crt SSLCertificateKeyFile /etc/apache2/ssl/my-server.key </VirtualHost>
ssl站点设为可运行:
a2ensite ssl
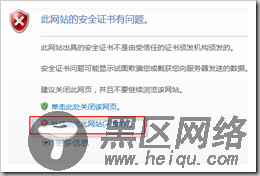
重启apache后,即可以通过https访问。因为是自己生成证书,在通过ie7访问的时候会出现以下情况,选择继续浏览此网站即可。
手工导入证书如果如上面的方式通过浏览器访问,会在ie7地址栏中有警告:
在google chrome中也会有警告信息:
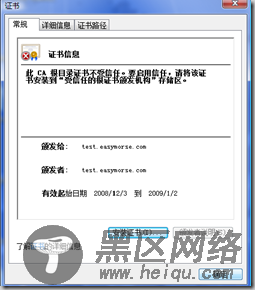
如果嫌这个比较扎眼(其实不影响使用),可以手工导入证书,将/etc/apache2/ssl/my-server.crt文件发布,供用户下载。下载后双击该文件:
点击:安装证书
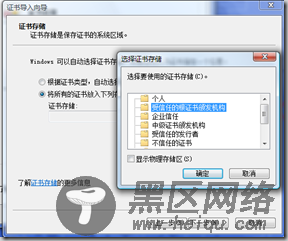
需要选择根证书条目。安装好后,访问即可不再有警告提示。


