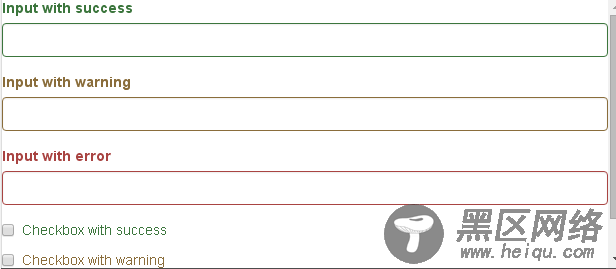
<!DOCTYPE HTML> <html> <head> <link href="https://www.jb51.net/stylesheets/bootstrap.min.css" > </head> <body> <div><label for="inputSuccess1">Input with success</label> <input type="text"> </div> <div> <label for="inputWarning1">Input with warning</label> <input type="text"> </div> <div> <label for="inputError1">Input with error</label> <input type="text"> </div> <div> <div> <label> <input type="checkbox" value="option1">Checkbox with success</label> </div> </div> <div> <div> <label> <input type="checkbox" value="option1">Checkbox with warning</label> </div> </div> <div> <div> <label> <input type="checkbox" value="option1">Checkbox with error</label> </div> </div> </body> </html>

11.添加额外的图标
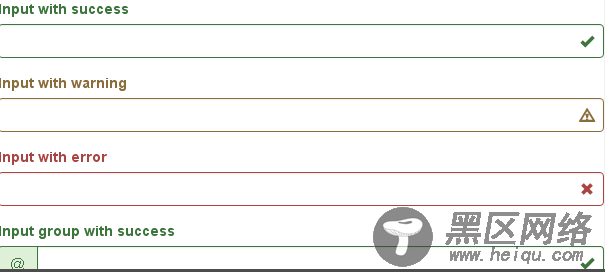
你还可以针对校验状态为输入框添加额外的图标。只需设置相应的 .has-feedback 类并添加正确的图标即可。
反馈图标(feedback icon)只能使用在文本输入框 <input> 元素上。
图标、label 和输入控件组
对于不带有 label 标签的输入框以及右侧带有附加组件的输入框组,需要手动为其图标定位。为了让所有用户都能访问你的网站,我们强烈建议为所有输入框添加 label 标签。如果你不希望将label 标签展示出来,可以通过添加 .sr-only 类来实现。如果的确不能添加 label 标签,请调整图标的 top 值。对于输入框组,请根据你的实际情况调整 right 值。
向辅助技术设备传递图标的含义
为了确保辅助技术- 如屏幕阅读器 - 正确传达一个图标的含义,额外的隐藏的文本应包含在 .sr-only 类中,并明确关联使用了 aria-describedby 的表单控件。或者,以某些其他形式(例如,文本输入字段有一个特定的警告信息)传达含义,例如改变与表单控件实际相关联的 <label> 的文本。
虽然下面的例子已经提到各自表单控件本身的 <label> 文本的验证状态,上述技术(使用 .sr-only 文本 和 aria-describedby) )已经包括了需要说明的目的。
<!DOCTYPE HTML> <html> <head> <link href="https://www.jb51.net/stylesheets/bootstrap.min.css" > </head> <body> <div><label for="inputSuccess2">Input with success</label> <input type="text" aria-describedby="inputSuccess2Status"> <span aria-hidden="true"></span> <span>(success)</span> </div> <div> <label for="inputWarning2">Input with warning</label> <input type="text" aria-describedby="inputWarning2Status"> <span aria-hidden="true"></span> <span>(warning)</span> </div> <div> <label for="inputError2">Input with error</label> <input type="text" aria-describedby="inputError2Status"> <span aria-hidden="true"></span> <span>(error)</span> </div> <div> <label for="inputGroupSuccess1">Input group with success</label> <div> <span>@</span> <input type="text" aria-describedby="inputGroupSuccess1Status"> </div> <span aria-hidden="true"></span> <span>(success)</span> </div> </body> </html>

12.控件尺寸
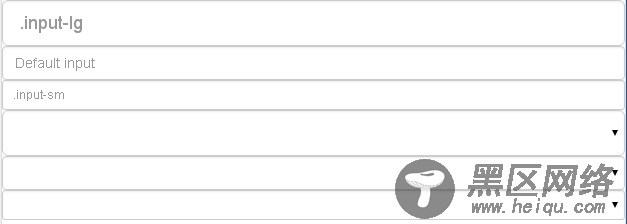
通过 .input-lg 类似的类可以为控件设置高度,通过 .col-lg-* 类似的类可以为控件设置宽度。
高度尺寸
创建大一些或小一些的表单控件以匹配按钮尺寸。
<!DOCTYPE HTML> <html> <head> <link href="https://www.jb51.net/stylesheets/bootstrap.min.css" > </head> <body> <input type="text" placeholder=".input-lg"> <input type="text" placeholder="Default input"> <input type="text" placeholder=".input-sm"> <select>...</select> <select>...</select> <select>...</select> </body> </html>

水平排列的表单组的尺寸
通过添加 .form-group-lg 或 .form-group-sm 类,为 .form-horizontal包裹的 label 元素和表单控件快速设置尺寸。
<!DOCTYPE HTML> <html> <head> <link href="https://www.jb51.net/stylesheets/bootstrap.min.css" > </head> <body> <form> <div> <label for="formGroupInputLarge">Large label</label> <div> <input type="text" placeholder="Large input"> </div> </div> <div> <label for="formGroupInputSmall">Small label</label> <div> <input type="text" placeholder="Small input"> </div> </div> </form> </body> </html>

调整列(column)尺寸
用栅格系统中的列(column)包裹输入框或其任何父元素,都可很容易的为其设置宽度。
