与PXE不同,Cobbler可以自动帮助我们生成系统安装的yum 源,而不需要我们自己去制作,我们只要指定光盘路径就好了
# 执行下面的命令制作 CentOS 7.3 的启动光盘
[root@localhost ~]#cobbler import --path=/misc/cd --name=centos7.3
# 然后更换ISO镜像,制作6.9的光盘内容
[root@localhost ~]#cobbler import --path=/misc/cd --name=centos6.9
Cobbler 制作的光盘yum源到底放在了什么地方呢??
#进入到下面的这个路径下,可以看到这里生成了两个源,其实也就是将光盘里的内容复制过来了而已。
[root@localhost ~]#cd /var/www/cobbler/ks_mirror/
[root@localhost ks_mirror]#ls
centos6.9 centos7.3 config
# 执行下面的命令可以看到,这里已经成功的制作了两个系统yum源。
[root@localhost ks_mirror]#cobbler distro list
centos6.9-x86_64
centos7.3-x86_64
修改启动菜单
yum 源文件创建成功之后,可以进行自定义的配置修改。
# 查看生成的启动菜单文件
[root@localhost tftpboot]#cat /var/lib/tftpboot/pxelinux.cfg/default
DEFAULT menu
PROMPT 0
MENU TITLE Cobbler | #可以修改为自己的标签。
TIMEOUT 200
TOTALTIMEOUT 6000
ONTIMEOUT local
LABEL local
MENU LABEL (local)
MENU DEFAULT
LOCALBOOT -1
LABEL centos6.9-x86_64
kernel /images/centos6.9-x86_64/vmlinuz
MENU LABEL centos6.9-x86_64
append initrd=/images/centos6.9-x86_64/initrd.img ksdevice=bootif lang= kssendmac text ks=http://172.18.2.77/cblr/svc/op/ks/profile/centos6.9-x86_64
ipappend 2
LABEL centos7.3-x86_64
kernel /images/centos7.3-x86_64/vmlinuz
MENU LABEL centos7.3-x86_64
append initrd=/images/centos7.3-x86_64/initrd.img ksdevice=bootif lang= kssendmac text ks=http://172.18.2.77/cblr/svc/op/ks/profile/centos7.3-x86_64
ipappend 2
MENU end
启动网络安装
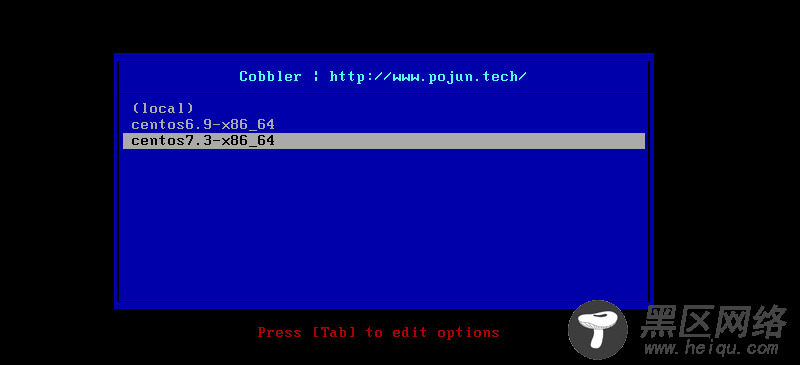
重新新建一个虚拟机,作为客户端,然后启动网络安装,就可以看到我们刚刚制作的界面了。

自定义KickStart文件
首先准备KickStart文件
在上面的实验中,我们没有进行任何的安装配置,全部都是Cobbler帮助我们完成的。可是在实际生产中,我们对每台主机的硬盘分区,安装的软件都有相应的要求,所以我们需要自己来定制KickStart文件,这样我们就能够定制地批量安装操作系统了。
我们就利用实验环境(CentOS 7.3)中的KickStart文件来定制我们自己的KickStart文件。
# 首先进入到Cobbler 的KickStart 目录下
[root@localhost] cd /var/lib/cobbler/kickstarts/
# 将根目录下的ks 文件复制到当前目录下
[root@localhost kickstarts]cp /root/anaconda-ks.cfg centos7.cfg
[root@localhost kickstarts]#cat centos7.cfg
#version=DEVEL
# System authorization information
auth --enableshadow --passalgo=sha512
# Use CDROM installation mediaurl
--url=$tree # url可以指定详细路径也可以使用$tree变量来进行替代
# Use graphical install
reboot #安装成功之后可以重启
text #采用字符界面进行安装
# Run the Setup Agent on first boot
firstboot --enable
ignoredisk --only-use=sda
# Keyboard layouts
keyboard --vckeymap=us --xlayouts='us'
# System language
lang en_US.UTF-8
# Network information
#修改网络环境
network --bootproto=dhcp --device=ens33 --onboot=yes --ipv6=auto --activate
network --hostname=localhost.localdomain
selinux --disabled #禁用SElinux 也可以禁用防火墙
# Root password #设置root用户的初始密码rootpw --iscrypted $6$BlwRFg7fgO1i8eQa$F9yjtePt1aOnsIwmNO7mexdnBOsJTVSSyTnwp2hS2lSY87thmNylXw43.Ycj6lfY1wk2NmoQjO/WzEEGBUlZt.
# System services
services --disabled="chronyd"
# System timezone
timezone Asia/Shanghai --isUtc --nontp
# X Window System configuration information
xconfig --startxonboot
# System bootloader configuration
bootloader --append=" crashkernel=auto" --location=mbr --boot-drive=sda
# Partition clearing information
zerombr #清楚MBR分区
clearpart --all #清楚系统中原有分区
# Disk partitioning information
part / --fstype="xfs" --ondisk=sda --size=56320
part swap --fstype="swap" --ondisk=sda --size=2000
part /app --fstype="xfs" --ondisk=sda --size=51200
part /boot --fstype="xfs" --ondisk=sda --size=1024
%packages
@^graphical-server-environment
@base
@core
@desktop-debugging
@dial-up
@fonts
@gnome-desktop
@guest-agents
@guest-desktop-agents
@hardware-monitoring
@input-methods
@internet-browser
@multimedia
@print-client
@x11
kexec-tools
%end
%post
#删除旧的yum仓库#可根据实际情况稍作调整。
rm -rf /etc/yum.repos.d/*
cat > /etc/yum.repos.d/base.repo <<EOF
[base]
name=base
baseurl=file:///misc/cd
gpgcheck=0
EOF
%end
将KickStart文件和yum源做关联


