<template> <div> <h1>{{ msg }}</h1> <items></items> </div> </template> <script> import items from "./components/Items" export default { components: { items }, name: 'app', data () { return { msg: 'My Fancy T-Shirt Store' } } } </script> <style> #app { font-family: 'Avenir', Helvetica, Arial, sans-serif; -webkit-font-smoothing: antialiased; -moz-osx-font-smoothing: grayscale; text-align: center; color: #2c3e50; margin-top: 60px; } h1, h2 { font-weight: normal; } ul { list-style-type: none; padding: 0; } li { display: inline-block; margin: 0 10px; } a { color: #42b983; } </style>
这里没有什么花哨的东西。我们所做的只是显示一条消息并渲染一个 <items> 组件。
接下来,打开 src/components/Items.vue 并添加以下代码:
<template> <div> <div> <Row :gutter="16"> <Col :span="24"> <Icon type="shopping-cart"/>{{shoppingList.length}} item(s) <Button @click="show = true">Checkout</Button> </Col> </Row> </div> <div v-if="show"> <Row :gutter="16"> <checkout v-bind:shoppingList="shoppingList"></checkout> </Row> </div> <div> <Row :gutter="16"> <Col :span="6" v-for="(item, key) in items" v-bind:key="key"> <Card v-bind:title="item.msg" v-bind:key="key"> <Button type="primary" @click="addItem(key)">Buy ${{item.price}}</Button> </Card> </Col> </Row> </div> </div> </template> <script> import { Card, Col, Row, Button, Icon } from 'ant-design-vue'; export default { methods: { addItem (key) { if(!this.shoppingList.includes(key)) { this.shoppingList.push(key); } } }, components: { Card, Col, Row, Button, Icon, checkout: () => import('./Checkout') }, data: () => ({ items: [ { msg: 'First Product', price: 9.99 }, { msg: 'Second Product', price: 19.99 }, { msg: 'Third Product', price: 15.00 }, { msg: 'Fancy Shirt', price: 137.00 }, { msg: 'More Fancy', price: 109.99 }, { msg: 'Extreme', price: 3.00 }, { msg: 'Super Shirt', price: 109.99 }, { msg: 'Epic Shirt', price: 3.00 }, ], shoppingList: [], show: false }) } </script> <style> #checkout { background-color:#e55242; color:white; margin-left: 10px; } </style>
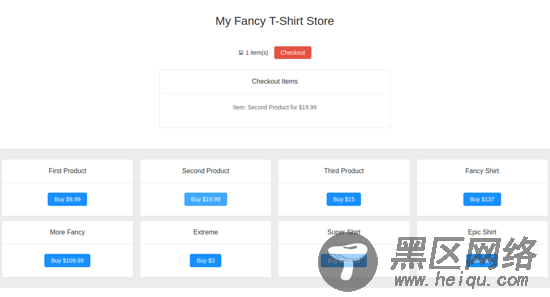
在此文件中,我们显示一个带有商品数量的购物车图标。商品是从 items 数组中提取的。如果单击项目的 Buy 按钮,将会调用 addItem 方法,该方法会将相关商品push到 shoppingList 数组中。从而增加购物车的总数。
我们还在页面中添加了一个 Checkout 按钮:
<Button @click="show = true">Checkout</Button>
当用户点击这个按钮,我们设置的参数 show 是 true 。 true 是非常重要对于有通过条件地加载我们的异步组件。
在接下来的几行中,您可以找到 v-if 的声明,这个语句仅用来显示我们 checkout 组件的 <div> ,但是我们只想在用户点击 Checkout 按钮时显示结账组件,我们该怎么办?
这里我们将 checkout 组件在 components 选项里异步加载。这里 v-bind 将参数传递给组件。正如你看的的这样,创建条件异步组件是很容易的:
<div v-if="show"> <checkout v-bind:shoppingList="shoppingList"></checkout> </div>
让我们快速 Checkout 组件添加下面的代码在 src/components/Checkout.vue 里:
<template> <Card title="Checkout Items" key="checkout"> <p v-for="(k, i) in this.shoppingList" :key="i"> Item: {{items[Number(k)].msg}} for ${{items[Number(k)].price}} </p> </Card> </template> <script> import { Card } from 'ant-design-vue'; export default { props: ['shoppingList'], components: { Card }, data: () => ({ items: [ { msg: 'First Product', price: 9.99 }, { msg: 'Second Product', price: 19.99 }, { msg: 'Third Product', price: 15.00 }, { msg: 'Fancy Shirt', price: 137.00 }, { msg: 'More Fancy', price: 109.99 }, { msg: 'Extreme', price: 3.00 }, { msg: 'Super Shirt', price: 109.99 }, { msg: 'Epic Shirt', price: 3.00 }, ] }) } </script>
在这里,我们将接收一个 shoppingList 并把他输出到屏幕上。
您可以使用该 npm run serve 命令运行该应用程序。然后导航到 http:// localhost:8080 。如果一切按计划进行,你应该会看到如下图所示的内容。

可以尝试打开在 network 选项卡,点击Checkout按钮,可以发现 network 里将异步加载 结账组件 。
您还可以在GitHub上查看此演示的代码 。
为异步组件添加加载中和加载错误组件
