
WordPress 5最近发布了一些核心变化,例如Gutenberg编辑器。我们的许多读者可能想在自己的服务器上测试它。对于那些人,在本教程中,我们将在Ubuntu 18.04上使用LEMP设置WordPress 5。
对于不了解的人,LEMP是Linux,Nginx,MySQL / MariaDB和PHP的流行组合。

要求
使用Ubuntu 18.04最小安装的专用服务器或VPS(虚拟专用服务器)。
本教程将指导您完成所有必需软件包的安装,创建自己的数据库,准备vhost以及通过浏览器完成WordPress安装。
在Ubuntu 18.04上安装Nginx Web服务器首先,我们将准备我们的Web服务器Nginx。要安装软件包,请运行以下命令:
linuxidc@linuxidc:~$ sudo apt update && sudo apt upgrade
linuxidc@linuxidc:~$ sudo apt install nginx
要启动nginx服务并在系统引导时自动启动它,请运行以下命令:
linuxidc@linuxidc:~$ sudo systemctl start nginx.service
linuxidc@linuxidc:~$ sudo systemctl enable nginx.service
现在我们将为您的WordPress网站创建虚拟主机。 使用您喜欢的文本编辑器创建以下文件:
$ sudo vim /etc/nginx/sites-available/wordpress.conf
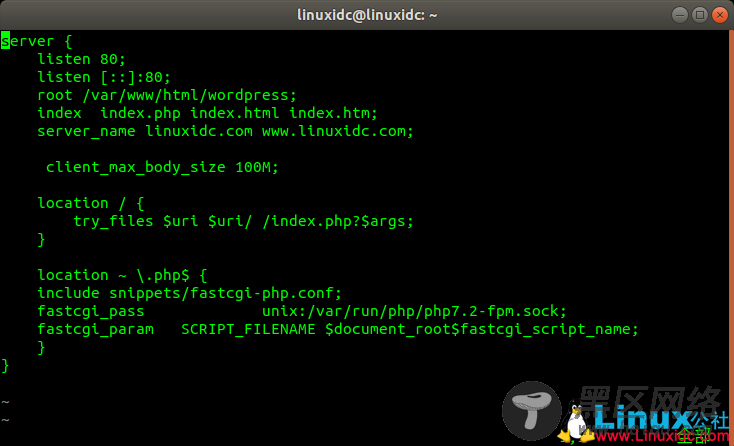
在下面的示例中,使用您要使用的域更改linuxidc.com:
server {
listen 80;
listen [::]:80;
root /var/www/html/wordpress;
index index.php index.html index.htm;
server_name linuxidc.com ;
client_max_body_size 100M;
location / {
try_files $uri $uri/ /index.php?$args;
}
location ~ \.php$ {
include snippets/fastcgi-php.conf;
fastcgi_pass unix:/var/run/php/php7.2-fpm.sock;
fastcgi_param SCRIPT_FILENAME $document_root$fastcgi_script_name;
}
}
保存文件并退出。 然后启用该站点:
$ sudo ln -s /etc/nginx/sites-available/wordpress.conf /etc/nginx/sites-enabled/
然后重新加载nginx:
$ sudo systemctl reload nginx

我们将使用MariaDB作为您的WordPress数据库。 要安装MariaDB,请运行以下命令:
$ sudo apt install mariadb-server mariadb-client
安装完成后,我们将启动它并将其配置为在系统引导时自动启动:
$ sudo systemctl start mariadb.service
$ sudo systemctl enable mariadb.service

接下来,通过运行以下命令来保护MariaDB安装:
linuxidc@linuxidc:~$ sudo mysql_secure_installation
NOTE: RUNNING ALL PARTS OF THIS SCRIPT IS RECOMMENDED FOR ALL MariaDB
SERVERS IN PRODUCTION USE! PLEASE READ EACH STEP CAREFULLY!
In order to log into MariaDB to secure it, we'll need the current
password for the root user. If you've just installed MariaDB, and
you haven't set the root password yet, the password will be blank,
so you should just press enter here.
Enter current password for root (enter for none):
OK, successfully used password, moving on...
Setting the root password ensures that nobody can log into the MariaDB
root user without the proper authorisation.
You already have a root password set, so you can safely answer 'n'.
Change the root password? [Y/n] y
New password:
Re-enter new password:
Password updated successfully!
Reloading privilege tables..
... Success!
By default, a MariaDB installation has an anonymous user, allowing anyone
to log into MariaDB without having to have a user account created for
them. This is intended only for testing, and to make the installation
go a bit smoother. You should remove them before moving into a
production environment.
Remove anonymous users? [Y/n] Y
... Success!
Normally, root should only be allowed to connect from 'localhost'. This
ensures that someone cannot guess at the root password from the network.
Disallow root login remotely? [Y/n] n
... skipping.