最近在学习基于electron + electron-vue开发聊天客户端项目时,需要用到编辑器插入表情功能。一般通过input或textarea也能实现,通过插入[笑脸]、(:12 这些标签,展示的时候解析标签就行。
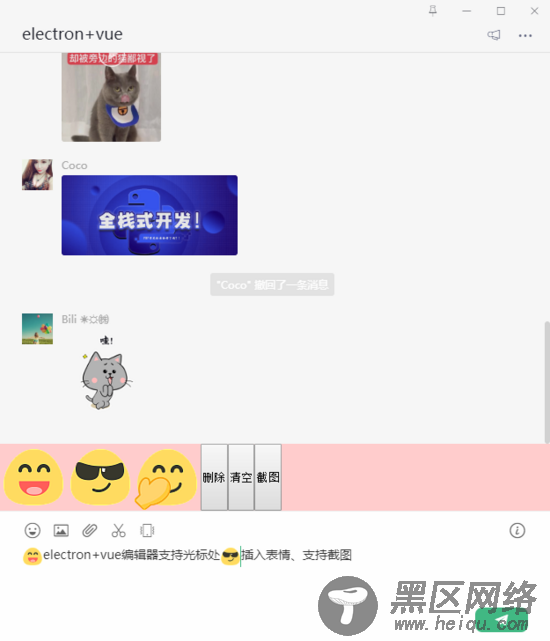
如下图效果:

在网上找到的jq插件实现在textarea光标处插入表情符标签
<!DOCTYPE html> <html> <head> <meta charset="utf-8"> <title></title> <link href="https://cdn.bootcss.com/bootstrap/3.3.7/css/bootstrap.min.css"> </head> <body> <div> <div> <div> <button data-emoj="[笑脸]">[笑脸]</button> <button data-emoj="[奋斗]">[奋斗]</button> <button data-emoj="[:17]">[:17]</button> </div> <div> <textarea rows="10"></textarea> </div> </div> </div> <script src="https://cdn.bootcss.com/jquery/3.3.1/jquery.min.js"></script> <script> (function ($) { $.fn.extend({ insertEmojAtCaret: function (myValue) { var $t = $(this)[0]; if (document.selection) { this.focus(); sel = document.selection.createRange(); sel.text = myValue; this.focus(); } else if ($t.selectionStart || $t.selectionStart == '0') { var startPos = $t.selectionStart; var endPos = $t.selectionEnd; var scrollTop = $t.scrollTop; $t.value = $t.value.substring(0, startPos) + myValue + $t.value.substring(endPos, $t.value.length); this.focus(); $t.selectionStart = startPos + myValue.length; $t.selectionEnd = startPos + myValue.length; $t.scrollTop = scrollTop; } else { this.value += myValue; this.focus(); } } }); })(jQuery); $("button").on("click", function() { $("#content").insertEmojAtCaret($(this).attr("data-emoj")); }); </script> </body> </html>
可是这种方法并不是我想要的类似微信编辑框插入表情效果。
如是就想到了div模拟 设置 contenteditable="true" 实现富文本编辑器效果,这种方法是可以实现,不过在vue中不能绑定v-model,最后参考一些技术贴实现了这个功能,一顿操作下来采坑不少,于是就做一些分享记录吧。
vue中通过给div添加contenteditable=true属性实现富文本功能
实现方式:
单独声明一个vue组件,chatInput.vue,通过监听数据变化并返回父组件。
1、父组件添加v-model
<template> ... <chatInput ref="chatInput" v-model="editorText" @focusFn="handleEditorFocus" @blurFn="handleEditorBlur" /> </template>
import chatInput from './chatInput' export default { data () { return { editorText: '', ... } }, components: { chatInput, }, ... }
2、v-model中传入的值在子组件prop中获取
export default { props: { value: { type: String, default: '' } }, data () { return { editorText: this.value, ... } }, watch: { value() { ... } }, }
3、通过监听获取到的prop值,并将该值赋值给子组件中的v-html参数,双向绑定就ok了。
chatInput.vue组件
<!-- vue实现contenteditable功能 --> <template> <div ref="editor" contenteditable="true" v-html="editorText" @input="handleInput" @focus="handleFocus" @blur="handleBlur"> </div> </template> <script> export default { props: { value: { type: String, default: '' } }, data () { return { editorText: this.value, isChange: true, } }, watch: { value() { if(this.isChange) { this.editorText = this.value } } }, methods: { handleInput() { this.$emit('input', this.$el.innerHTML) }, // 清空编辑器 handleClear() { this.$refs.editor.innerHTML = '' this.$refs.editor.focus() }, // 获取焦点 handleFocus() { this.isChange = false this.$emit('focusFn') }, // 失去焦点 handleBlur() { this.isChange = true this.$emit('blurFn') }, /** * 光标处插入内容 * @param html 需要插入的内容 */ insertHtmlAtCaret(html) { let sel, range; if(!this.$refs.editor.childNodes.length) { this.$refs.editor.focus() } if (window.getSelection) { // IE9 and non-IE sel = window.getSelection(); if (sel.getRangeAt && sel.rangeCount) { range = sel.getRangeAt(0); range.deleteContents(); let el = document.createElement("div"); el.appendChild(html) var frag = document.createDocumentFragment(), node, lastNode; while ((node = el.firstChild)) { lastNode = frag.appendChild(node); } range.insertNode(frag); if (lastNode) { range = range.cloneRange(); range.setStartAfter(lastNode); range.collapse(true); sel.removeAllRanges(); sel.addRange(range); } } } else if (document.selection && document.selection.type != "Control") { // IE < 9 document.selection.createRange().pasteHTML(html); } this.handleInput() } } } </script> <style> </style>
组件功能已经亲测,直接一次性拿走使用。
以下是一些参考:
1、vue官方描叙, 自定义组件的v-model:
一个组件上的 v-model 默认会利用名为 value 的 prop 和名为 input 的事件,v-model的值将会传入子组件中的prop