iOS消息推送的基本流程
1.注册:为应用程序申请消息推送服务。此时你的设备会向APNs服务器发送注册请求。2. APNs服务器接受请求,并将deviceToken返给你设备上的应用程序 3.客户端应用程序将deviceToken发送给后台服务器程序,后台接收并储存。 4.后台服务器向APNs服务器发送推送消息 5.APNs服务器将消息发给deviceToken对应设备上的应用程序
使用leanclound进行消息推送
优势:文档清晰,价格便宜
接入Leanclound
1.首先需要创建一个react-native项目
react-native init projectName
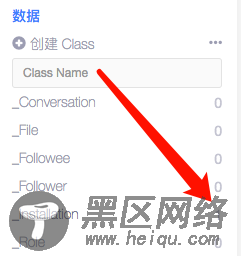
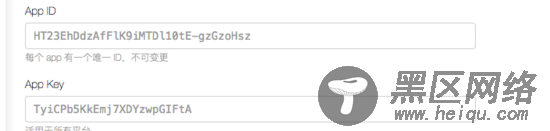
2.在leancloud创建一个同名项目,并记录好appid和appkey
3.项目创建成功后,安装推送所需的模块(需要cd到工程目录)
1.使用yarn安装
yarn add leancloud-storage yarn add leancloud-installation
2.使用npm安装
npm install leancloud-storage --save npm install leancloud-installation --save
4.在项目目录下新建一个文件夹,名字为pushservice,在里面添加一个js文件PushService.js,处理消息推送的逻辑,
1.在index.js初始化leanclound
import AV from 'leancloud-storage' ... /* *添加注册的appid和appkey */ const appId = 'HT23EhDdzAfFlK9iMTDl10tE-gzGzoHsz' const appKey = 'TyiCPb5KkEmj7XDYzwpGIFtA' /* *初始化 */ AV.initialize(appId,appKey); /* *把Installation设为全局变量,在其他文件方便使用 */ global.Installation = require('leancloud-installation')(AV); ...
2.iOS端配置
首先,在项目中引入RCTPushNotification,详情请参考:
步骤一:将PushNotification项目拖到iOS主目录,PushNotification路径:当前项目/node_modules/react-native/Libraries/PushNotificationIOS目录下
步骤二:添加libRCTPushNotification静态库,添加方法:工程Targets-Build Phases-link binary with Libraries 点击添加,搜索libRCTPushNotification.a并添加
步骤三:开启推送功能,方法:工程Targets-Capabilities 找到Push Notification并打开
步骤四:在Appdelegate.m文件添加代码
#import <React/RCTPushNotificationManager.h> ... //注册推送通知 -(void)application:(UIApplication *)application didRegisterUserNotificationSettings:(UIUserNotificationSettings *)notificationSettings{ [RCTPushNotificationManager didRegisterUserNotificationSettings:notificationSettings]; } // Required for the register event. - (void)application:(UIApplication *)application didRegisterForRemoteNotificationsWithDeviceToken:(NSData *)deviceToken { [RCTPushNotificationManager didRegisterForRemoteNotificationsWithDeviceToken:deviceToken]; } // Required for the notification event. You must call the completion handler after handling the remote notification. - (void)application:(UIApplication *)application didReceiveRemoteNotification:(NSDictionary *)userInfo fetchCompletionHandler:(void (^)(UIBackgroundFetchResult))completionHandler { NSLog(@"收到通知:%@",userInfo); [RCTPushNotificationManager didReceiveRemoteNotification:userInfo fetchCompletionHandler:completionHandler]; } // Required for the registrationError event. - (void)application:(UIApplication *)application didFailToRegisterForRemoteNotificationsWithError:(NSError *)error { NSLog(@"error == %@" , error); [RCTPushNotificationManager didFailToRegisterForRemoteNotificationsWithError:error]; } // Required for the localNotification event. - (void)application:(UIApplication *)application didReceiveLocalNotification:(UILocalNotification *)notification { NSLog(@"接受通知:%@",notification); [RCTPushNotificationManager didReceiveLocalNotification:notification]; }
5. 获取deviceToken,并将deviceToken插入到_Installation
找到PushService文件,编写代码
//引用自带PushNotificationIOS const PushNotificationIOS = require('react-native').PushNotificationIOS; ... class PushService { //初始化推送 init_pushService = () => { //添加监听事件 PushNotificationIOS. addEventListener('register',this.register_push); //请求权限 PushNotificationIOS.requestPermissions(); } //获取权限成功的回调 register_push = (deviceToken) => { //判断是否成功获取到devicetoken if (deviceToken) { this.saveDeviceToken(deviceToken); } } //保存devicetoken到Installation表中 saveDeviceToken = (deviceToken) => { global.Installation.getCurrent() .then(installation => { installation.set('deviceType', 'ios'); installation.set('apnsTopic', '工程bundleid'); installation.set('deviceToken', deviceToken); return installation.save(); }); } }
修改App.js文件 在componentDidMount初始化推送
import PushService from './pushservice/PushService'; ... componentDidMount () { //初始化 PushService.init_pushService(); }
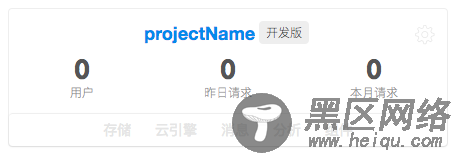
运行项目,必须真机才能获取到deviceToken,模拟器获取不到,看看是否保存的deviceToken,如果保存成功,leandclound后台能发现_Installation表多了一条数据