
范例:
All examples read nginx config file for access log location and format. If you want to specify the access log file and / or log format, use the -f and -a options. "top" like view of nginx requests 指定配置文件启动ngxtop: $ ngxtop -c /usr/local/nginx/conf/nginx.conf 404前十的请求: $ ngxtop top request_path --filter 'status == 404' 总流量前十的请求: $ ngxtop --order-by 'avg(bytes_sent) * count' 访问量前十的ip地址: $ ngxtop --group-by remote_addr 输出400以上状态码的请求以及请求来源: $ ngxtop -i 'status >= 400' print request status http_referer Average body bytes sent of 200 responses of requested path begin with 'foo': $ ngxtop avg bytes_sent --filter 'status == 200 and request_path.startswith("foo")'指定nginx的配置文件进行启动:
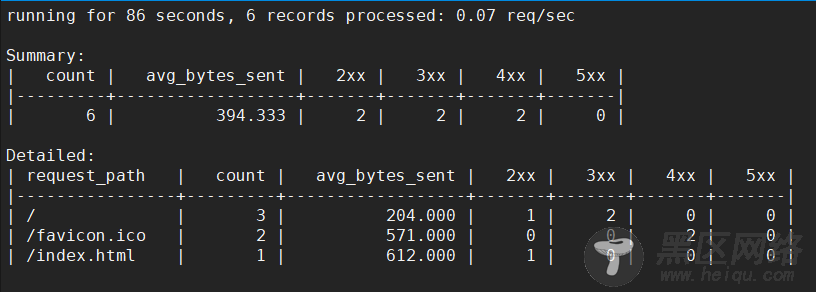
[root@01server ~]# ngxtop -c /usr/local/nginx/conf/nginx.conf启动后如下:

注:Summary相当于请求的概览信息,Detailed就自然是请求的详细信息了。2xx、3xx、4xx以及5xx,都是表示的http状态。avg_bytes_sent表示请求所发送的字节数平均值,request_path则是请求路径,count表示请求的总次数。
默认情况下,ngxtop不会显示启动ngxtop之前的请求信息,只会显示ngxtop启动之后新的请求信息。所以我们可以到浏览器上刷新一下,随便访问一些页面,人为制造一些请求。如下图,这时就可以看到ngxtop成功监控到了请求信息:
我们可以通过选项来指定一些条件,例如我希望只显示http状态是200的,就可以使用-i进行指定:
[root@01server ~]# ngxtop -c /usr/local/nginx/conf/nginx.conf -i 'status == 200'如下:

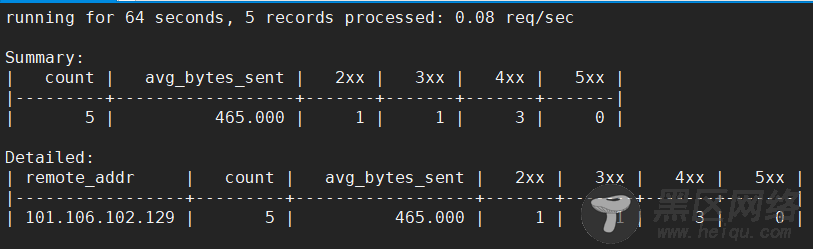
例如我希望显示访问最多的ip,就可以使用-g进行指定:
[root@01server ~]# ngxtop -c /usr/local/nginx/conf/nginx.conf -g remote_addr如下:
如果想要查看之前的请求信息可以使用--no-follow选项,相当于是对历史的请求信息做了一个统计,如下:

关于ngxtop常用操作就先简单介绍到这,希望详细了解最直接的就是查阅该项目在github上的文档。
nginx-rrd图形化监控在上两小节中,我们介绍了两个基础的nginx工具,能够监控连接信息和请求信息,它们都是基于命令行的。本小节则介绍一个图形化的nginx监控工具,该工具就是nginx-rrd。nginx-rrd 也是 Nginx 官方推荐的一款 Nginx 监控工具,利用 nginx-rrd 可以很方便的生成图表,它可以监控连接信息和请求信息。
nginx-rrd 官网地址如下:
https://www.nginx.com/resources/wiki/modules/rrd_graph/
那么我们接下来就看看如何安装并使用nginx-rrd吧。nginx-rrd部分功能是基于上两小节所介绍的工具实现的,所以在安装nginx-rrd之前需要根据上两节的介绍安装好所需的工具。由于nginx-rrd是使用php实现的,所以在此之前,我们得先安装好php的运行环境,以及安装rrdtool的相关依赖。我这里使用yum进行安装,命令如下:
[root@01server ~]# yum install -y php php-gd php-soap php-mbstring php-xmlrpc php-dom php-fpm [root@01server ~]# yum install -y perl rrdtool perl-libwww-perl libwww-perl perl-rrdtool安装好php运行环境以及rrdtool后,我们还需要把nginx和php-fpm进行一个整合。修改php-fpm的配置文件,将文件中的user和group修改为与nginx.conf中的user一致:
[root@01server ~]# vim /etc/php-fpm.d/www.conf user = nobody group = nobody [root@01server ~]#还需要让nginx支持解析php,在虚拟主机配置文件中,增加如下内容:
[root@01server ~]# vim /usr/local/nginx/conf/vhost/default.conf # 添加以下内容 location ~ \.php$ { include fastcgi_params; fastcgi_pass unix:/tmp/php-fcgi.sock; fastcgi_index index.php; fastcgi_param SCRIPT_FILENAME /usr/local/nginx/html$fastcgi_script_name; } [root@01server ~]#