
3 个基础类加载器在 conf/catalina.properties 中进行配置:
common.loader="${catalina.base}/lib","${catalina.base}/lib/*.jar","${catalina.home}/lib","${catalina.home}/lib/*.jar" server.loader= shared.loader=Common: 以应用类加载器为父类,是 Tomcat 顶层的公用类加载器,其路径由 conf/catalina.properties 中的 common.loader 指定,默认指向 ${catalina.home}/lib 下的包。
Catalina: 以 Common 类加载器为父类,是用于加载 Tomcat 应用服务器的类加载器,其路径由 server.loader 指定,默认为空,此时 Tomcat 使用 Common 类加载器加载应用服务器。
Shared: 以 Common 类加载器为父类,是所有 Web 应用的父类加载器,其路径由 shared.loader 指定,默认为空,此时 Tomcat 使用 Common 类加载器作为 Web 应用的父加载器。
Web 应用: 以 Shared 类加载器为父类,加载 /WEB-INF/classes 目录下的未压缩的 Class 和资源文件以及 /WEB-INF/lib 目录下的 jar 包,该类加载器只对当前 Web 应用可见,对其他 Web 应用均不可见。
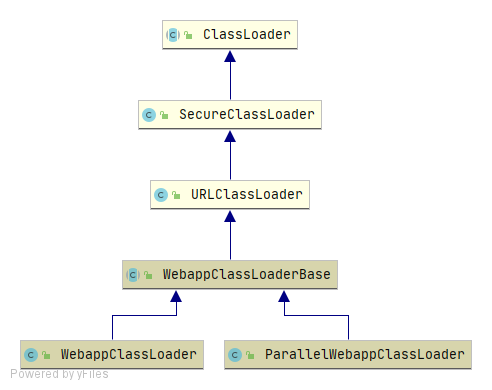
4. Tomcat 类加载机制源码 4.1 ClassLoader 的创建先看下加载器类图:
先从 BootStrap 的 main 方法看起:
public static void main(String args[]) { synchronized (daemonLock) { if (daemon == null) { // Don't set daemon until init() has completed Bootstrap bootstrap = new Bootstrap(); try { bootstrap.init(); } catch (Throwable t) { handleThrowable(t); t.printStackTrace(); return; } daemon = bootstrap; } else { // When running as a service the call to stop will be on a new // thread so make sure the correct class loader is used to // prevent a range of class not found exceptions. Thread.currentThread().setContextClassLoader(daemon.catalinaLoader); } // 省略其余代码... } }可以看到这里先判断了 bootstrap 是否为 null ,如果不为 null 直接把 Catalina ClassLoader 设置到了当前线程,如果为 null 下面是走到了 init() 方法。
public void init() throws Exception { // 初始化类加载器 initClassLoaders(); // 设置线程类加载器,将容器的加载器传入 Thread.currentThread().setContextClassLoader(catalinaLoader); // 设置区安全类加载器 SecurityClassLoad.securityClassLoad(catalinaLoader); // 省略其余代码... }接着这里看到了会调用 initClassLoaders() 方法进行类加载器的初始化,初始化完成后,同样会设置 Catalina ClassLoader 到当前线程。
private void initClassLoaders() { try { commonLoader = createClassLoader("common", null); if (commonLoader == null) { // no config file, default to this loader - we might be in a 'single' env. commonLoader = this.getClass().getClassLoader(); } catalinaLoader = createClassLoader("server", commonLoader); sharedLoader = createClassLoader("shared", commonLoader); } catch (Throwable t) { handleThrowable(t); log.error("Class loader creation threw exception", t); System.exit(1); } }看到这里应该就清楚了,会创建三个 ClassLoader : CommClassLoader , Catalina ClassLoader , SharedClassLoader ,正好对应前面介绍的三个基础类加载器。
接着进入 createClassLoader() 查看代码:
private ClassLoader createClassLoader(String name, ClassLoader parent) throws Exception { String value = CatalinaProperties.getProperty(name + ".loader"); if ((value == null) || (value.equals(""))) return parent; value = replace(value); List<Repository> repositories = new ArrayList<>(); String[] repositoryPaths = getPaths(value); for (String repository : repositoryPaths) { // Check for a JAR URL repository try { @SuppressWarnings("unused") URL url = new URL(repository); repositories.add(new Repository(repository, RepositoryType.URL)); continue; } catch (MalformedURLException e) { // Ignore } // Local repository if (repository.endsWith("*.jar")) { repository = repository.substring (0, repository.length() - "*.jar".length()); repositories.add(new Repository(repository, RepositoryType.GLOB)); } else if (repository.endsWith(".jar")) { repositories.add(new Repository(repository, RepositoryType.JAR)); } else { repositories.add(new Repository(repository, RepositoryType.DIR)); } } return ClassLoaderFactory.createClassLoader(repositories, parent); }可以看到,这里加载的资源正好是我们刚才看到的配置文件 conf/catalina.properties 中的 common.loader , server.loader 和 shared.loader 。
4.2 ClassLoader 加载过程直接打开 ParallelWebappClassLoader ,至于为啥不是看 WebappClassLoader ,从名字上就知道 ParallelWebappClassLoader 是一个并行的 WebappClassLoader 。