一、关于使用Three.js几点理论说明
1.请参考官网地址 https://threejs.org/
2.使用three.js必备条件 <场景 A scene、相机a camera、渲染器 a renderer 三者缺一不可>
To actually be able to display anything with Three.js, we need three things: A scene, a camera, and a renderer so we can render the scene with the camera.
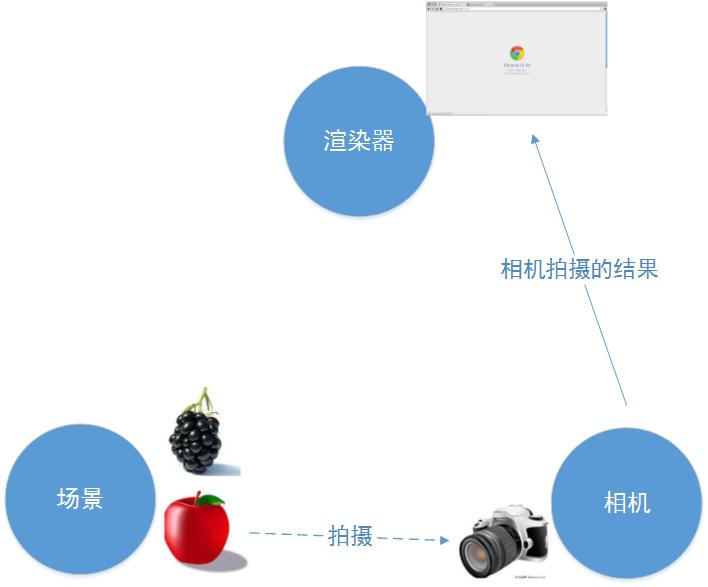
3.场景 A scene、相机a camera、渲染器 a renderer 三者之间的关系 <渲染器的作用就是将相机拍摄下来的图片,放到浏览器中去显示>
三、案例使用Three.js绘制旋转立方体
实现效果图如下所示

案例案例源码
<!DOCTYPE html> <html> <head> <meta charset="UTF-8"> <title>用threejs构建室内模型</title> <style> #canvas-frame { width: 100%; height: 600px; } </style> </head> <body> <div ></div> </body> <script type="text/javascript" src="https://www.jb51.net/article/lib/three.js" ></script> <script type="text/javascript"> var renderer, //渲染器 width = document.getElementById('canvas-frame').clientWidth, //画布宽 height = document.getElementById('canvas-frame').clientHeight; //画布高 //初始化渲染器 function initThree(){ renderer = new THREE.WebGLRenderer({ antialias : true //canvas: document.getElementById('canvas-frame') }); renderer.setSize(width, height); renderer.setClearColor(0xFFFFFF, 1.0); document.getElementById('canvas-frame').appendChild(renderer.domElement); renderer.setClearColor(0xFFFFFF, 1.0); } //初始化场景 var scene; function initScene(){ scene = new THREE.Scene(); } var camera; function initCamera() { //透视相机 camera = new THREE.PerspectiveCamera(45, width/height , 1, 10000); camera.position.x = 50; camera.position.y = 150; camera.position.z =150; camera.up.x = 0; camera.up.y = 1; //相机朝向--相机上方为y轴 camera.up.z = 0; camera.lookAt({ //相机的中心点 x : 0, y : 0, z : 0 }); // camera 正交相机 /*camera = new THREE.OrthographicCamera(-300, 300, 100, -100, 1, 10000); camera.position.x = 250; camera.position.y = 100; camera.position.z = 1800; camera.up.x = 0; camera.up.y = 1; //相机朝向--相机上方为y轴 camera.up.z = 0; camera.lookAt({ //相机的中心点 x : 0, y : 0, z : 0 });*/ } function initLight(){ // light--这里使用环境光 //var light = new THREE.DirectionalLight(0xffffff); /*方向性光源*/ //light.position.set(600, 1000, 800); var light = new THREE.AmbientLight(0xffffff); //模拟漫反射光源 light.position.set(600, 1000, 800); //使用Ambient Light时可以忽略方向和角度,只考虑光源的位置 scene.add(light); } function initObject(){ //初始化对象 //初始化地板 initFloor(); } function initGrid(){ //辅助网格 var helper = new THREE.GridHelper( 1000, 50 ); helper.setColors( 0x0000ff, 0x808080 ); scene.add( helper ); } function initFloor(){ //创建一个立方体 var geometry = new THREE.BoxGeometry(80, 20, 80); for ( var i = 0; i < geometry.faces.length; i += 2 ) { var hex = Math.random() * 0xffffff; geometry.faces[ i ].color.setHex( hex ); geometry.faces[ i + 1 ].color.setHex( hex ); } var material = new THREE.MeshBasicMaterial( { vertexColors: THREE.FaceColors} ); //将material材料添加到几何体geometry var mesh = new THREE.Mesh(geometry, material); mesh.position = new THREE.Vector3(0,0,0); scene.add(mesh); } //初始化页面加载 function threeStart(){ //初始化渲染器 initThree(); //初始化场景 initScene(); //初始透视化相机 initCamera(); //初始化光源 initLight(); //模型对象 initObject(); //初始化网格辅助线 initGrid(); renderer.render(scene, camera); //实时动画 //animation(); } function animation(){ //渲染成像 var timer = Date.now()*0.0001; camera.position.x = Math.cos(timer)*100; camera.position.z = Math.sin(timer)*100; camera.lookAt(scene.position); renderer.render(scene, camera); requestAnimationFrame(animation); } </script> </html>
一.场景 场景就是一个三维空间。 用 [Scene] 类声明一个叫 [scene] 的对象。
二.关于上述案例中PerspectiveCamera透视相机注意点说明
1. 照相机默认的观察方向是指向z轴负方向(就是朝向屏幕),所以当变化坐标以后,就要将照相机指向原点,才能观察到物体。
2.利用 lookAt 方法来设置相机的视野中心。 「lookAt()」的参数是一个属性包含中心坐标「x」「y」「z」的对象。