下面详解如下:
1. 准备
玄机逸士很久没有开发web方面的应用了,所以机器上没有现成的环境,为此先要进行这方面的准备。
a) 到 上下载tomcat压缩包apache-tomcat-6.0.33.zip,将其解压到指定目录即可,
如:D:\Tomcat6
b) 到上下载用于文件上传的两个包:commons-fileupload-1.2.2-bin.zip
和commons-io-2.1-bin.zip, commons-fileupload依赖于commons-io,但在编程的过程中,
不会直接用到commons-io
c) 检查Tomcat的安装是否成功。双击D:\Tomcat6\bin目录中的startup.bat文件,就可以启动tomcat。
打开浏览器,访问:8080/,如果出现tomcat相关的页面,则说明tomcat安装成功。
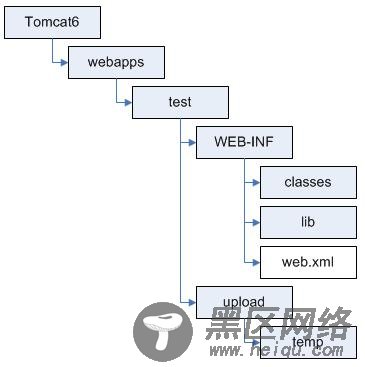
d) 在D:\Tomcat6\webapps目录下创建一个test子目录,我们等会开发的servlet就将部署在这里。在
test目录下再建立两个目录WEB-INF(必须大写)和upload,在WEB-INF下面 创建两个目录classes和lib,
同时在新建一个web.xml文件;在upload目录下,创建一个temp子目录,这些工作做完以后,test目录
下面的目录文件结构如下图所示。

其中的classes目录,用来存放将要开发的servlet,lib用来存放commons-fileupload和commons-io相关的jar包,web.xml是一些应用描述信息;upload用于存放客户端(即我们要开发的Java application)上传过来的文件,temp则用于存放上传过程中可能产生的一些临时文件。
e) 将commons-fileupload-1.2.2-bin.zip和commons-io-2.1-bin.zip解压,可以得到commons-fileupload-
1.2.2.jar和commons-io-2.1.jar,我们将这两个文件拷贝到d)中创建的lib目录中。
f) 编辑web.xml使之如下:
<?xmlversion="1.0" encoding="ISO-8859-1"?>
<!--
Licensed to the Apache Software Foundation(ASF) under one or more
contributor license agreements. See the NOTICE file distributed with
this work for additional informationregarding copyright ownership.
The ASF licenses this file to You under theApache License, Version 2.0
(the "License"); you may not usethis file except in compliance with
the License. You may obtain a copy of the License at
Unless required by applicable law or agreedto in writing, software
distributed under the License is distributedon an "AS IS" BASIS,
WITHOUT WARRANTIES OR CONDITIONS OF ANY KIND,either express or implied.
See the License for the specific languagegoverning permissions and
limitations under the License.
-->
<web-appxmlns="http://java.sun.com/xml/ns/javaee"
xmlns:xsi="http://www.w3.org/2001/XMLSchema-instance"
xsi:schemaLocation="http://java.sun.com/xml/ns/javaee"
version="2.5">
<servlet>
<servlet-name>Hello</servlet-name>
<servlet-class>com.pat.handlinghttprequestservlet.HandlingHttpRequestServlet</servlet-class>
</servlet>
<servlet-mapping>
<servlet-name>Hello</servlet-name>
<url-pattern>/upload</url-pattern>
</servlet-mapping>
</web-app>
这个web.xml可以先从D:\Tomcat6\webapps\examples\WEB-INF下面拷贝过来,再进行如上黑体字所示的修改即可。<servlet>标签描述的是servlet代码方面的资料,其中<servlet-name>Hello</servlet-name>是给这个servlet起一个名字Hello,它必须和下面的<servlet-mapping>中的<servlet-name>一致,该名字具体是什么可以随意写定。
<servlet-class>com.pat.handlinghttprequestservlet.HandlingHttpRequestServlet</servlet-class>说明了完整的servlet类名,即servlet的类名为HandlingHttpRequestServlet,它位于包com.pat.handlinghttprequestservlet中。
<url-pattern>/upload</url-pattern>,说明了如果客户端向“服务器的URL地址:端口号/test/upload”发出了请求,则该请求将由位于包com.pat.handlinghttprequestservlet中的HandlingHttpRequestServlet进行处理。
到此,前期准备工作结束。下面准备写代码。
2. Servlet的代码
packagecom.pat.handlinghttprequestservlet;
importjava.io.File;
importjava.io.IOException;
importjava.io.PrintWriter;
importjava.util.ArrayList;
importjavax.servlet.ServletException;
importjavax.servlet.http.HttpServlet;
importjavax.servlet.http.HttpServletRequest;
importjavax.servlet.http.HttpServletResponse;
importorg.apache.commons.fileupload.FileItem;
importorg.apache.commons.fileupload.disk.DiskFileItemFactory;
importorg.apache.commons.fileupload.servlet.ServletFileUpload;
public classHandlingHttpRequestServlet extends HttpServlet
{
private static final longserialVersionUID = 1L;
@Override
protected void doGet(HttpServletRequestreq, HttpServletResponse resp)
throws ServletException, IOException
{
super.doGet(req, resp);
}
@SuppressWarnings({"unchecked", "deprecation" })
@Override
protected voiddoPost(HttpServletRequest req, HttpServletResponse resp)
throwsServletException, IOException
{
DiskFileItemFactory factory =new DiskFileItemFactory();
String path = req.getRealPath("/upload"); //得到绝对文件夹路径,比如
// "D:\\Tomcat6\\webapps\\test\\upload"
String repositoryPath =req.getRealPath("/upload/temp"); //临时文件夹路径
factory.setRepository(newFile(repositoryPath)); // 设定临时文件夹为repositoryPath
factory.setSizeThreshold(1024* 1024); // 设定上传文件的阈值,如果上传文件大于1M,
// 就可能在repository所代 表的文件夹中产生
// 临时文件,否则直接在内存中进行处理
//System.out.println("----"+ req.getContextPath()); // 得到相对文件夹路径,比如 "/test"
// 创建一个ServletFileUpload对象
ServletFileUpload uploader =new ServletFileUpload(factory);
try
{
// 调用uploader中的parseRequest方法,可以获得请求中的相关内容,
// 即一个FileItem类型的ArrayList。FileItem是在
// org.apache.commons.fileupload中定义的,它可以代表一个文件,
// 也可以代表一个普通的form field
ArrayList<FileItem>list = (ArrayList<FileItem>)uploader.parseRequest(req);
System.out.println(list.size());
for(FileItemfileItem : list)
{
if(fileItem.isFormField()) // 如果是普通的form field
{
Stringname = fileItem.getFieldName();
Stringvalue = fileItem.getString();
System.out.println(name+ " = " + value);
}
else // 如果是文件
{
Stringvalue = fileItem.getName();
intstart = value.lastIndexOf("\\");
StringfileName = value.substring(start + 1);
// 将其中包含的内容写到path(即upload目录)下,
// 名为fileName的文件中
fileItem.write(newFile(path, fileName));
}
}
}
catch(Exception e)
{
e.printStackTrace();
}
// 向客户端反馈结果
PrintWriter out =resp.getWriter();
out.print("OK");
out.flush();
out.close();
super.doPost(req, resp);
}
}
再在classes目录建立如下目录结构com\pat\handlinghttprequestservlet,这用来代表HandlingHttpRequestServlet这个servlet所在的包名,将编译好的HandlingHttpRequestServlet.class,拷贝到这个目录下,然后启动(或者重新启动)tomcat
