6 用RJS查询locations
我的设想是设置一个定时器,不断地查询locations表,把获得的记录显示右边的空白处(<div ></div>),同时把坐标点显示在地图(map)上。当我们访问:3000/locations,会显示locations数据表的全部信息,因此我们就想办法把这个表显示在admin_div处,这就需要引入Ajax,或者称为RJS(Ruby-generated JavaScript)的东西。请参考另一篇文章(RubyOnRails with Ajax 具体见 ),那里面详细讨论了RJS技术的实现原理和方法。
为此我们首先添加一个链接到清单6中(\home\index.html.erb),当用户点击这个链接,admin_div就显示查询的结果。添加链接之后的代码如下:
清单7:修改index.html.erb,红色粗体的部分是我新增的代码
<div id="header" dojotype="dijit.layout.ContentPane" region="top"> Click this link to show the current <%= link_to_remote "locations", :update => 'admin_div', :url => {:controller=>"locations", :action =>"list_by"} %>. </div> <!-- header -->
上面清单7代码中,:url => {:controller=>"locations", :action =>"list_by"}指明链接的位置:controller和action。我们知道在locations controller中并没有list_by这个action,我手动把这个list_by添加到locations_controller.rb中,不要修改其他任何部分,见清单8: 清单8:给locations_controller.rb添加list_by,红色粗体的部分是我新增的代码
class LocationsController < ApplicationController # GET /locations # GET /locations.xml def index @locations = Location.find(:all) respond_to do |format| format.html # index.html.erb format.xml { render :xml => @locations } end end # add by me def list_by redirect_to :action => "index" end
另外为了支持RJS,我们还需要把<%= javascript_include_tag :defaults %>添加到index.html.erb中:
清单9:添加RJS声明
... </style> <%= javascript_include_tag :defaults %> <script type="text/javascript"> ...
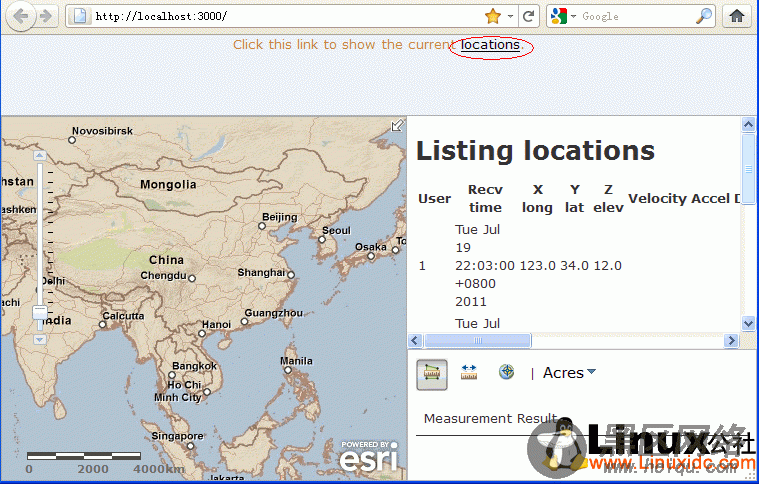
现在我们浏览:3000/并点击locations链接后,界面显示如下:
图6:增加了RJS后的首页
到目前为止,locations链接是您见到的惟一触发器。Ajax 还有许多其他的可用武器,一些由用户驱动,而另一些由程序事件驱动,如时钟。它是一个像闹钟一样并不需要用户干预的东西。可以用 Ajax 的 periodically_call_remote 方法定期更新时钟。更改 index.html.erb 代码如清单10(仅仅修改红色黑体部分):
清单10:修改index.html.erb,增加periodically_call_remote
<div id="header" dojotype="dijit.layout.ContentPane" region="top"> <h1>A Test for RoR with ArcGIS Online Map</h1> <%= periodically_call_remote :update => 'admin_div', :url => {:controller=>"locations", :action =>"list_by"}, :frequency => 3.0 %> </div> <!-- header -->
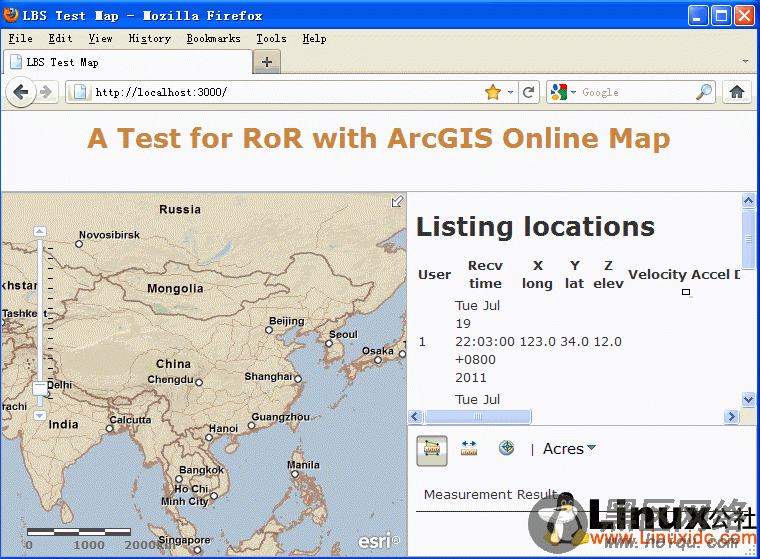
重新浏览:3000/,现在发现admin_div被每3秒自动更新一次。此时我们打开一个新的浏览器并定位到:3000/locations/new,创建一个新的location,可以在:3000/页面看到Listing locations发生了变化,我们新增加的记录被添加到了底部:

图7:自动更新Listing locations
接下来的工作主要是页面的重构和美化。说实在的,这的确耗去了我很多时间。重构之后的页面改变了某些div的id,对部分网页代码也做了调整。最终的成果就是看起来如图8的样子:

图8:最终的gis主页
6.2 为定时器添加启动(Start Monitor)和暂停(StopMonitor)的方法我们设想用户可以控制periodically_call_remote定时器的启动和停止。因此需要修改一下Ruby代码。修改后的代码如下:
清单11:控制periodically_call_remote定时器的启动和停止代码
<head> ...... <%= javascript_include_tag :defaults %> <script type="text/javascript"> ...... var myMonitor = true; var myUpdater = null; PeriodicalExecuter.prototype.resume = function(){ if(!this.timer) this.registerCallback(); }; function startMonitor() { if (myUpdater != null) { myUpdater.resume(); } } function stopMonitor() { if (myUpdater != null) { myUpdater.stop(); } } </script> </head> <body class="claro"> <%= periodically_call_remote( :variable => "myUpdater", :condition => "myMonitor == true", :update => "locations_div", :url => {:controller=>"locations", :action =>"list_by"}, :frequency => 5, :complete => "new Effect.Highlight('locations_div');refreshLocations(dojo.byId('tb_users'));") %> <div id="mainWindow" dojotype="dijit.layout.BorderContainer" design="headline" gutters="false"> ...... <div id="locations_div" dojotype="dijit.layout.ContentPane" region="center"> </div> <!-- locations_div --> ...... </div> </body>
:variable => "myUpdater", 指明new PeriodicalExecuter返回变量名。:condition => "myMonitor == true", 指明触发器回调函数运行的条件。
:update => "locations_div", 指明要更新的div id。就是上文的(admin_div),我改了名字。
:url => {:controller=>"locations", :action =>"list_by"}, 指明控制器和反应器名称。
:frequency => 5, 指定定时器间隔5秒
:complete => "...." 指明链接加载完毕onComplete执行的代码,我们的JavsScript代码可以放在这里。
我增加了下面的代码:
PeriodicalExecuter.prototype.resume = function(){
if(!this.timer)
this.registerCallback();
};
因为PeriodicalExecuter是...\gis\public\javascripts\prototype.js中的JS对象。PeriodicalExecuter只有stop方法,为此我们需要增加了启动定时器的重启方法resume()。
比较清单11中蓝色的代码和运行后查看浏览器源代码中的显示(我做了排版编辑):
清单12:查看浏览器源代码
myUpdater = new PeriodicalExecuter( function(){ if (myMonitor == true) { new Ajax.Updater( 'locations_div', '/locations/list_by', { asynchronous:true, evalScripts:true, onComplete:function(request) { new Effect.Highlight('locations_div'); refreshLocations(dojo.byId('tb_users')); }, parameters:'authenticity_token=' + encodeURIComponent('314268a80fbdca6f758e7bd120507c12a10c4698') } ); } }, 5 );
只要能操作PeriodicalExecuter的实例myUpdater和控制boolean变量myMonitor就可以控制periodically_call_remote定时器。为此我们需要修改Ruby产生的默认代码,这个过程称为override。默认的代码没有返回myUpdater,因此我们需要修改默认的代码。找到这个文件:C:\InstantRails-2.0-win\rails_apps\gis\app\helpers\application_helper.rb。
修改application_helper.rb文件以和下面的清单13一致:
清单13:重载periodically_call_remote,以支持返回变量
# Methods added to this helper will be available to all templates in the application. module ApplicationHelper def periodically_call_remote(options = {}) variable = options[:variable] ||= 'poller' frequency = options[:frequency] ||= 10 code = "#{variable} = new PeriodicalExecuter(function(){#{remote_function(options)}}, #{frequency})" javascript_tag(code) end end
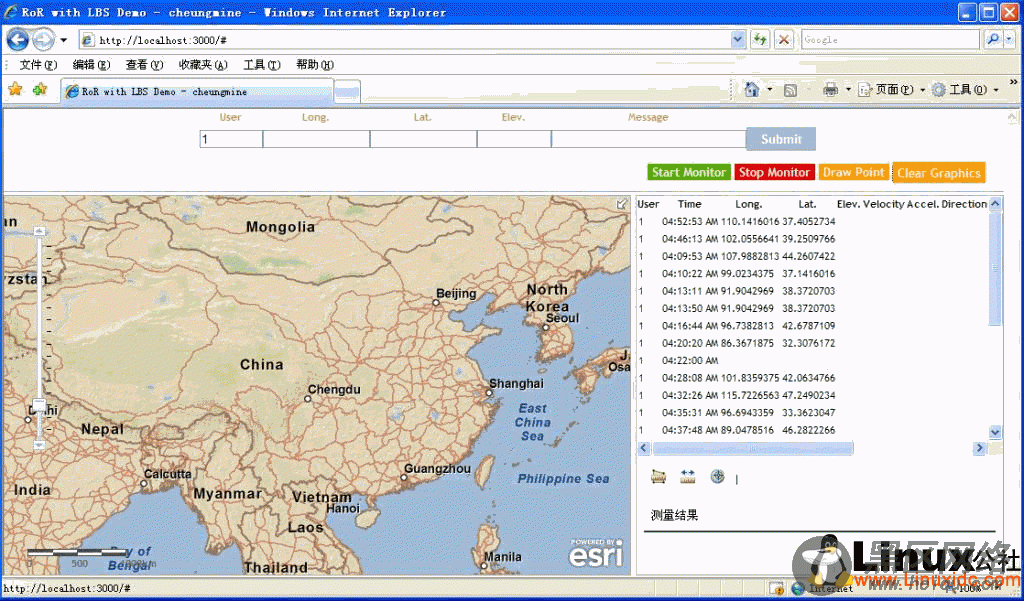
最后,我们调用myUpdater.stop()停止定时器,调用myUpdater.resume()重启定时器。示例主页中,表格定时会变黄色,就是定时器启动的情况下,Ajax代码: new Effect.Highlight('locations_div')作用的效果。当我们按Draw Point按钮时,我们会发现浏览器上部出现了一个输入表:

图9:locations/new的RJS实现
这又是另外一个Ajax的例子。读者可以自己在主页的源代码(index.html.erb)中揣摩(:3000/locations/new)。

