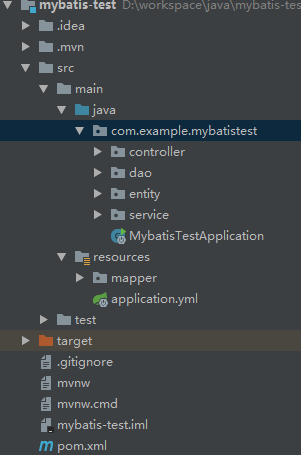
刚毕业的第一份工作是 java 开发,项目中需要用到 mybatis,特此记录学习过程,这只是一个简单 demo,mybatis 用法很多不可能全部写出来,有更复杂的需求建议查看 mybatis 的官方中文文档,点击跳转。下面时项目环境/版本。
开发工具:IDEA
jdk 版本:1.8
springboot 版本:2.03
其他依赖版本见下面 pom.xml:
<?xml version="1.0" encoding="UTF-8"?> <project xmlns="http://maven.apache.org/POM/4.0.0" xmlns:xsi="http://www.w3.org/2001/XMLSchema-instance" xsi:schemaLocation="http://maven.apache.org/POM/4.0.0 "> <modelVersion>4.0.0</modelVersion> <groupId>com.example</groupId> <artifactId>mybatis-test</artifactId> <version>0.0.1-SNAPSHOT</version> <packaging>jar</packaging> <name>mybatis-test</name> <description>Demo project for Spring Boot</description> <parent> <groupId>org.springframework.boot</groupId> <artifactId>spring-boot-starter-parent</artifactId> <version>2.0.3.RELEASE</version> <relativePath/> <!-- lookup parent from repository --> </parent> <properties> <project.build.sourceEncoding>UTF-8</project.build.sourceEncoding> <project.reporting.outputEncoding>UTF-8</project.reporting.outputEncoding> <java.version>1.8</java.version> </properties> <dependencies> <dependency> <groupId>org.springframework.boot</groupId> <artifactId>spring-boot-starter-web</artifactId> </dependency> <dependency> <groupId>mysql</groupId> <artifactId>mysql-connector-java</artifactId> <scope>runtime</scope> </dependency> <!--mybatis依赖 --> <dependency> <groupId>org.mybatis.spring.boot</groupId> <artifactId>mybatis-spring-boot-starter</artifactId> <version>1.3.2</version> </dependency> <!--alibaba连接池依赖--> <dependency> <groupId>com.alibaba</groupId> <artifactId>druid-spring-boot-starter</artifactId> <version>1.1.9</version> </dependency> <!--分页依赖--> <dependency> <groupId>com.github.pagehelper</groupId> <artifactId>pagehelper-spring-boot-starter</artifactId> <version>1.2.5</version> </dependency> <dependency> <groupId>org.springframework.boot</groupId> <artifactId>spring-boot-starter-test</artifactId> <scope>test</scope> </dependency> </dependencies> <build> <plugins> <plugin> <groupId>org.springframework.boot</groupId> <artifactId>spring-boot-maven-plugin</artifactId> </plugin> </plugins> </build> </project> 1.创建项目 使用 idea 中的 spring initializr 生成 maven 项目,项目命令为 mybatis-test,选择 web,mysql,mybatis 依赖,即可成功。(详细过程不赘述,如有需要学习 springboot 创建过程,可参考这篇文章。
然后依照上面的 pom 文件,补齐缺少的依赖。接着创建包 entity,service 和 mybatis 映射文件夹 mapper,创建。为了方便配置将 application.properties 改成 application.yml。由于我们时 REST 接口,故不需要 static 和 templates 目录。修改完毕后的项目结构如下:

修改启动类,增加@MapperScan("com.example.mybatistest.dao"),以自动扫描 dao 目录,避免每个 dao 都手动加@Mapper注解。代码如下:
@SpringBootApplication @MapperScan("com.example.mybatistest.dao") public class MybatisTestApplication { public static void main(String[] args) { SpringApplication.run(MybatisTestApplication.class, args); } }修改 application.yml,配置项目,代码如下:
mybatis: #对应实体类路径 type-aliases-package: com.example.mybatistest.entity #对应mapper映射文件路径 mapper-locations: classpath:mapper/*.xml #pagehelper物理分页配置 pagehelper: helper-dialect: mysql reasonable: true support-methods-arguments: true params: count=countSql returnPageInfo: check server: port: 8081 spring: datasource: name: mysqlTest type: com.alibaba.druid.pool.DruidDataSource #druid连接池相关配置 druid: #监控拦截统计的filters filters: stat driver-class-name: com.mysql.jdbc.Driver url: jdbc:mysql://localhost:3306/test?useUnicode=true&characterEncoding=utf-8&useSSL=true username: root password: 123456 #配置初始化大小,最小,最大 initial-size: 1 min-idle: 1 max-active: 20 #获取连接等待超时时间 max-wait: 6000 #间隔多久检测一次需要关闭的空闲连接 time-between-eviction-runs-millis: 60000 #一个连接在池中的最小生存时间 min-evictable-idle-time-millis: 300000 #打开PSCache,并指定每个连接上PSCache的大小。oracle设置为true,mysql设置为false。分库分表设置较多推荐设置 pool-prepared-statements: false max-pool-prepared-statement-per-connection-size: 20 http: encoding: charset: utf-8 enabled: true 2.编写代码
