Pipeline 生效:
List<Object> objects = redisTemplate.executePipelined(new RedisCallback<Object>() { @Override public Object doInRedis(RedisConnection connection) throws DataAccessException { connection.get("test".getBytes()); connection.get("test2".getBytes()); return null; } });Pipeline 不生效:
List<Object> objects = redisTemplate.executePipelined(new RedisCallback<Object>() { @Override public Object doInRedis(RedisConnection connection) throws DataAccessException { redisTemplate.opsForValue().get("test"); redisTemplate.opsForValue().get("test2"); return null; } });然后,我们尝试将其加入事务中,由于我们的目的不是真的测试事务,只是为了演示问题,所以,仅仅是用 SessionCallback 将 GET 命令包装起来:
redisTemplate.execute(new SessionCallback<Object>() { @Override public <K, V> Object execute(RedisOperations<K, V> operations) throws DataAccessException { return operations.opsForValue().get("test"); } });这里最大的区别就是,外层获取连接的时候,这次是 bind = true 即将连接与当前线程绑定,用于保持会话连接。外层流程如下:
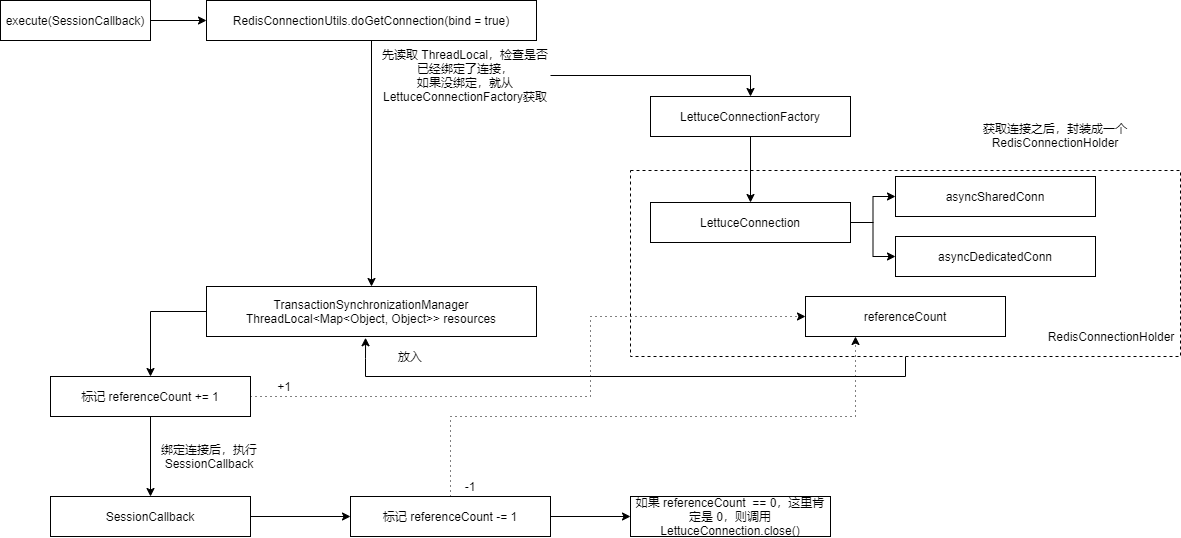
里面的 SessionCallback 其实就是 redisTemplate.opsForValue().get("test"),使用的是共享的连接,而不是独占的连接,因为我们这里还没开启事务(即执行 multi 命令),如果开启了事务使用的就是独占的连接,流程如下:
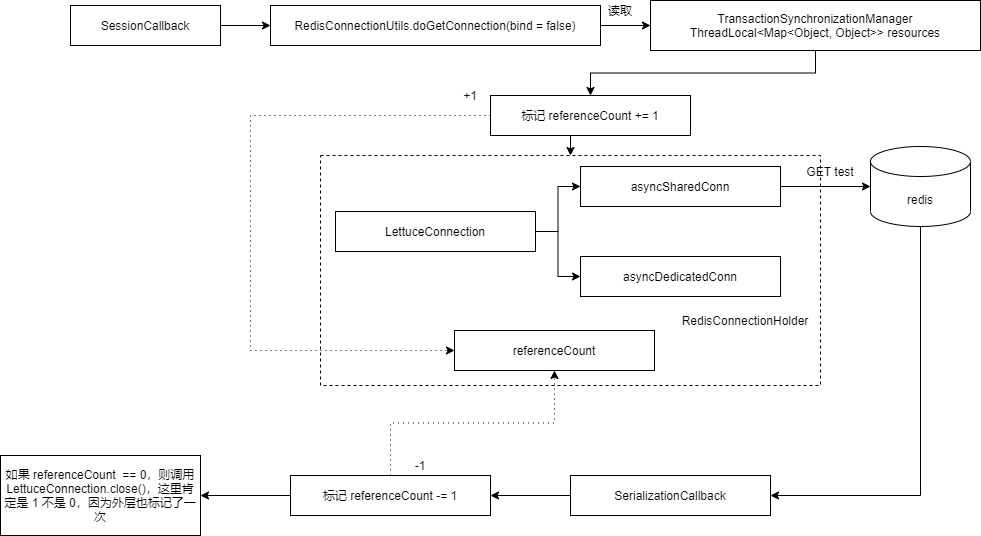
由于 SessionCallback 需要保持连接,所以流程有很大变化,首先需要绑定连接,其实就是获取连接放入 ThreadLocal 中。同时,针对 LettuceConnection 进行了封装,我们主要关注这个封装有一个引用计数的变量。每嵌套一次 execute 就会将这个计数 + 1,执行完之后,就会将这个计数 -1, 同时每次 execute 结束的时候都会检查这个引用计数,如果引用计数归零,就会调用 LettuceConnection.close()。
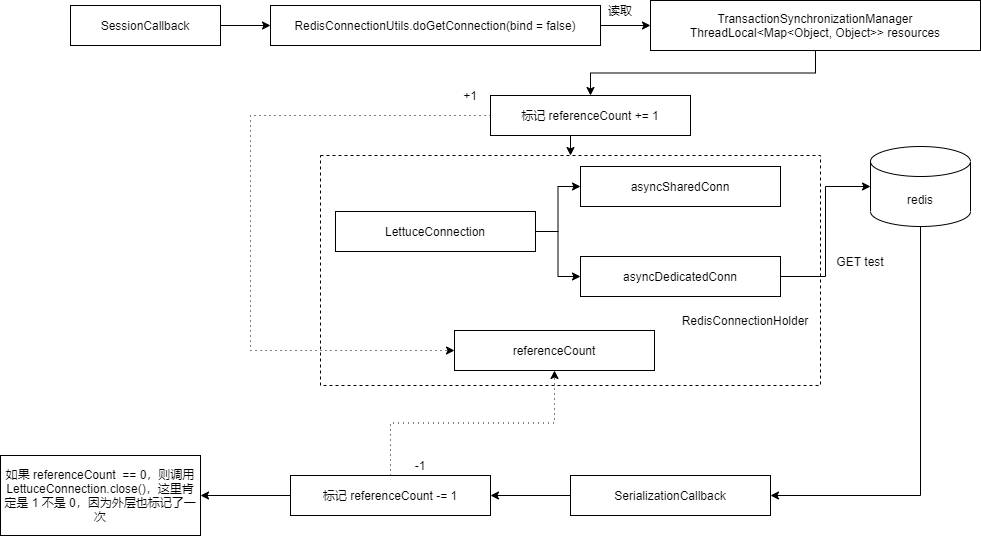
接下来再来看,如果是 executePipelined(SessionCallback) 会怎么样:
List<Object> objects = redisTemplate.executePipelined(new SessionCallback<Object>() { @Override public <K, V> Object execute(RedisOperations<K, V> operations) throws DataAccessException { operations.opsForValue().get("test"); return null; } });其实与第二个例子在流程上的主要区别在于,使用的连接不是共享连接,而是直接是独占的连接。
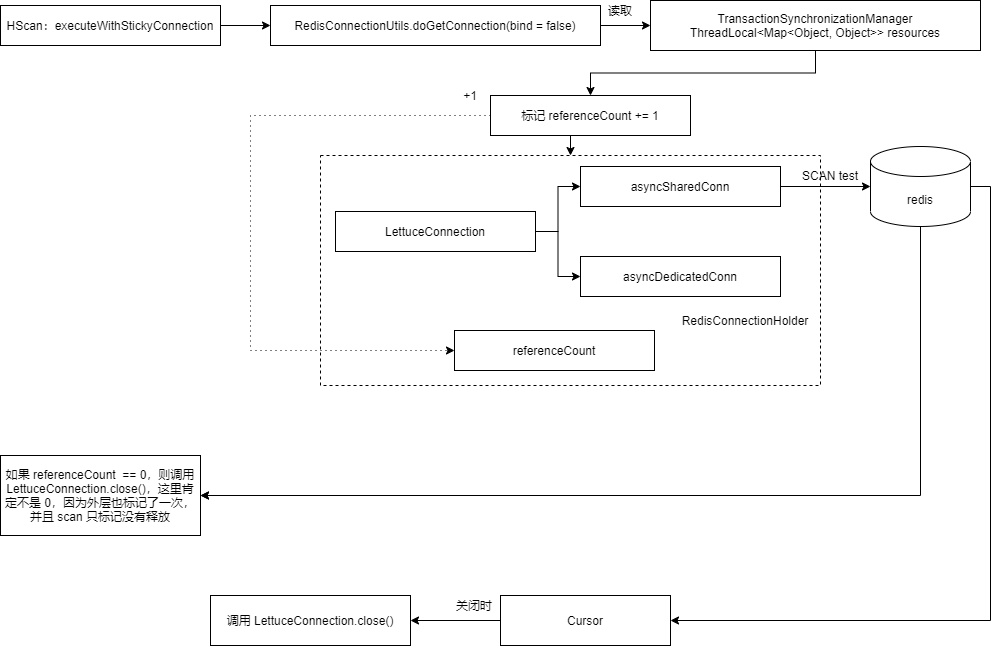
最后我们再来看一个例子,如果是在 execute(RedisCallback) 中执行基于 executeWithStickyConnection(RedisCallback<T> callback) 的命令会怎么样,各种 SCAN 就是基于 executeWithStickyConnection(RedisCallback<T> callback) 的,例如:
redisTemplate.execute(new SessionCallback<Object>() { @Override public <K, V> Object execute(RedisOperations<K, V> operations) throws DataAccessException { Cursor<Map.Entry<Object, Object>> scan = operations.opsForHash().scan((K) "key".getBytes(), ScanOptions.scanOptions().match("*").count(1000).build()); //scan 最后一定要关闭,这里采用 try-with-resource try (scan) { } catch (IOException e) { e.printStackTrace(); } return null; } });这里 Session callback 的流程,如下图所示,因为处于 SessionCallback,所以 executeWithStickyConnection 会发现当前绑定了连接,于是标记 + 1,但是并不会标记 - 1,因为 executeWithStickyConnection 可以将资源暴露到外部,例如这里的 Cursor,需要外部手动关闭。