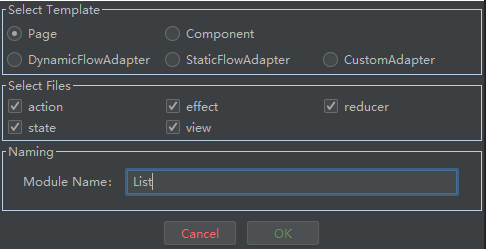
此处新建个文件夹,在文件夹上新建fis_redux文件就行了;这地方,我们选择page,整体的五个文件:action,effect,reducer,state,view;全部都要用到,所以默认全选,填入Module的名字,点击OK

按照流程走
根据接口返回json,创建相应的bean ---> 创建item模块 ---> 编写state ---> 编写view界面
准备工作
创建bean实体
根据api返回的json数据,生成相应的实体
api:https://www.wanandroid.com/project/list/1/json
json转实体
网站:https://javiercbk.github.io/json_to_dart/
插件:AS中可以搜索:FlutterJsonBeanFactory
这地方生成了:ItemDetailBean;代码俩百多行就不贴了,具体的内容,点击下面链接
ItemDetailBean代码:https://github.com/CNAD666/ExampleCode/blob/master/Flutter/fish_redux_demo/lib/list/bean/item_detail_bean.dart
创建item模块
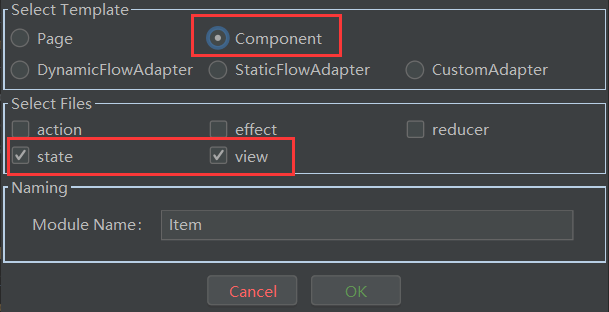
这边我们实现一个简单的列表,item仅仅做展示功能;不做点击,更新ui等操作,所以这边我们就不需要创建:effect,reducer,action文件;只选择:state和view就行了
创建item,这里选择component

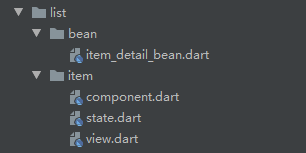
文件结构

OK,bean文件搞定了,再来看看,item文件中的文件,这里component文件不需要改动,所以这地方,我们只需要看:state.dart,view.dart
state
这地方还是常规的写法,因为json生成的bean里面,能用到的所有数据,都在Datas类里面,所以,这地方建一个Datas类的变量即可
因为,没用到reducer,实际上clone实现方法都能删掉,防止后面可能需要clone对象,暂且留着
import 'package:fish_redux/fish_redux.dart'; import 'package:fish_redux_demo/list/bean/item_detail_bean.dart'; class ItemState implements Cloneable<ItemState> { Datas itemDetail; ItemState({this.itemDetail}); @override ItemState clone() { return ItemState() ..itemDetail = itemDetail; } } ItemState initState(Map<String, dynamic> args) { return ItemState(); }view
这里item布局稍稍有点麻烦,整体上采用的是:水平布局(Row),分左右俩大块
左边:单纯的图片展示
右边:采用了纵向布局(Column),结合Expanded形成比例布局,分别展示三块东西:标题,内容,作者和时间
OK,这边view只是简单用到了state提供的数据形成的布局,没有什么要特别注意的地方
Widget buildView(ItemState state, Dispatch dispatch, ViewService viewService) { return _bodyWidget(state); } Widget _bodyWidget(ItemState state) { return Card( shape: RoundedRectangleBorder(borderRadius: BorderRadius.circular(20)), elevation: 5, margin: EdgeInsets.only(left: 20, right: 20, top: 20), child: Row( children: <Widget>[ //左边图片 Container( margin: EdgeInsets.all(10), width: 180, height: 100, child: Image.network( state.itemDetail.envelopePic, fit: BoxFit.fill, ), ), //右边的纵向布局 _rightContent(state), ], ), ); } ///item中右边的纵向布局,比例布局 Widget _rightContent(ItemState state) { return Expanded( child: Container( margin: EdgeInsets.all(10), height: 120, child: Column( mainAxisAlignment: MainAxisAlignment.start, children: <Widget>[ //标题 Expanded( flex: 2, child: Container( alignment: Alignment.centerLeft, child: Text( state.itemDetail.title, style: TextStyle(fontSize: 16), maxLines: 1, overflow: TextOverflow.ellipsis, ), ), ), //内容 Expanded( flex: 4, child: Container( alignment: Alignment.centerLeft, child: Text( state.itemDetail.desc, style: TextStyle(fontSize: 12), maxLines: 3, overflow: TextOverflow.ellipsis, ), )), Expanded( flex: 3, child: Column( mainAxisAlignment: MainAxisAlignment.end, children: <Widget>[ //作者 Row( children: <Widget>[ Text("作者:", style: TextStyle(fontSize: 12)), Expanded( child: Text(state.itemDetail.author, style: TextStyle(color: Colors.blue, fontSize: 12), overflow: TextOverflow.ellipsis), ) ], ), //时间 Row(children: <Widget>[ Text("时间:", style: TextStyle(fontSize: 12)), Expanded( child: Text(state.itemDetail.niceDate, style: TextStyle(color: Colors.blue, fontSize: 12), overflow: TextOverflow.ellipsis), ) ]) ], ), ), ], ), )); }item模块,就这样写完了,不需要改动什么了,接下来看看List模块
列表模块逻辑完善首先最重要的,我们需要将adapter建立起来,并和page绑定
创建adapter文件 ---> state调整 ---> page中绑定adapter
adapter创建及其绑定
创建adapter

