
Domain Verification in Zoho Mail
Zoho Mail is a business email platform where you can generate domain-based custom email addresses, like yourname@yourdomain.com. And when you add your domain to create your custom email address, you need to verify that you own the domain before proceeding further. Zoho Mail can verify the ownership of your domain in different ways—One-click Verification, TXT, CNAME, or HTML. And to verify your domain using one of these methods, you will need access and permission to modify your Domain's DNS page.
In case you do not have the required privileges to edit the DNS, you need to get the assistance of someone who has access to those details. This is essential to complete the email hosting setup of your domain with Zoho Mail.
Table of Contents
CNAME Verification steps for some popular DNS Providers
Troubleshoot Verification
Why does Zoho Mail verify your domain?Zoho Mail strictly follows domain verification as an essential step to ensure that,
The domain provided is valid and has not expired
The domain was provided by its legitimate owner or a user with permission to access its DNS page.
The domain is NOT a spoofed address to prevent any misuse or loss of service.
One-click VerificationZoho Mail provides One-click verification for selected domain providers—currently for IONOS by 1&1 and GoDaddy.
With the one-click verification method, you can verify your domain by simply logging in to your domain provider's page and authenticating Zoho Mail to access your domain's DNS page. This way, we will automatically verify your account without the help of manual verification techniques.
TXT MethodVerifying your domain using the TXT method involves three major steps:
Copying the unique TXT value from Zoho Mail Admin Console.
Adding the value as a TXT record to your domain's DNS Manager.
Verifying the added TXT record from the Zoho Mail Admin Console.
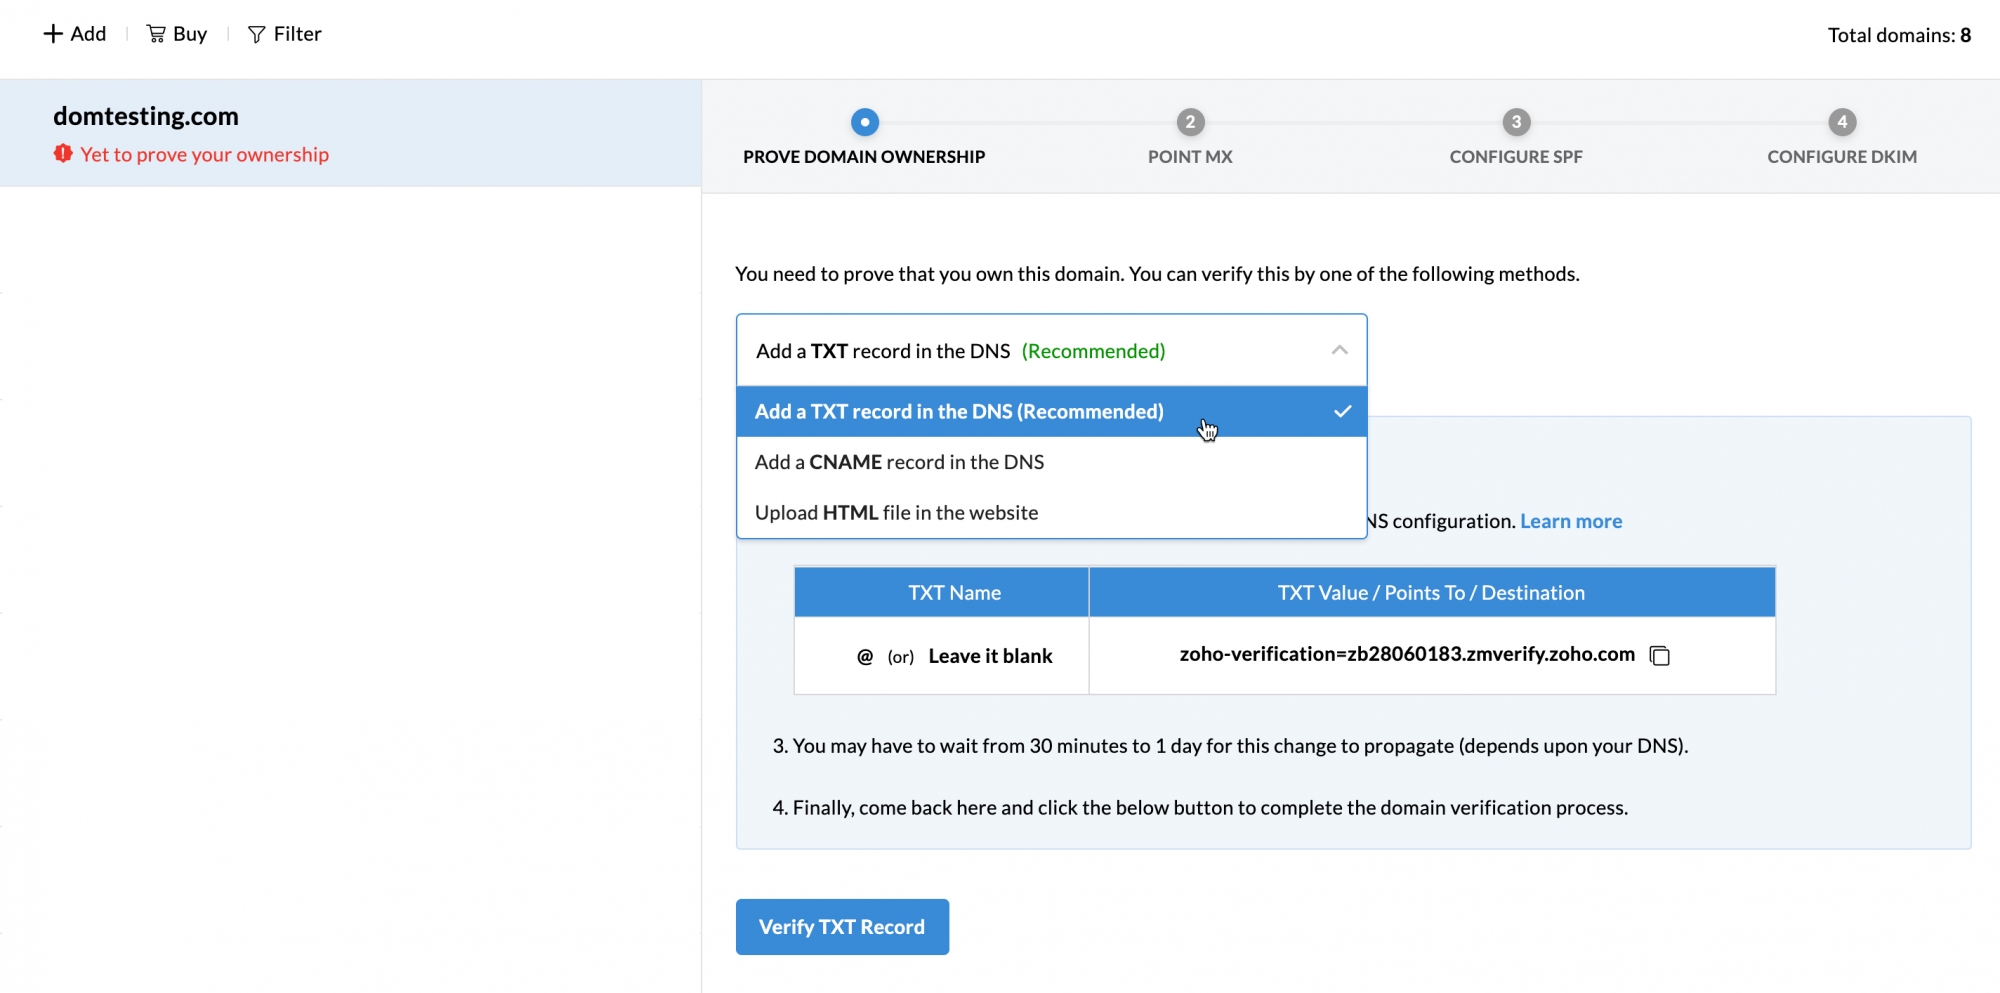
Copy your unique TXT code:Login to your Zoho Mail Admin Console and navigate to the page via the left pane.
Click the domain you want to verify from the list of added domains. If you want to add a new domain, you can do that by clicking the + Add button at the top.
At the prove ownership section of your domain, choose the Add a TXT record in the DNS option from the drop-down list.
You can either write down or copy the text hash generated to easily add it to your domain's DNS page.
After copying the values, proceed to your domain provider's page and log in to your account.
Note:
The hash code generated is unique and specific to each domain you configured. The ZB code of one domain will not work when added to a different domain's DNS.
Adding TXT record to your DNS: Generic instructionsYou can configure domains from any provider and successfully host your emails in Zoho Mail. The only prerequisite is that you should have access and permission to edit the DNS page of your domain.
Login to the domain provider's account (For example, GoDaddy, namecheap, among others) where your domain's name server is pointed.
Access your domain and navigate to it's DNS page (DNS Manager or DNS Control Panel or Advanced DNS editor).
Locate the option to add TXT records (generally found under DNS Records).
In the Name/ Host/ Alias/ TXT, enter @ or leave it blank.
In the Value/ Points To/ Destination field, add the Zoho Mail verification hash—zoho-verification=zb********.zmverify.zoho.***.
Name/ Host/ Alias/ TXT Value/ Points To/ Destination/TXT @ or leave it blank zoho-verification=zb2****183.zmverify.zoho.***
If the TTL is editable, set it to the minimum possible value recommended by your Registrar.
Save the TXT Record added and give it an hour to two to propagate.
Note:
You can also request your domain provider to create a TXT with the hash code generated in Zoho Mail Admin Console if you find any difficulties.
Verify your TXT recordTo verify the added TXT record,
Login to your Zoho Mail Admin Console and navigate to the page via the left pane.
Click the domain you want to verify from the list of added domains.
At the prove ownership section of your domain, choose the Add a TXT record in the DNS option from the drop-down list.
Click the Verify TXT record button.
Your domain will get successfully verified if the values you added were right. In case of errors during the process, you can troubleshoot for domain verification failure.
Note:
Toolkit by Zoho Mail is a free lookup tool by Zoho for all your DNS-related lookup queries. You can check if the CNAME/ TXT values you entered have propagated, lookup existing DNS values, and perform many other admin-related activities.
For detailed instructions on using the Toolkit, click here.
CNAME verificationVerifying your domain using the CNAME method involves three major steps:
Copying the unique CNAME value from Zoho Mail Admin Console.
Adding the value as a CNAME record to your domain's DNS Manager.
Verifying the added CNAME record from the Zoho Mail Admin Console.
Copy your unique CNAME code:Login to your Zoho Mail Admin Console and navigate to the page via the left pane.
Click the domain you want to verify from the list of added domains. If you want to add a new domain, you can do that by clicking the + Add button at the top.
At the prove ownership section of your domain, choose the Add a CNAME record in the DNS option from the drop-down list.
You can either write down or copy the values generated to easily add them to your domain's DNS page.